I’ve got five RGB controllers in my PC. Five. An ASUS ROG STRIX Z390-E motherboard with two ARGB headers, a Razer Addressable RGB Controller handling LED strips and a GPU holder, a ThermalTake LedBox running my Riing Quad fans, and a Lian Li Uni Fan Controller managing three SL120 Infinity fans plus two more LED strips. For the longest time, I was running four different pieces of software just to get everything lit up the same color. Armoury Crate for the motherboard headers, Razer Synapse for the Razer controller, TT RGB Plus for the ThermalTake stuff, and L-Connect for the Lian Li fans. It was a nightmare. I couldn’t sync a single rainbow wave across my entire system because each app operated in its own little universe.
Then I found SignalRGB, and it genuinely changed everything. One app, one interface, every single controller detected and configurable from the same dashboard. I’m not exaggerating when I say I spent an entire evening just watching synchronized effects ripple across my entire system for the first time. But here’s the thing that tripped me up initially: the Components tab. SignalRGB doesn’t magically know what’s plugged into each controller port. You’ve got to tell it. I see people asking about this on Reddit every single week, and if you get this part wrong, your effects will look choppy, offset, or just plain broken. This guide covers exactly how to configure components for every type of controller, step by step.
What Are Components in SignalRGB?
I think the biggest source of confusion with SignalRGB is understanding why you need to manually set up components at all. Here’s the deal: your RGB controllers are basically dumb hubs. They provide power and data to whatever’s connected to their ports, but they don’t communicate back to SignalRGB about what that device actually is. Your motherboard’s ARGB header doesn’t tell SignalRGB “hey, there’s a 28-LED strip connected to me.” It just says “I exist and I have data lines.” That’s it.
I think of components as your way of telling SignalRGB what’s physically connected to each channel (port) on each controller. A component can be a fan, an LED strip, a GPU holder bracket, an RGB cube, a RAM stick cover, or really anything with addressable LEDs. I learned that every controller has a certain number of channels, and every channel can hold one or more components. I had to wrap my head around the idea that a single channel can actually have multiple components daisy-chained together, but once that clicked, everything made sense.
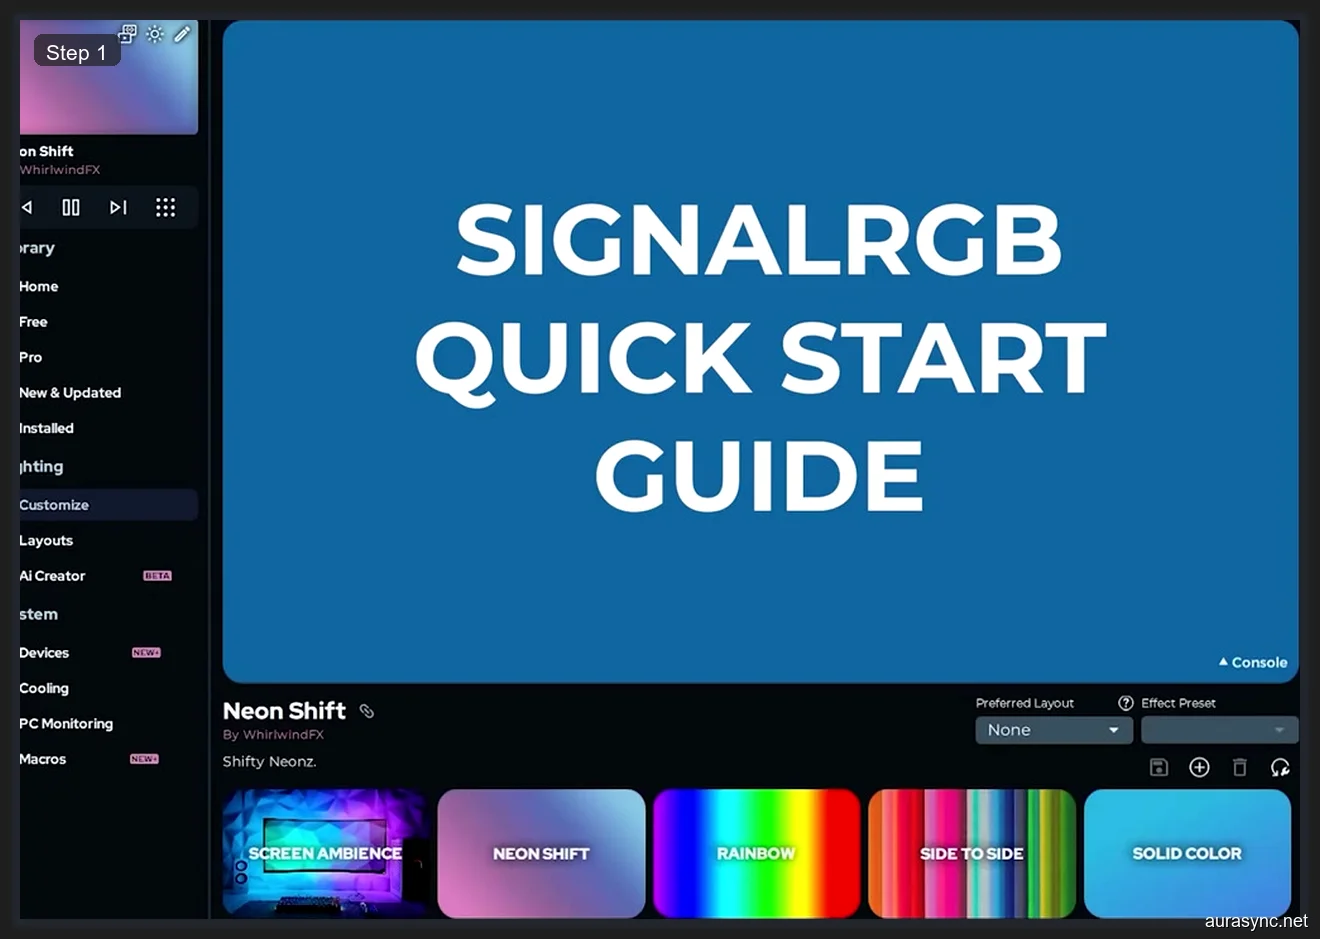
When you first open SignalRGB, you’ll see the home screen shown below with the effect library on the left. Effects like Screen Ambience, Neon Shift, Rainbow, and Solid Color are all right there waiting for you. But before any of these effects will work properly across your hardware, you need to configure your components under System > Devices. I made the mistake of trying to apply effects before configuring components, and my strips were flickering random colors while my fans did absolutely nothing. Don’t skip this step.
Step 1: Open Devices and Find Unconfigured Controllers
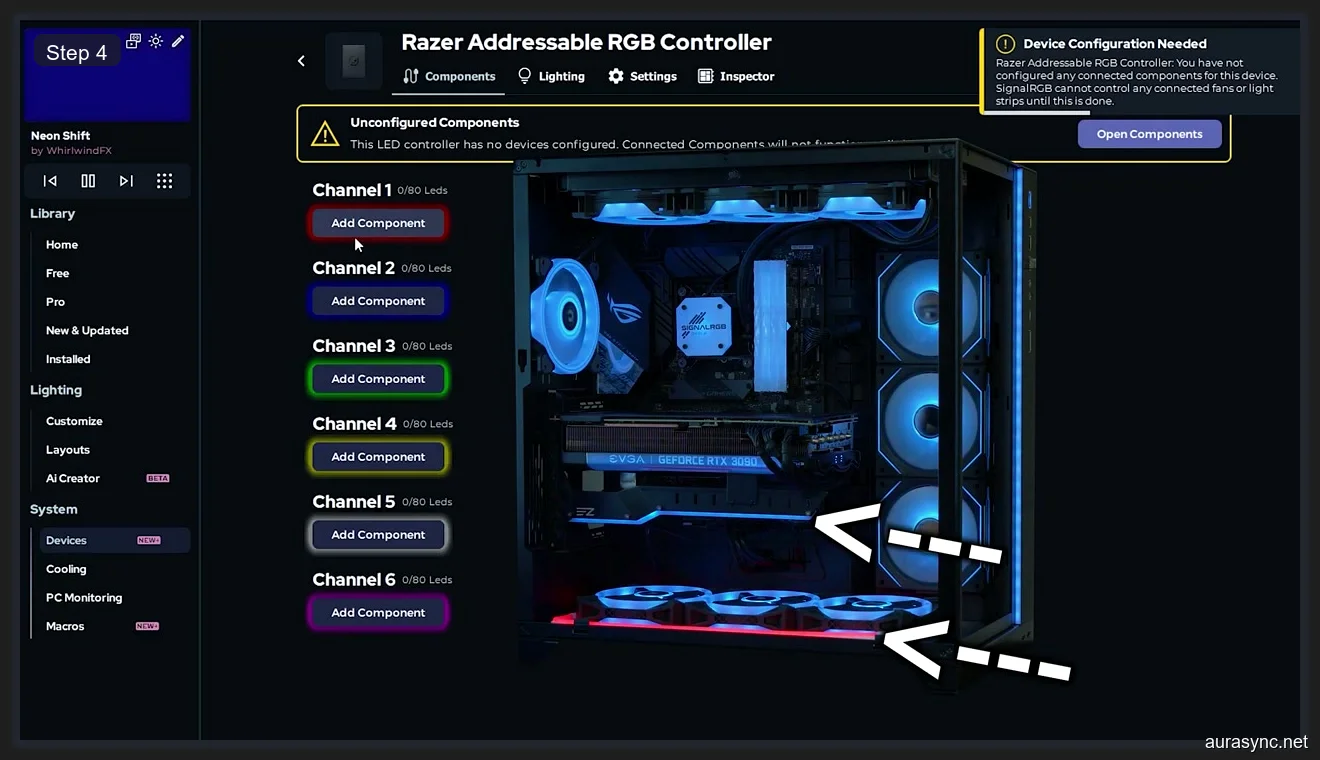
I remember the first time I opened the Devices panel and saw a wall of unconfigured controllers staring back at me. It felt overwhelming, but it’s actually pretty straightforward once you understand the layout. Click on “System” in the left sidebar, then click “Devices.” Every controller that SignalRGB detects in your system will show up here, and any controller that hasn’t been configured yet will display a yellow “Device Configuration Needed” warning banner across the top right of its panel.
I wish someone had told me this upfront: SignalRGB uses a color-coded pulsing system to help you figure out which physical port corresponds to which channel in the software. I noticed that when you open a controller’s device page, Channel 1 will pulse red on your actual hardware, Channel 2 will pulse blue, Channel 3 will pulse green, and so on. I found this incredibly helpful because controller ports aren’t always labeled clearly on the hardware itself. I spent a good five minutes just watching the colors pulse on my strips and fans to map each physical connection to the right channel number in SignalRGB.
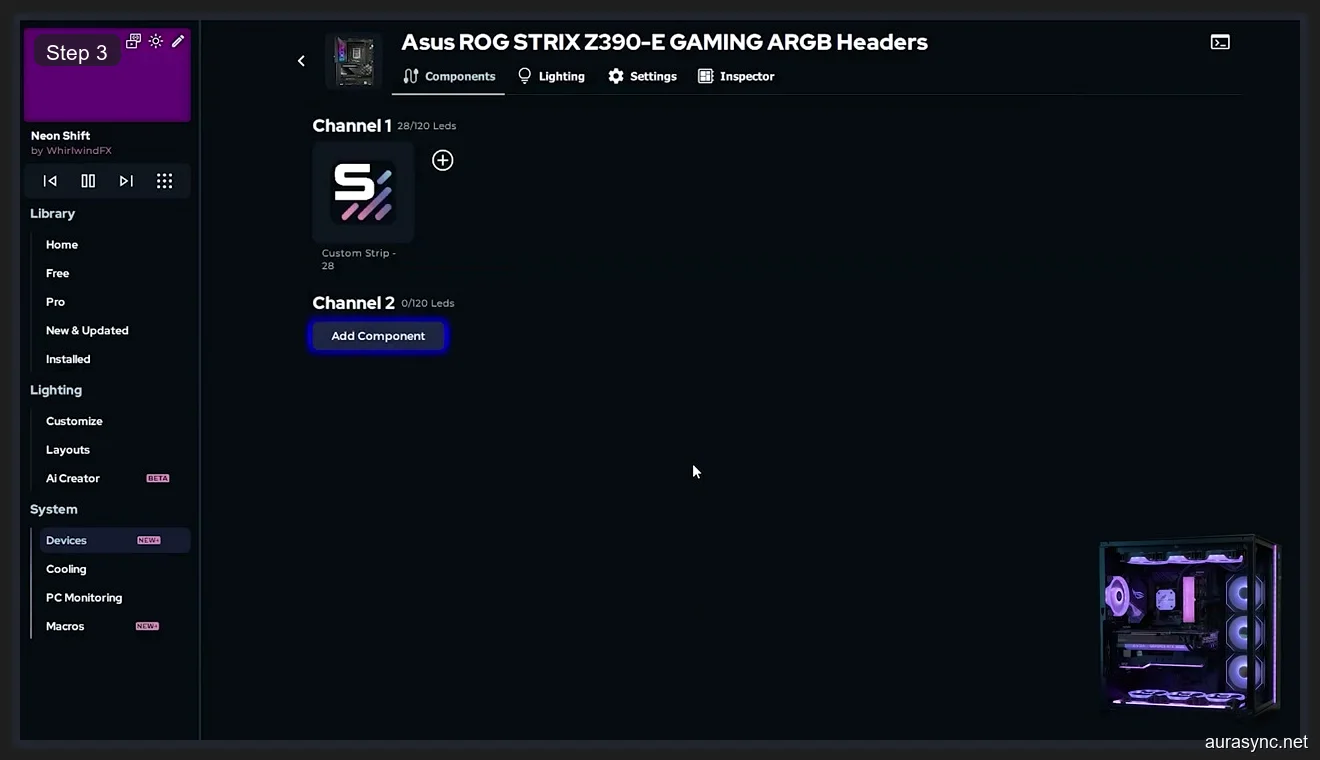
In the screenshot below, you can see my ASUS ROG STRIX Z390-E motherboard’s ARGB headers. Notice the yellow “Device Configuration Needed” banner at the top right. Both Channel 1 and Channel 2 are empty, waiting for me to tell SignalRGB what’s plugged into them. The Z390-E has two 3-pin addressable RGB headers on the board, and each one shows up as a separate channel here. I’ve got a 28-LED strip on Header 1 and nothing connected to Header 2, so I only need to configure Channel 1.

Step 2: Remove Default Placeholder Strips
I need to mention this because it caught me off guard. Some controllers in SignalRGB will have default placeholder strips already assigned to their channels when they first appear. These are generic “Custom Strip” placeholders that SignalRGB adds automatically to give you something to start with. The problem is that these defaults almost never match what you’ve actually got connected. They’ll have the wrong LED count, the wrong component type, and your effects will look terrible as a result.
I’d recommend removing any pre-populated components on a channel by clicking the X button next to the component name. I know it feels counterintuitive to delete something when you’re trying to set things up, but trust me on this. I found that the default strips had 30 LEDs assigned to a channel where I had a 28-LED strip, and the result was that my Rainbow effect had a weird gap at the end where two phantom LEDs were being addressed. I could see it looked like the strip was glitching. Once I removed the default and added my actual component with the correct 28-LED count, everything looked flawless. I can’t stress this enough: always start with a clean channel and add your real components fresh.
Step 3: Add Your Actual Components
I consider this the most important step in the entire process. Click the “Add Component” button on whatever channel you want to configure. I discovered that SignalRGB gives you two options: search the component library for a pre-made entry (great for popular products like EZDIY-FAB strips or Corsair QL fans), or create a custom strip with your exact LED count. I use the custom strip option when my product isn’t in the library. I just click “Create,” choose “Custom Strip,” and enter the exact LED count. I can’t overstate how crucial getting the LED count right is. I’d suggest checking the product listing or spec sheet since most manufacturers list it prominently.
I want to flag something that caught me off guard: order matters when you’re daisy-chaining multiple components on a single channel. I learned the hard way that you need to add daisy-chained components in the exact same physical order. I noticed that getting the order wrong reverses the LED mapping and your effects won’t flow correctly from one strip to the next. Here’s what it looks like after configuring Channel 1 on my ASUS board. I’ve added a Custom Strip with 28 LEDs, which matches the LED strip connected to my motherboard’s first ARGB header. Channel 2 is still empty because nothing is connected to it on my board.
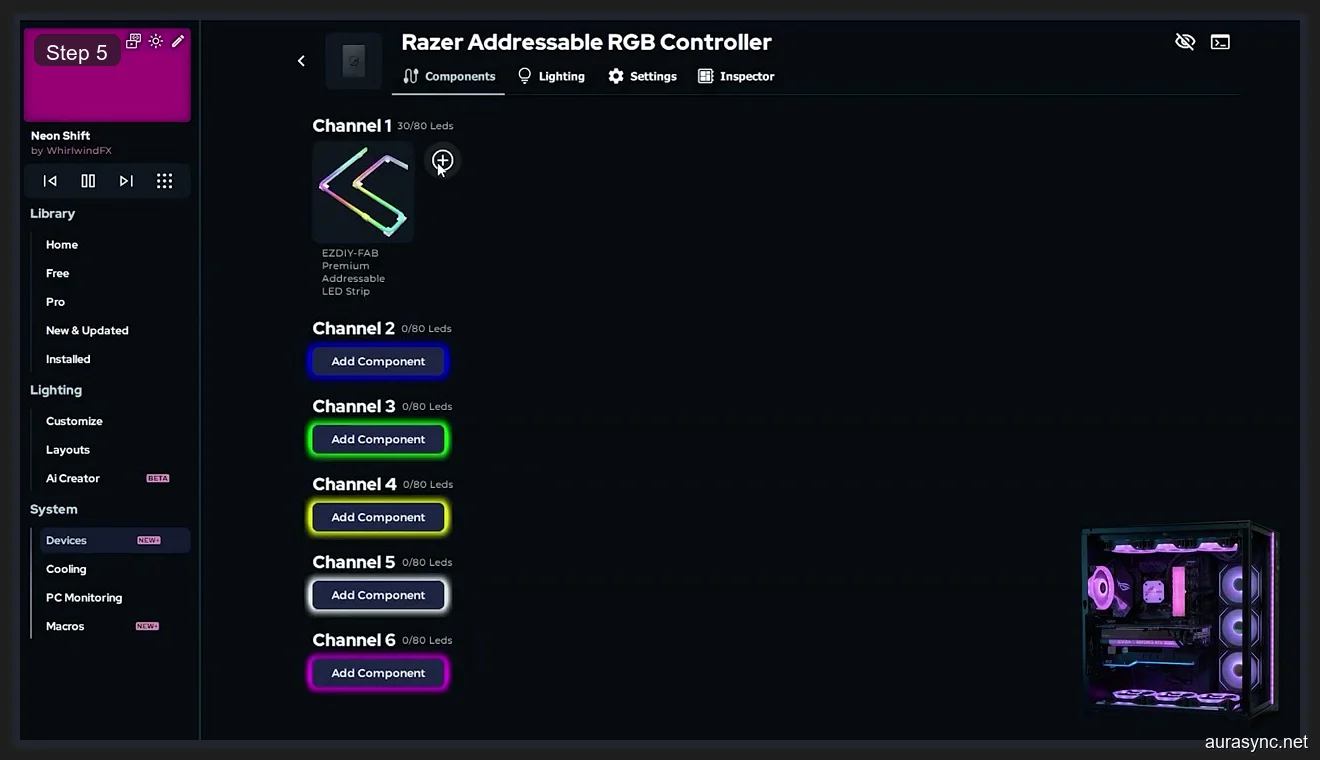
I always try searching the library first before creating a custom strip. In the example below, I searched for “EZDIY-FAB” on my Razer controller and the Premium Addressable LED Strip appeared immediately with the correct 30-LED count already set.
Configuring a Multi-Channel Controller (Razer Example)
I want to walk through the Razer Addressable RGB Controller specifically because it’s a perfect example of a multi-channel setup. I noticed that this controller has six channels, each with a color-coded “Add Component” button matching the pulsing color system I mentioned earlier. I confirmed that Channel 1 pulses red, Channel 2 pulses blue, Channel 3 pulses green, and so on.
The Razer Addressable RGB Controller shown below has six channels. My PC only uses Channel 1 (red, for LED strips) and Channel 2 (blue, for a GPU holder bracket), so I left channels 3 through 6 empty. I see people on forums spending time configuring channels that have nothing connected to them, and that’s totally unnecessary. I’d recommend connecting one device at a time and watching the pulsing colors to identify the correct channel before adding the component. I made the mistake of guessing which port was Channel 1 and ended up assigning the LED strip to Channel 3. I was baffled when the strip didn’t respond, and then I realized SignalRGB was sending data to an empty port.
Setting Up Fan Controllers (ThermalTake and Lian Li)
I’ve found that fans are by far the most common component people need to configure in SignalRGB, and they’re also where I see the most mistakes. I want to emphasize that you’re not just telling SignalRGB “there’s a fan here.” I learned that you need to specify exactly which fan model because different fans have wildly different LED counts: a ThermalTake Riing Quad 12 has 54 LEDs, a Corsair QL120 has 34, and a Lian Li SL120 Infinity has 20. I always search for my exact fan model in SignalRGB’s component library since the LED count and layout are pre-configured for popular fans.
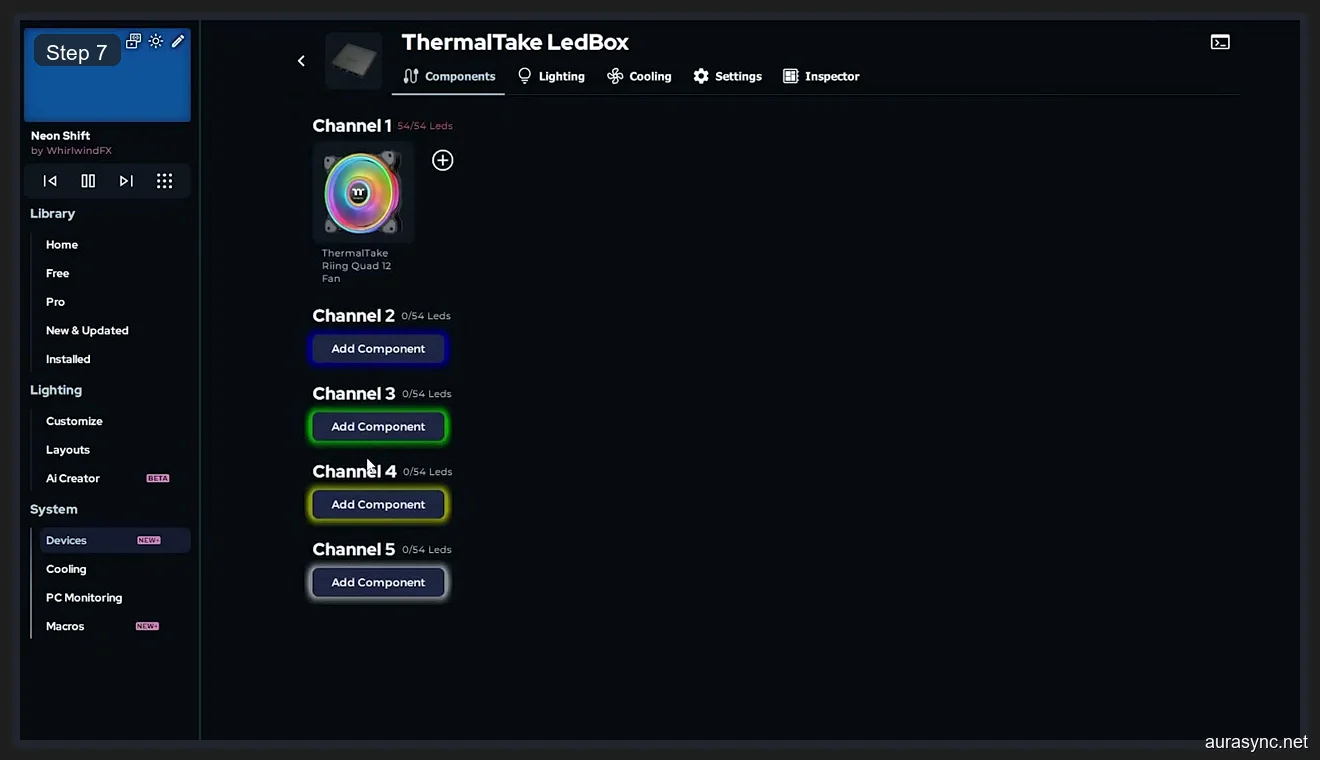
The ThermalTake LedBox controller below shows Channel 1 configured with a Riing Quad 12 fan. I can see the LED count shows 54/54, meaning all LEDs are accounted for. I left the remaining four channels empty because only one fan is connected to this controller in my build.
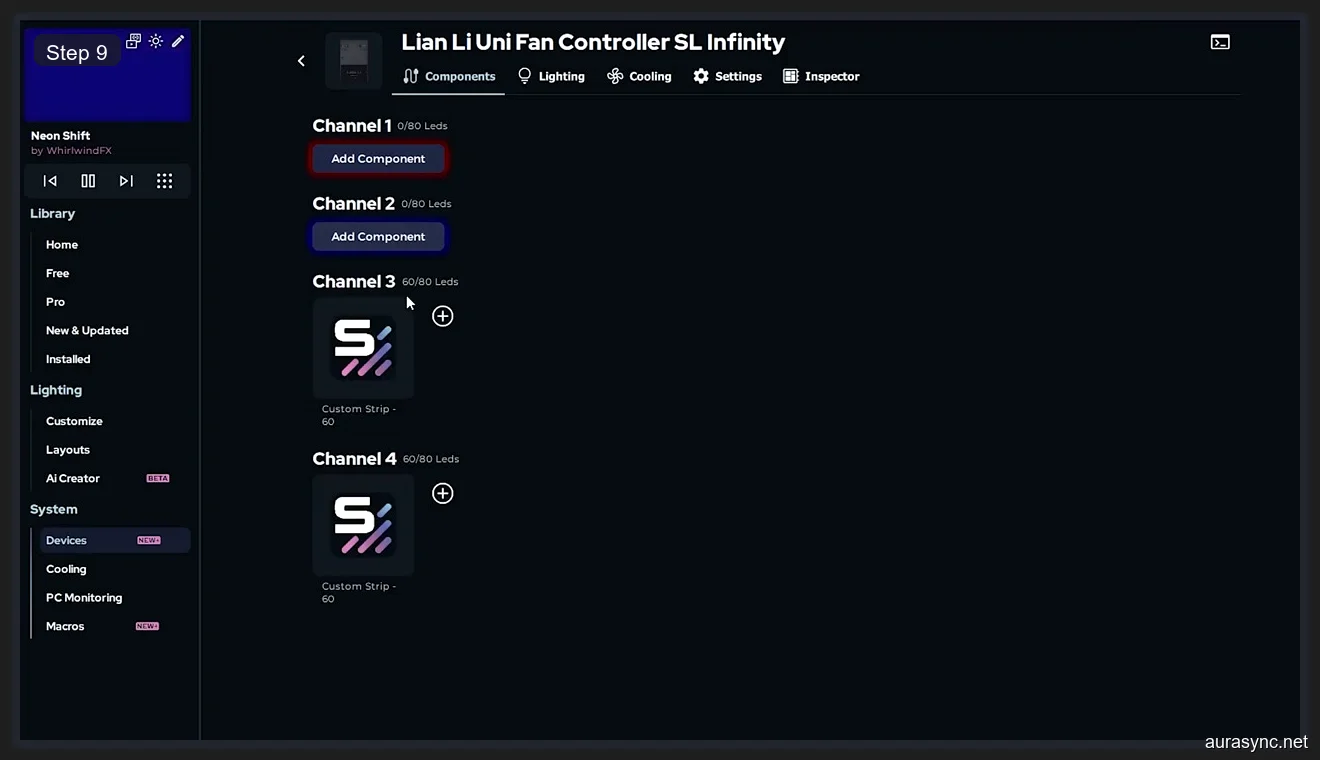
If your specific fan model isn’t in the library, don’t panic. I ran into this with LED strips on my Lian Li Uni Fan Controller. I couldn’t find my specific strip model, so I created custom strips instead. The Lian Li Uni Fan Controller below shows Channels 3 and 4 each configured with a Custom Strip set to 60 LEDs. I found the results identical to using a pre-made component as long as the LED count is accurate.
Adding Lian Li Infinity Fans
I want to give the Lian Li SL120 Infinity fans their own section because they’re probably the most popular RGB fans right now, and I discovered a quirk that trips people up. I found that when you’ve got multiple fans daisy-chained on a single channel, you need to add each fan as a separate component. I tried creating one component with a combined LED count first, and it didn’t work because each fan has its own LED layout that SignalRGB addresses individually.
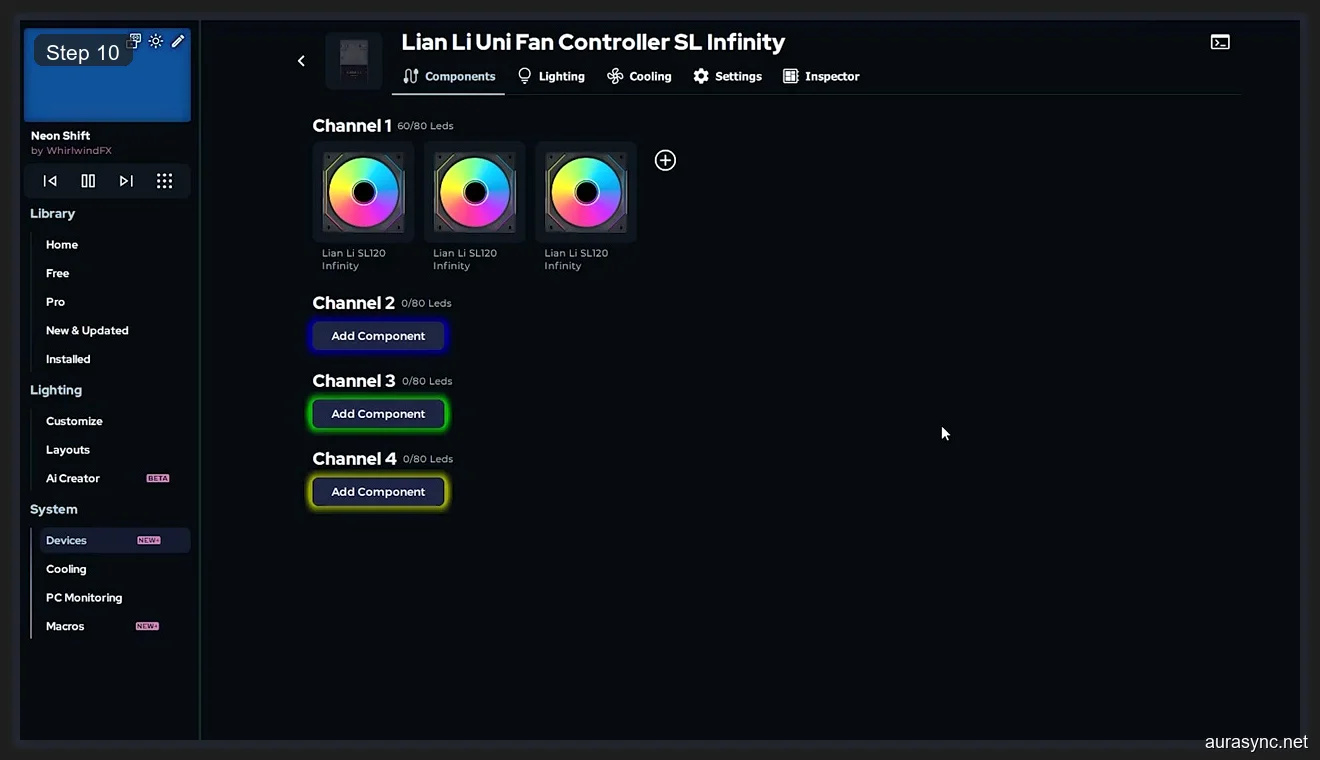
I’ve got three SL120 Infinity fans on Channel 1 of my Lian Li controller. I added each one by searching for “SL120 Infinity” and adding it three times in a row. Here’s the completed Channel 1 with all three fans configured. Each fan shows up as its own icon with the correct LED count. I can see the total shows 60/80 LEDs, meaning there’s room for one more fan on this channel if I add one later. I really like how SignalRGB gives you this visual feedback so you can plan your build around channel capacity limits.
What If My Component Isn’t Listed?
I’ve already touched on this, but it’s worth covering in more detail. I’ve learned that if your device doesn’t appear in the library, you just click “Create,” select “Custom Strip,” and enter the exact number of LEDs. I’ve confirmed that SignalRGB treats every addressable LED the same way regardless of whether it knows the product name or not.
I use three methods to find LED counts. I always start by checking the manufacturer’s spec sheet. If I can’t find it online, I count the LEDs manually on my addressable RGB strips where each chip is distinct and visible. I also check the SignalRGB Discord server where someone has almost certainly posted the LED count for your specific device.
Common Mistakes and How to Avoid Them
I’ve made every single one of these mistakes, and I don’t want you to repeat them. I’d say the most common issue is wrong LED count. I assigned 30 LEDs to a 28-LED strip once, and the effects looked like they were cutting off at the end. I’ve also found that wrong channel assignment is another killer. I assigned a strip to Channel 3 when it was physically on Channel 1, and it didn’t respond at all.
I’ve seen that forgetting to remove default strips happens a lot. I noticed people adding their actual strip alongside the default placeholder, resulting in doubled-up LED assignments. I can tell you that not configuring all controllers is another one. I forgot about my ThermalTake LedBox during initial setup and spent an hour wondering why my Riing Quad fans weren’t responding. I also learned that daisy-chain order matters. If you’ve got two strips in series, add them in the same physical order or your effects will flow backward.
SignalRGB Free vs Pro: What Do You Need?
I should mention this because people always ask. I can confirm that everything I’ve covered in this guide works on the free version of SignalRGB. All the component configuration, all the controller detection, all the channel setup. You don’t need to pay anything to get your hardware properly configured and running basic effects like Rainbow, Solid Color, or breathing patterns.
I personally use Pro ($45/year) because I love the Screen Ambience feature for gaming, but for basic RGB control, the free tier is genuinely enough. I wrote a detailed breakdown in my SignalRGB vs OpenRGB comparison if you’re comparing options. If you’re coming from Armoury Crate issues or RGB Fusion problems, I’d recommend uninstalling your old RGB software first to avoid conflicts. I also have an OpenRGB setup guide if you want a fully open-source alternative.
Frequently Asked Questions
How do I know how many LEDs my strip has?
I check three sources: the manufacturer’s product page, the product packaging, or I physically count the LED chips on the strip. I know that each individual chip is one addressable LED. I’d also recommend checking the SignalRGB Discord community where users frequently share LED counts. I can’t stress enough that getting this number right is essential because effects will look choppy or cut off if the count doesn’t match.
Can I use SignalRGB with Corsair iCUE devices?
I can confirm that SignalRGB supports many Corsair devices, including LL, QL, and SP series fans, as well as Corsair LED strips and some Corsair controllers. I discovered that you’ll need to close iCUE before running SignalRGB because both apps try to control the same hardware and they’ll conflict with each other. I’d suggest checking SignalRGB’s device support list on their website to see which specific Corsair products are compatible. I’ve noticed they’re adding more with every update.
Why are my RGB effects not syncing properly after setup?
I’ve run into this myself, and it’s almost always one of three things: wrong LED count on a component (effects look offset or choppy), a component assigned to the wrong channel (the device doesn’t respond at all), or leftover default placeholder strips that you forgot to remove (effects look doubled or broken). I’d suggest going back to System > Devices, verifying each controller’s channels, and making sure the component assignments match your physical hardware. I’d also recommend checking that no other RGB software is running in the background and fighting SignalRGB for control.
Does SignalRGB work with motherboard ARGB headers?
I’ve tested this on my ASUS ROG STRIX Z390-E and it works perfectly. I can confirm that SignalRGB supports ARGB headers (the 3-pin 5V addressable ones) from ASUS, MSI, Gigabyte, and ASRock motherboards. I noticed that each ARGB header shows up as a separate channel in the Devices panel. I should note that the standard 12V RGB headers (4-pin) are not supported because they’re not individually addressable. If your motherboard has both types, I’ve verified that only the 3-pin ARGB headers will appear in SignalRGB.
What’s the difference between components and devices in SignalRGB?
I got confused by this terminology at first too. I eventually figured out that a device in SignalRGB is the controller itself. I’m talking about your motherboard ARGB header controller, your Razer RGB controller, your ThermalTake LedBox, etc. I learned that a component is what’s physically connected to that device. So my ASUS Z390-E ARGB headers are the device, and the Custom Strip with 28 LEDs is the component attached to it. One device can have multiple channels, and each channel can have multiple components. Think of devices as the hubs and components as the things plugged into those hubs.
Can I save my component configuration as a profile?
I’m happy to report that SignalRGB saves your component configuration automatically. I’ve restarted my PC dozens of times and the configuration persists across restarts and updates. I’ve found that the only time you’d need to reconfigure is if you physically change your hardware. I also discovered that SignalRGB lets you export your entire configuration as a backup, which I highly recommend doing after your initial setup.
I went from running five separate RGB apps to one unified dashboard, and the component configuration was the one step that made it all work. It took me about 20 minutes to configure every controller in my system the first time, and I haven’t had to touch the settings since. If you follow this guide channel by channel, your SignalRGB setup should be equally painless. Just remember: identify the channel with the pulsing colors, remove any default strips, add your actual component with the correct LED count, and move on to the next one. That’s genuinely all there is to it.
Related Guides
- SignalRGB Free vs Pro — whether the upgrade is worth it.
- How to use SignalRGB feature guide — the per-feature reference.
- How to sync RGB across ASUS, Corsair, Razer with SignalRGB — the cross-vendor flow.
- SignalRGB audio visualizers — the audio-reactive killer feature.
- OpenRGB vs SignalRGB — the comparison if you’re picking sides.