I rage-uninstalled Aura Sync, iCUE, and Mystic Light in the same afternoon, and OpenRGB is what I’ve been running ever since.
The breaking point was my B550 build. ASUS Aura wouldn’t see my G.Skill Trident Z RGB sticks. iCUE saw the sticks but kept fighting Aura for the motherboard headers, and every reboot one of them would steal control. By the time I had three vendor apps in my tray fighting over the same PC, I was done. I downloaded OpenRGB, ran the EXE as administrator, hit Rescan, and watched it pull every device into one window in about four seconds. I haven’t gone back.
This guide covers the actual setup, not the marketing version. The “download and click rescan” tutorials skip the parts that bite you. The Run-as-Admin step that nobody calls out clearly enough. The BIOS settings that have to be flipped before your RAM ever shows up. The vendor app conflict that silently breaks detection. The plugin ecosystem that turns OpenRGB from a static color picker into a real lighting engine. By the end you’ll have a working install that detects your hardware, runs effects, and stays alive across reboots.
(For context on why so many of us are running away from vendor apps, I wrote a cross-vendor RGB troubleshooting playbook covering the five categories of failure that drive people here in the first place.)
What OpenRGB Actually Is
OpenRGB is open source RGB lighting control that doesn’t depend on manufacturer software. That’s the tagline on openrgb.org and it’s also the entire pitch. It’s a single portable application, written in C++ on Qt, that talks directly to the SMBus, USB HID, and various proprietary RGB protocols on your hardware. No background service. No telemetry. No “module installer” trying to sell you a router app.
It’s maintained by Adam Honse (CalcProgrammer1 on GitLab) and a sizable community of contributors. The official repo lives on GitLab, not GitHub, which throws some people off. The supported devices page lists well over a thousand items at this point. ASUS, Gigabyte, MSI, ASRock motherboards. Corsair, G.Skill, Crucial, Patriot, HyperX, Kingston RAM. Razer, Logitech, SteelSeries peripherals. Even Philips Hue, Nanoleaf, and Yeelight bulbs through plugins.
It runs on Windows, Linux, and macOS. The Windows build is what I’ve been using on my main rig (Ryzen 7 5700X3D, ASUS B550-F Gaming, G.Skill Trident Z RGB 32GB, Lian Li Galahad AIO, three Lian Li UNI fans, and a generic ARGB strip on a SATA-powered 8-port hub). It runs on Linux too, where I use it on a secondary Mint box, and honestly the Linux experience is better in some ways because there’s no vendor service trying to claim the hardware.
It’s also free. Not freemium. Not “free with paid plugins.” Free. If you’ve been paying $5/month for SignalRGB Pro just to control your motherboard headers, OpenRGB will do that part for nothing. (SignalRGB has its own strengths, mostly the visual effect editor, but more on that comparison below.)
How to Download and Install OpenRGB
Go to openrgb.org, click Download, and grab the Windows 64-bit ZIP. Don’t go through some third-party download mirror, just grab it from the source. The current release artifacts also live on the GitLab releases page if you want to verify hashes.
Here’s the part the install guides usually miss. OpenRGB is portable. There’s no installer, no “Next Next Finish” wizard. You extract the ZIP somewhere (I keep mine in C:\Tools\OpenRGB) and run OpenRGB.exe directly. The folder you extract has the EXE, a bunch of Qt DLLs, the OpenRGB-Qt6 stylesheet stuff, and the platforms folder. Don’t move any of those, the EXE needs them all in the same directory.
The portable nature is actually the underrated feature here. You can drop OpenRGB on a USB stick and use it on any Windows machine without polluting their install. I’ve used it to fix a friend’s Aura-bricked PC twice this way. No reboot, no uninstall war, just plug in, run, control the lights, walk away.
One caveat: the OpenRGB EXE is unsigned, so SmartScreen will pop a warning the first time. Click “More info” and “Run anyway.” If you want the warm fuzzies, download the SHA256 checksum from the release page and verify it before running. The maintainer is responsive on the GitLab issue tracker if anything looks off.
The First-Run Step That Matters: Run as Administrator
This is the single biggest first-time mistake. The download page doesn’t shout it loud enough. The OpenRGB Wiki mentions it but tucks it under a header. So I’m going to put it in big letters here: the very first time you run OpenRGB, right-click the EXE and choose Run as administrator.
What happens on first admin run is OpenRGB silently installs two helper drivers, inpout32 (or inpoutx64 on 64-bit Windows) and WinRing0. Both are well-known low-level driver shims. inpout gives userspace access to legacy I/O ports, which is how OpenRGB pokes at certain motherboard ICs. WinRing0 gives access to MSRs and PCI config space, which is how it talks to the SMBus to detect RAM and motherboard chips.
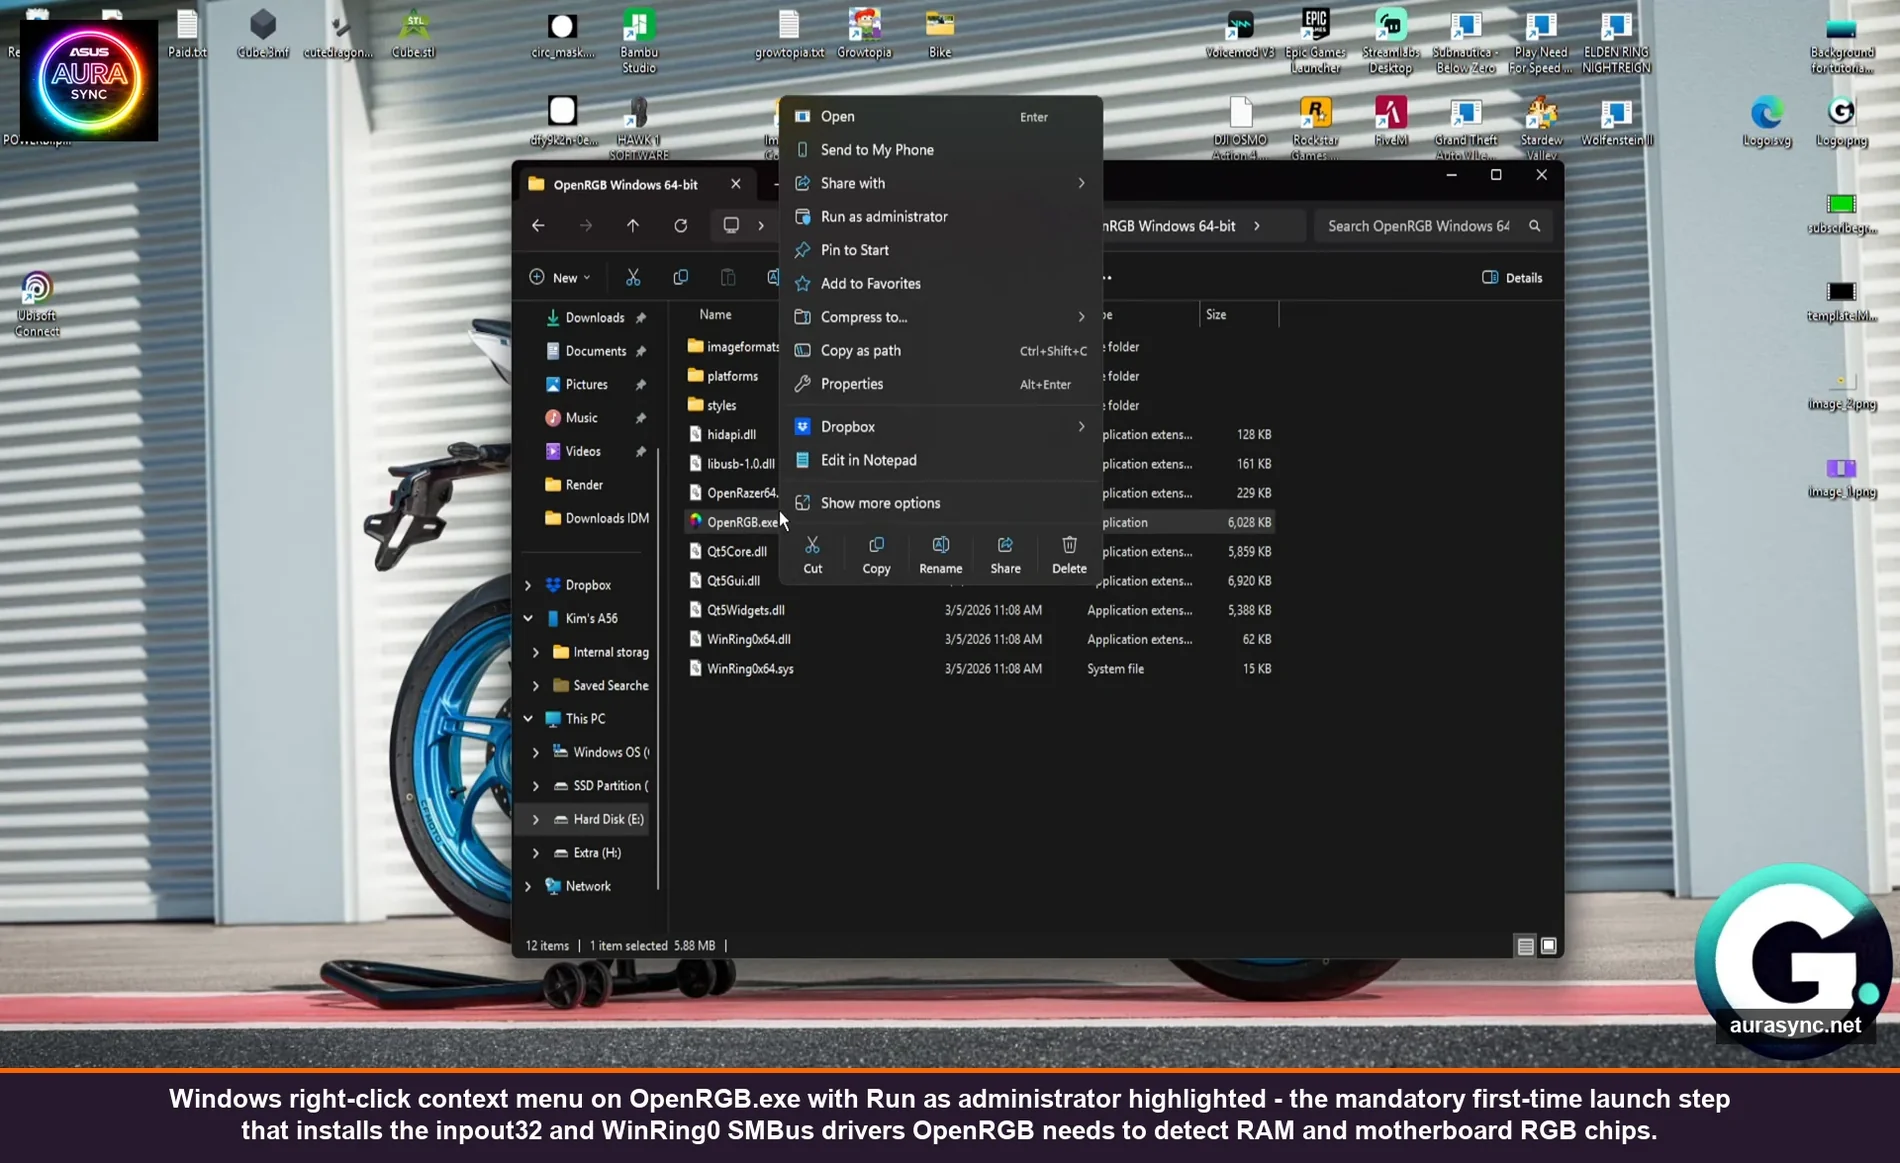
Without those drivers, OpenRGB will still launch, but it will only see whatever USB peripherals show up to it cleanly. Your RAM won’t appear. Your motherboard headers usually won’t appear. Your AIO might or might not. People hit this constantly and assume their hardware “isn’t supported” when really they just never gave OpenRGB the access it needed to detect anything beyond USB. After the first admin run installs the drivers, normal user-mode launches work fine for the rest of the session and across reboots.
⚠️ Heads up: WinRing0 has a known security advisory (CVE-2020-14979) tied to older driver signing. The version OpenRGB ships is the current signed build, but if your antivirus flags it, that’s why. It’s not malicious, it’s just that any tool with raw hardware access will trip endpoint protection. Same goes for HWiNFO, ThrottleStop, and most overclocking tools.
Rescan Devices and Read the Output
Once OpenRGB is open with admin drivers installed, the first action is to hit Rescan Devices at the bottom of the window. The status bar reads “OpenRGB is detecting devices…” for anywhere from two to ten seconds, then your devices populate the left panel.
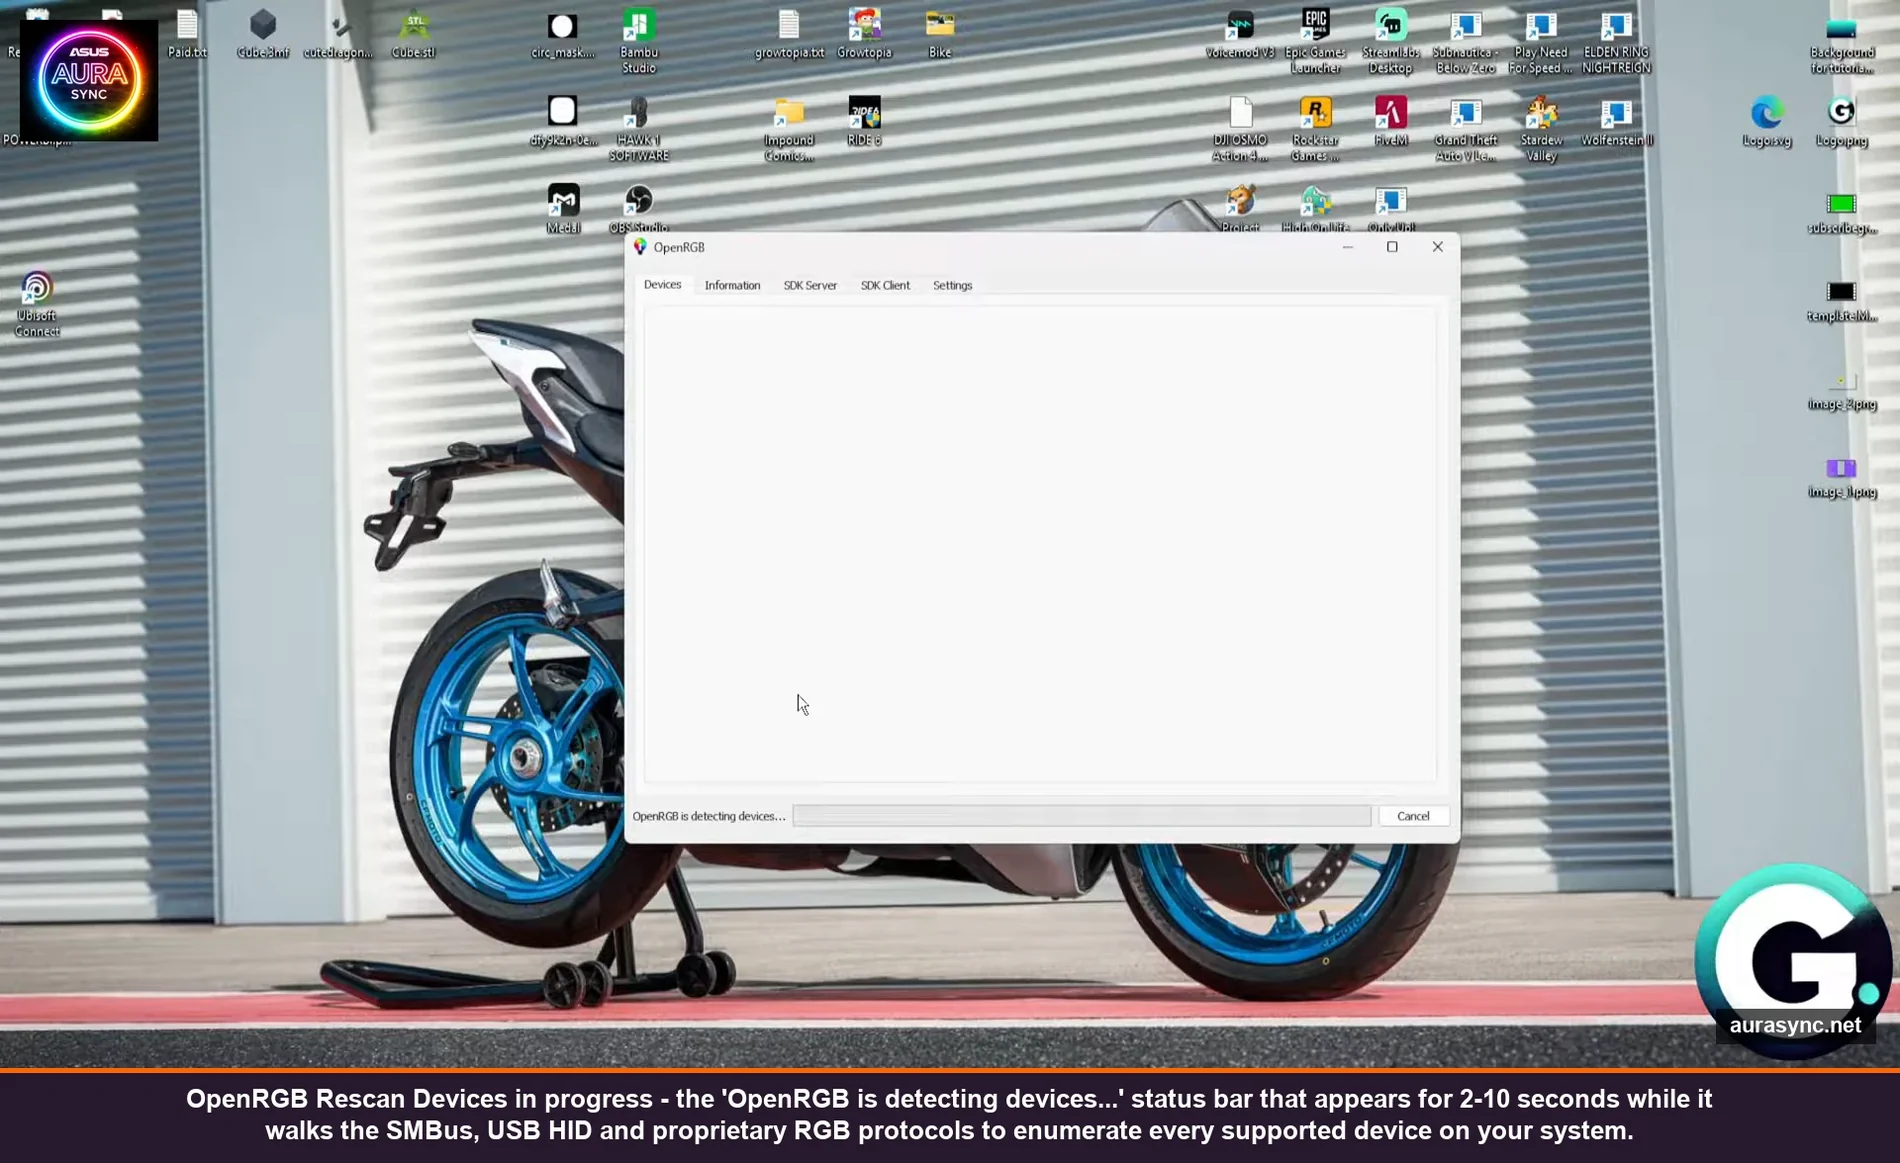
Each detected device shows up as its own entry in the dropdown. On my B550 setup, I get the motherboard chip (NCT6798D-R via Aura), the JRGB header zone, the JRAINBOW1 zone, both SPD-detected RAM sticks (G.Skill Trident Z RGB), the Lian Li Galahad pump, and any USB peripherals if I plugged in something Razer or Corsair-branded that day. If your AIO uses a USB-attached controller (most modern Corsair AIOs do via Commander Core), it’ll show up too as long as iCUE isn’t running and holding the device handle.
If your device list is shorter than expected, three things to check before you start blaming OpenRGB. First, are any vendor apps still running? Aura, iCUE, Synapse, Mystic Light, G HUB, Polychrome, and Fusion all hold exclusive USB handles on devices they manage. Close all of them, ideally Exit-from-tray and verify in Task Manager. Second, did you actually run as admin first time? If unsure, check Device Manager for “Inpoutx64” under System devices. If it’s not there, you didn’t, and you need to start over with admin. Third, BIOS settings, which gets its own section below because it’s the deepest hole.
The Main Interface Tour
OpenRGB’s main window has five tabs along the top: Devices, Information, SDK Server, SDK Client, Settings. You’ll spend 95% of your time on Devices.
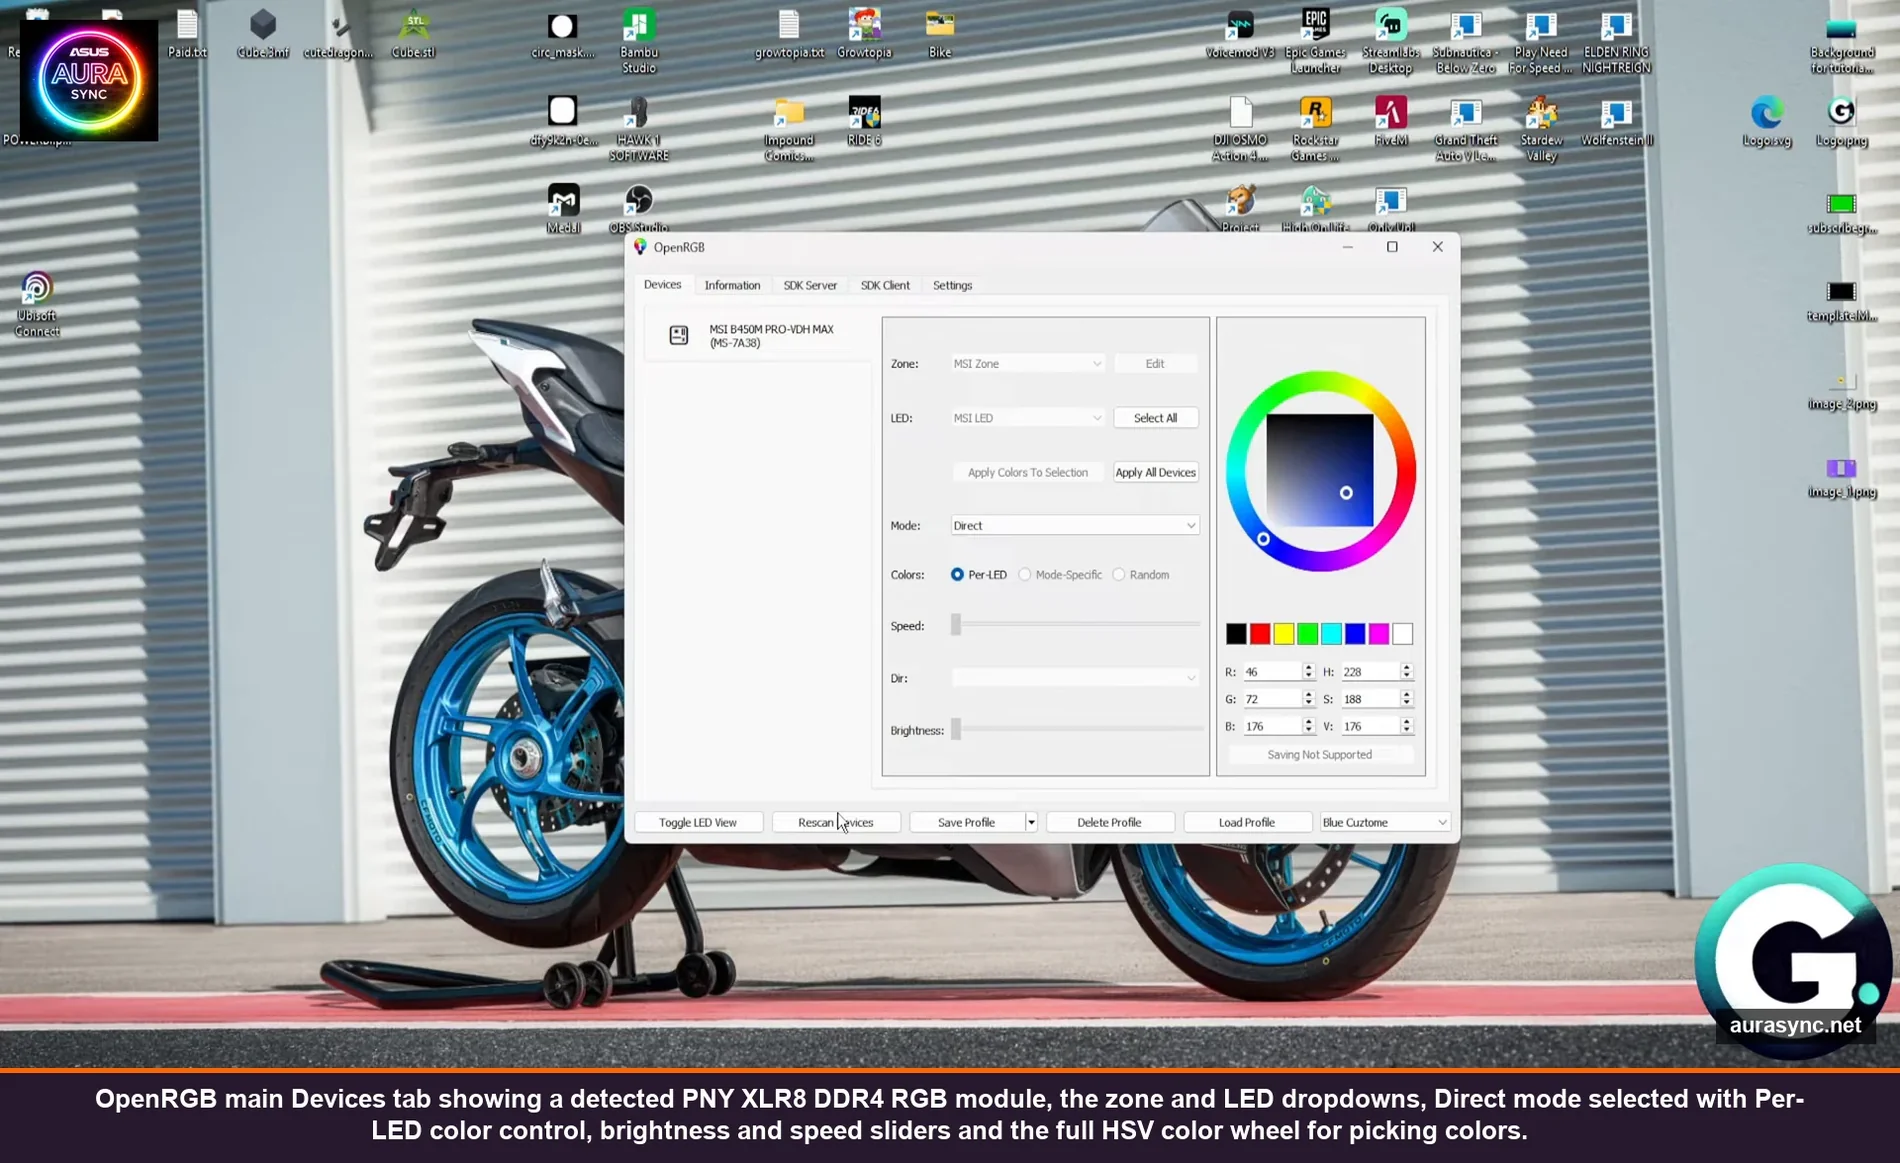
The left side of the Devices tab is the device picker dropdown. The right side is everything else: zones, LEDs, modes, colors, brightness, speed. Per device.
Zones
A zone is a controllable group of LEDs on the device. On a motherboard, each RGB header is usually its own zone (JRGB, JRAINBOW1, JRAINBOW2, PCH on MSI boards, similar layout on ASUS and Gigabyte under different names). You can pick a single zone or “All Zones” to apply effects to the whole device at once.
LEDs
Below zones is the per-LED list. Most addressable strips show up as 30, 60, or whatever-the-strip-density LEDs. Per-LED control is what makes OpenRGB special, you can color each individual LED differently if you select Per-LED mode and pick LEDs out of the list. Most people don’t bother and just use Mode-Specific or All Zones, but it’s there.
Modes
The Mode dropdown is the main control. Direct mode means OpenRGB sets the colors and the device just displays them. Static is a single color baked into the device that survives even if OpenRGB closes. Then there’s Breathing, Flashing, Spectrum Cycle, Rainbow, and a handful of others depending on what the device firmware supports. Some devices only support Direct, some support a dozen modes. The dropdown only shows you what your specific hardware can do.
The thing to understand about Direct vs Static: Direct gives you live software control (so you can hook OpenRGB up to audio, screen ambient, game integration, etc.) but the lights revert if OpenRGB stops. Static is “set it and forget it” but you lose dynamic effects.
Colors and Brightness
The right panel has the color wheel, hex input, RGB and HSV sliders, and a row of preset color swatches. The brightness slider works on supported devices, on the ones that don’t (a lot of cheap ARGB strips don’t), the slider just sits there grayed out. The “Mode Not Supported” tooltip shows up when you’ve picked a mode the device’s firmware doesn’t actually accept.
Profiles
At the bottom of the window are Save Profile, Delete Profile, Load Profile. A profile snapshots every device’s current mode, color, and brightness state into a named file. I have three profiles saved: “work” (low-brightness warm white on everything, no effects), “game” (per-device dynamic colors with audio reactive on the strip), and “off” (literally everything black).
Profiles are stored as JSON in %APPDATA%\OpenRGB on Windows. You can copy profiles between machines, share them on Reddit, or version-control your lighting if you want to be that person.
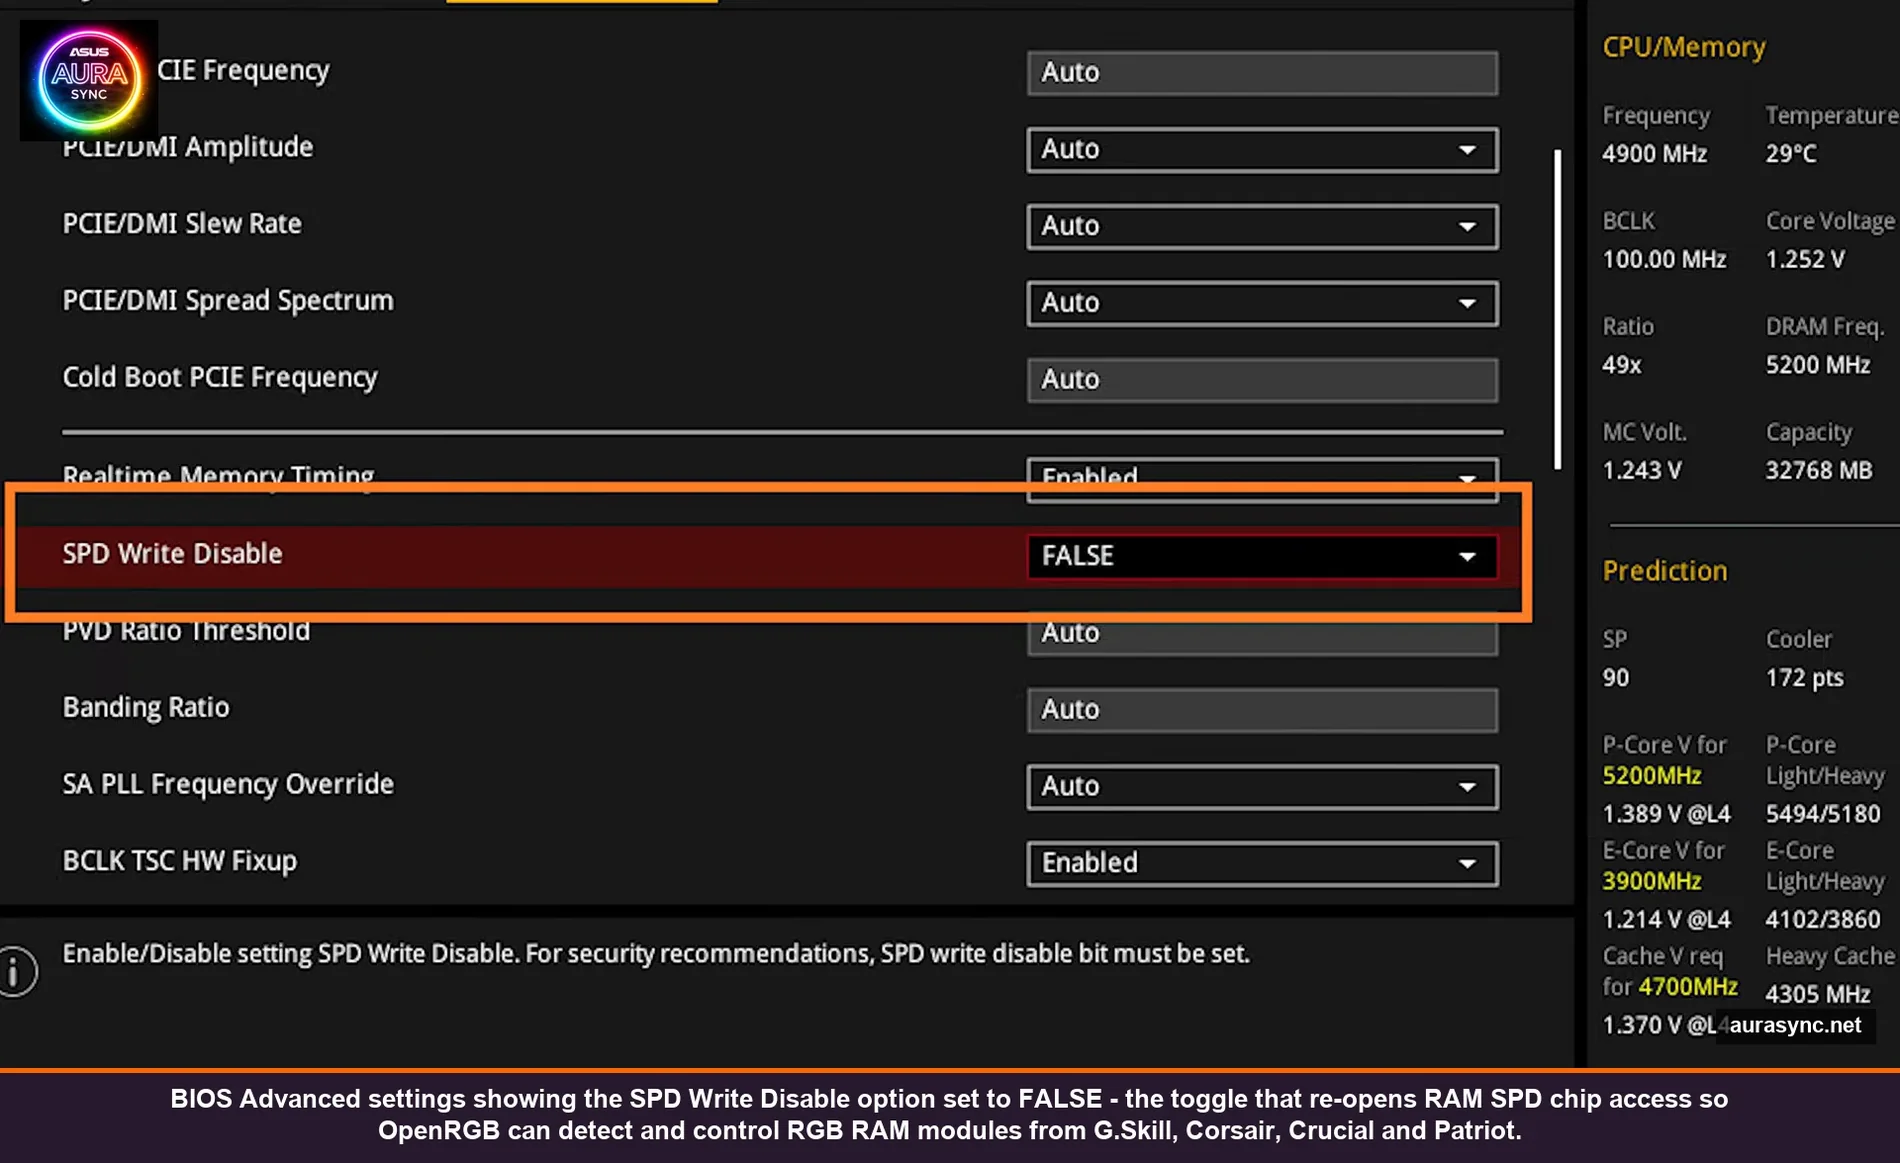
The BIOS Settings Nobody Mentions
If your RAM doesn’t show up after Run-as-Admin and Rescan, the problem is almost always BIOS. OpenRGB needs SMBus access to read the SPD chips on RGB RAM sticks and to talk to motherboard RGB ICs. Modern BIOSes ship with SMBus locked down by default for security and stability reasons, and you have to flip a few toggles to open it back up.
The exact path depends on your motherboard vendor. Here’s what to look for:
- ASUS: Advanced > Onboard Devices Configuration > ASUS Armoury Crate Download Service = Disabled. Also Advanced > AMD CBS or Intel equivalent > SPD Write Disable = FALSE on many boards.
- MSI: Settings > Advanced > Integrated Peripherals > SMBus Configuration. Some boards expose SPD Write Disable, some don’t.
- Gigabyte: Tweaker > Advanced Memory Settings > SPD Write Disable = Disabled. The setting is sometimes hidden behind Advanced Mode.
- ASRock: Advanced > Chipset Configuration. SPD Write toggle varies by board.
The ASUS one trips the most people because the setting is literally named “Armoury Crate Download” but disabling it is what helps OpenRGB. The reason is that toggle controls whether the BIOS aggressively reserves SMBus for the Aura Sync stack at boot. With it on, Windows boots and Aura immediately claims SMBus before OpenRGB can get to it. With it off, SMBus is shareable.
SPD Write Disable is the other big one. When it’s TRUE (the default on many newer boards because of XMP-write attack vectors), the BIOS makes RAM SPD chips read-only at the EEPROM level. Vendor apps can usually still read serial numbers and detect modules even with SPD writes locked. OpenRGB sometimes can’t, depending on the controller chip, because some RGB RAM controllers piggyback on the SPD write channel for color updates. Setting it to FALSE re-enables that path.
💡 Pro tip: If you don’t see the SPD Write Disable option in your BIOS, your board might just default to having it enabled and you won’t have the lever. Update to the latest BIOS, the option got added in late 2023 firmware revisions on many AM4 and AM5 boards.
The Vendor App Conflict (and How to Actually End It)
OpenRGB is exclusive control. So is every vendor app. That means if iCUE is running, OpenRGB cannot detect or control any Corsair USB device, because iCUE is holding the handle. Same for Aura with ASUS hardware, Synapse with Razer, Mystic Light with MSI, Polychrome with ASRock, Fusion with Gigabyte, G HUB with Logitech.
Closing them is harder than it sounds. Closing the window doesn’t close them, they minimize to system tray. You have to right-click the tray icon and Exit. Some of them auto-restart on reboot or even when triggered by a hardware event, so the tray icon comes back even though you exited.
The reliable kill list, in order:
- Exit each vendor app from the system tray.
- Open Task Manager > Services tab. Stop and disable: Aura Service, LightingService (Corsair), Razer Synapse Service, MSI Central Service, RGBController.exe if Polychrome installed one. Set Startup Type = Disabled, not Manual.
- Open Task Manager > Startup apps. Disable iCUE, Synapse, MSI Center, Aura Sync, anything ending in “RGB” that you don’t recognize.
- Reboot to confirm the services don’t come back. If something does come back, find its scheduled task in Task Scheduler > Task Scheduler Library > vendor folder and disable that.
This sounds like a lot of work. It is. But you only have to do it once per system, and the payoff is OpenRGB owning the hardware cleanly without an arbitration war on every reboot.
If you can’t fully exorcise a vendor app (some Razer mice literally only work in Direct Mode through Synapse and OpenRGB doesn’t have a working driver yet), the workaround is to leave Synapse installed but disable its lighting control (in Synapse 4 there’s a per-device “Disable Synapse lighting” toggle). That way Synapse still handles macros and DPI but OpenRGB takes lighting.
Plugins: Where OpenRGB Stops Being Static
The base OpenRGB install is mostly a color picker. The plugins are what turn it into a real lighting engine. Plugins go in the plugins subfolder of your OpenRGB directory and load on next launch.
The ones I actually use:
- OpenRGB Effects Plugin: This is the one. Adds a tab with proper effects: rainbow wave, color shift, audio visualization, screen ambient, ping wave, swirl, and about twenty more. It’s separately maintained on the OpenRGB GitLab and gets updates regularly. Without this plugin, “effects” in OpenRGB means whatever your device firmware can do natively, which is usually three options. With this plugin, you get the SignalRGB-style visual effect library.
- Hue+ Plugin: Bridges Philips Hue bulbs into OpenRGB so they respond to the same effects as your PC RGB. Lets you color-match your desk lamp to your case lighting. Actually useful for streamers.
- E1.31 Receiver: Lets external software (xLights, Vixen, Resolume, basically any DMX-over-Ethernet tool) control your OpenRGB devices. Niche, but if you’re into that you know.
- Visual Map Plugin: Lets you arrange your devices in 2D space (e.g., “this strip is to the left of these fans which are below this AIO”) so screen-ambient effects know where to send each color. This is what makes ambient effects look right instead of randomly distributed.
Install order: download the plugin DLL from its GitLab releases page, drop it in the plugins folder, restart OpenRGB. The plugin appears as a new tab in the main window. If it doesn’t appear, version mismatch (the plugin needs to match your OpenRGB version major number).
The SDK Server: OpenRGB as a Backend
One of the SDK Server tab settings I ignored for a year and now use constantly. OpenRGB ships with a built-in TCP server (default port 6742) that exposes the entire device list and color-set API to any client that speaks the OpenRGB protocol.
What that unlocks:
- Stream Deck plugins that change profiles on a button press.
- Python scripts that flash the case red when a build fails (mine does this).
- Home Assistant integration so your PC lights match your bedroom Hue.
- SignalRGB can talk to OpenRGB as a downstream device set, meaning you can use SignalRGB’s effect editor to drive OpenRGB-detected hardware (a real cheat code if you want SignalRGB visuals on hardware SignalRGB doesn’t natively support).
- OBS plugins that pulse lighting on stream alerts.
To turn it on, go to SDK Server tab, set Bind Address to 127.0.0.1 (loopback only, you don’t want this exposed on your LAN unless you mean to), set Port to 6742 (or whatever), click Start Server. Then check “Start server on launch” so it auto-starts next time. The Python SDK (openrgb-python on PyPI) is the easiest way to scratch-test it, half a dozen lines of Python and you can blink your case at will.
I ranted about how OpenRGB and SignalRGB compare in a separate post, but the SDK is the underrated bridge between them: you don’t have to pick.
Auto-Start: Make OpenRGB Survive Reboots
By default, OpenRGB doesn’t auto-start. After a reboot your lights revert to whatever default state your firmware has, which for most motherboards is the rainbow wave that nobody actually wants.
To fix this, in OpenRGB go to Settings > General Settings, set “Start at Login” = enabled, set “Start Minimized” = enabled (otherwise the window pops up every reboot), and most importantly set “Load Profile on Startup” to your saved profile name. Without that last one, OpenRGB launches but doesn’t apply any colors and you stare at firmware-default rainbow until you click Load.
On Linux it’s the same idea but you set up a systemd user unit. There’s a sample one in the OpenRGB Wiki under “Linux Setup” that I copy-pasted with one path change and it’s worked across two distros.
What OpenRGB Can’t Do
I’m not going to pretend it’s perfect. The honest gaps:
- Some Razer keyboards and mice don’t have full per-key support yet. Razer’s protocol is reverse-engineered piecemeal by the community and Razer occasionally changes it on firmware updates. My old BlackWidow Chroma works fine. The newer Huntsman v3 isn’t fully covered.
- Logitech G HUB devices are limited. Most Logitech RGB stuff works but per-key keyboards (G915, G815) are partial.
- No mouse DPI / macros / polling control. OpenRGB does lighting only. If you need DPI or macros, the vendor app has to stay around for that side. Use the “lighting off in vendor app” trick mentioned above.
- No game integration. SignalRGB has built-in plugins for games (CS, Minecraft, Apex, etc.) that read game state and translate to lighting. OpenRGB doesn’t ship that. You can build your own with the SDK but it’s work.
- No marketplace of pretty effects. SignalRGB has a community effect library you can browse and one-click install. OpenRGB has Effects Plugin which is fine but visually less wow.
If you want pretty out of the box, SignalRGB. If you want full control, no subscription, and no telemetry, OpenRGB. They’re not really competitors, they solve different problems for different people.
Real Reddit Sentiment, Honestly
I went and read about a hundred Reddit posts on OpenRGB before writing this and the sentiment is consistently a few flavors:
- “I switched and never looked back.” Mostly people who were fed up with vendor app bloat. Common in r/pcmasterrace, r/buildapc threads.
- “My RAM never showed up and I gave up.” Almost always a missed Run-as-Admin or BIOS SPD setting. Fixable, but the docs make it sound easier than it is.
- “It works for everything except [specific peripheral].” Usually a recent Razer or Logitech device. Workaround is keep vendor app for that one device, OpenRGB for everything else.
- “SignalRGB looks better.” True for canned effects. Not true for raw control.
The community is small but technical. The OpenRGB Discord is where most of the real troubleshooting happens, the GitLab issue tracker is where bugs go to get fixed (often within a release or two if it’s a popular device).
Who OpenRGB Is For (and Who Should Skip It)
It’s for you if:
- You have hardware from multiple vendors and you’re tired of running three vendor apps.
- You care about not having background services or telemetry from RGB software.
- You’re on Linux and have basically no other choice anyway.
- You want to script lighting (CI status indicator, audio reactive, screen ambient via SDK).
- You don’t want to pay for SignalRGB Pro just to control basics.
It’s NOT for you if:
- You only have one vendor’s stuff (e.g., all-Corsair build) and the vendor app already works fine. iCUE on a pure Corsair setup is, honestly, kind of solid. Don’t fix what’s not broken.
- You want gorgeous out-of-the-box effects without configuration. SignalRGB ships better visuals.
- You want game-aware lighting without coding. SignalRGB and Razer Chroma Studio integrate that natively.
- You can’t tolerate a 30-minute first-time setup. OpenRGB is 30 minutes; vendor apps are 5 minutes (and a year of pain).
Quick FAQ
Is OpenRGB safe? Are those drivers a security risk?
OpenRGB itself is open source and has been audited by the community. The two drivers it installs (inpout32 / WinRing0) are well-known low-level shims used by HWiNFO, ThrottleStop, and most overclocking tools. They expose hardware access that any app running as admin could already use, so they’re not a meaningful additional risk on a single-user PC. CVE-2020-14979 affected an older WinRing0 build; OpenRGB ships a current signed version. If you’re on a corporate-managed box, your endpoint protection will probably block it anyway.
Does OpenRGB work alongside vendor apps?
Sort of. They share hardware, so whoever opens the device first wins. In practice this means OpenRGB and vendor apps fight, the result is unpredictable, and you should pick one. The cleanest setup is OpenRGB only, with vendor apps fully exited and their services disabled. The exception is when you need a vendor-only feature (Synapse macros, iCUE thermal sensors): leave the vendor app running but turn off its lighting control.
Why doesn’t my RAM show up in OpenRGB?
The three causes, in order of frequency: you didn’t run as admin first time so the SMBus driver isn’t installed, your BIOS has SPD Write Disable = TRUE and needs to be set to FALSE, or your RAM is using a controller chip OpenRGB doesn’t have a driver for yet (rare but happens with brand-new SKUs). Fix in that order.
Can OpenRGB control my keyboard’s per-key lighting?
Depends on the keyboard. Corsair K95, K70, K65 RGB lines: yes, well-supported. Razer BlackWidow / Huntsman: partial, depends on model and firmware. Logitech G915 / G815: partial. Cherry / Ducky / Keychron: usually yes if it shows up as a standard HID. Check the OpenRGB supported devices page for your exact SKU before assuming.
Is OpenRGB a replacement for SignalRGB?
Different tools. SignalRGB is closed-source freemium with a beautiful effect editor and game integration. OpenRGB is fully open source with deeper hardware control and an SDK. Many people run both: OpenRGB as the universal hardware backend, SignalRGB Pro as the effect frontend, talking to each other via the OpenRGB SDK. Or they pick one based on whether they value pretty (SignalRGB) or control (OpenRGB) more.
Where to Grab It and What to Read Next
The official site is openrgb.org, the source repo is on GitLab under CalcProgrammer1, and the documentation lives at openrgb-wiki.readthedocs.io. Releases drop roughly every couple of months and the changelogs are worth skimming for new device drivers.
If you came here from one of my vendor-app guides and want the full picture, here’s the cluster:
- RGB sync troubleshooting playbook (5 categories) — start here if your lights are misbehaving across vendors.
- OpenRGB vs SignalRGB — the head-to-head if you’re picking sides.
- MSI Mystic Light setup — the vendor side of the story for MSI users.
- Corsair iCUE 5 setup — Corsair’s first-party answer.
- Razer Synapse 4 profiles + linked games — Razer’s per-game lighting flow.
- ASUS Aura Sync addressable headers — the Gen1/Gen2 toggle that breaks half the strips.
OpenRGB took me a weekend to fully set up and it’s been quietly running every day since. No subscription. No telemetry. No tray-icon war. Just an EXE, two drivers, and one window that controls everything. Worth the setup time, especially if you’ve been losing the vendor-app fight.