I plugged a 5V ARGB strip into the 12V JRGB header on my MSI B550 the first time I built around an MSI board, then spent twenty minutes wondering why the strip wouldn’t show up in Mystic Light. It did show up. It was just dead. The 12V on the JRGB header had quietly cooked the LEDs because the strip was rated for 5V. So the very first thing I want anyone reading this to know is that on MSI motherboards the headers look almost identical and the wrong combination kills your strip in seconds.
So this is the version I wish someone had handed me before I started plugging things in. Specifically how to get MSI Mystic Light working across the full set of devices on a modern MSI build (motherboard, fans, AIO, RAM, addressable strips) without frying anything or fighting MSI Center for an hour. I’m running this on an MSI B550 Gaming Plus paired with an AMD wraith prism heatsink, a Lian Li UNI fan setup on L-Connect 3, and a generic ARGB strip on a SATA-powered 8-port hub. The walkthrough applies to basically any MSI Mystic Light board.
If you want the cross-vendor RGB story (because Mystic Light only handles MSI-compatible devices and not Corsair RAM or Razer mice), I covered that in this OpenRGB vs SignalRGB breakdown. This guide is for staying inside the MSI ecosystem.
Header types: JRGB vs JRAINBOW vs JCorsair (read this before plugging anything in)
This is the part nobody warns you about and it’s the most expensive mistake to make. MSI motherboards have three different RGB header types and they look similar enough that it’s easy to grab the wrong one if you’re not paying attention.
- JRGB – 4 pins, 12V, pinout 12V/G/R/B. Up to 3A. For non-addressable RGB (single solid color across the whole strip). Standard “old school” 4-pin RGB strips and fans.
- JRAINBOW – 3 pins, 5V, pinout 5V/D/-/G. Up to 3A. For addressable WS2812-based ARGB (per-LED control, rainbow gradients, animations across the strip). Modern ARGB everything plugs in here.
- JCorsair – 3 pins, slightly different shape. Specifically for Corsair Lighting Node Pro chains. You won’t have this on every MSI board (it’s mostly on the higher tiers).
The B550 Gaming Plus I’m running has one JRGB and two JRAINBOW headers. Higher-tier boards (X570, X670E, Z790, Z890 series) generally have more of both. Check your manual before you plug anything in – the pinout matters.
⚠️ Heads up: Plugging a 5V ARGB device into a 12V JRGB header sends 12V into LEDs rated for 5V. They die instantly. Plugging a 12V RGB strip into a JRAINBOW gives 5V to a 12V device and it just doesn’t light up. The connectors look almost the same and the only safety is reading both sides before you plug. Always check the strip’s label and the header’s silkscreen, every single time.
If you’re using a SATA-powered hub like the cheap 8-port ones on Amazon (I’m using one of those), the hub usually has its own switch on the side that lets you pick whether the input signal comes from 5V or 12V. Set that to match what your devices need before you plug anything else in. The hub then repeats the same signal out to all 8 ports, so they all sync together.
Step 1: Install MSI Center (and only MSI Center, never Dragon Center)
MSI Center replaced Dragon Center back in 2021. If you have Dragon Center installed for any reason, uninstall it first. Running both at the same time causes Mystic Light conflicts where the lighting flips between profiles every few seconds because both apps are fighting over the same hardware controller.
To install MSI Center: go to your motherboard’s product page on msi.com → Support → Utility tab. Download MSI Center from there (don’t grab it from random mirrors, the installer pulls modules and the wrong version sometimes can’t see your specific board). Run as admin, accept the privacy policy, and let it install.
When it boots up the first time, it asks you to pick a “User Scenario.” This is misleading – it’s really just a preset list of which optional modules to install. Pick “Gamer” because that pre-checks Mystic Light along with the other useful modules. The others (User Scenario, Smart Image Finder, Devices Speed Up, Super Charger, etc.) are mostly bloat with no description of what they actually do, which is one of the more frustrating parts of MSI’s whole UX.
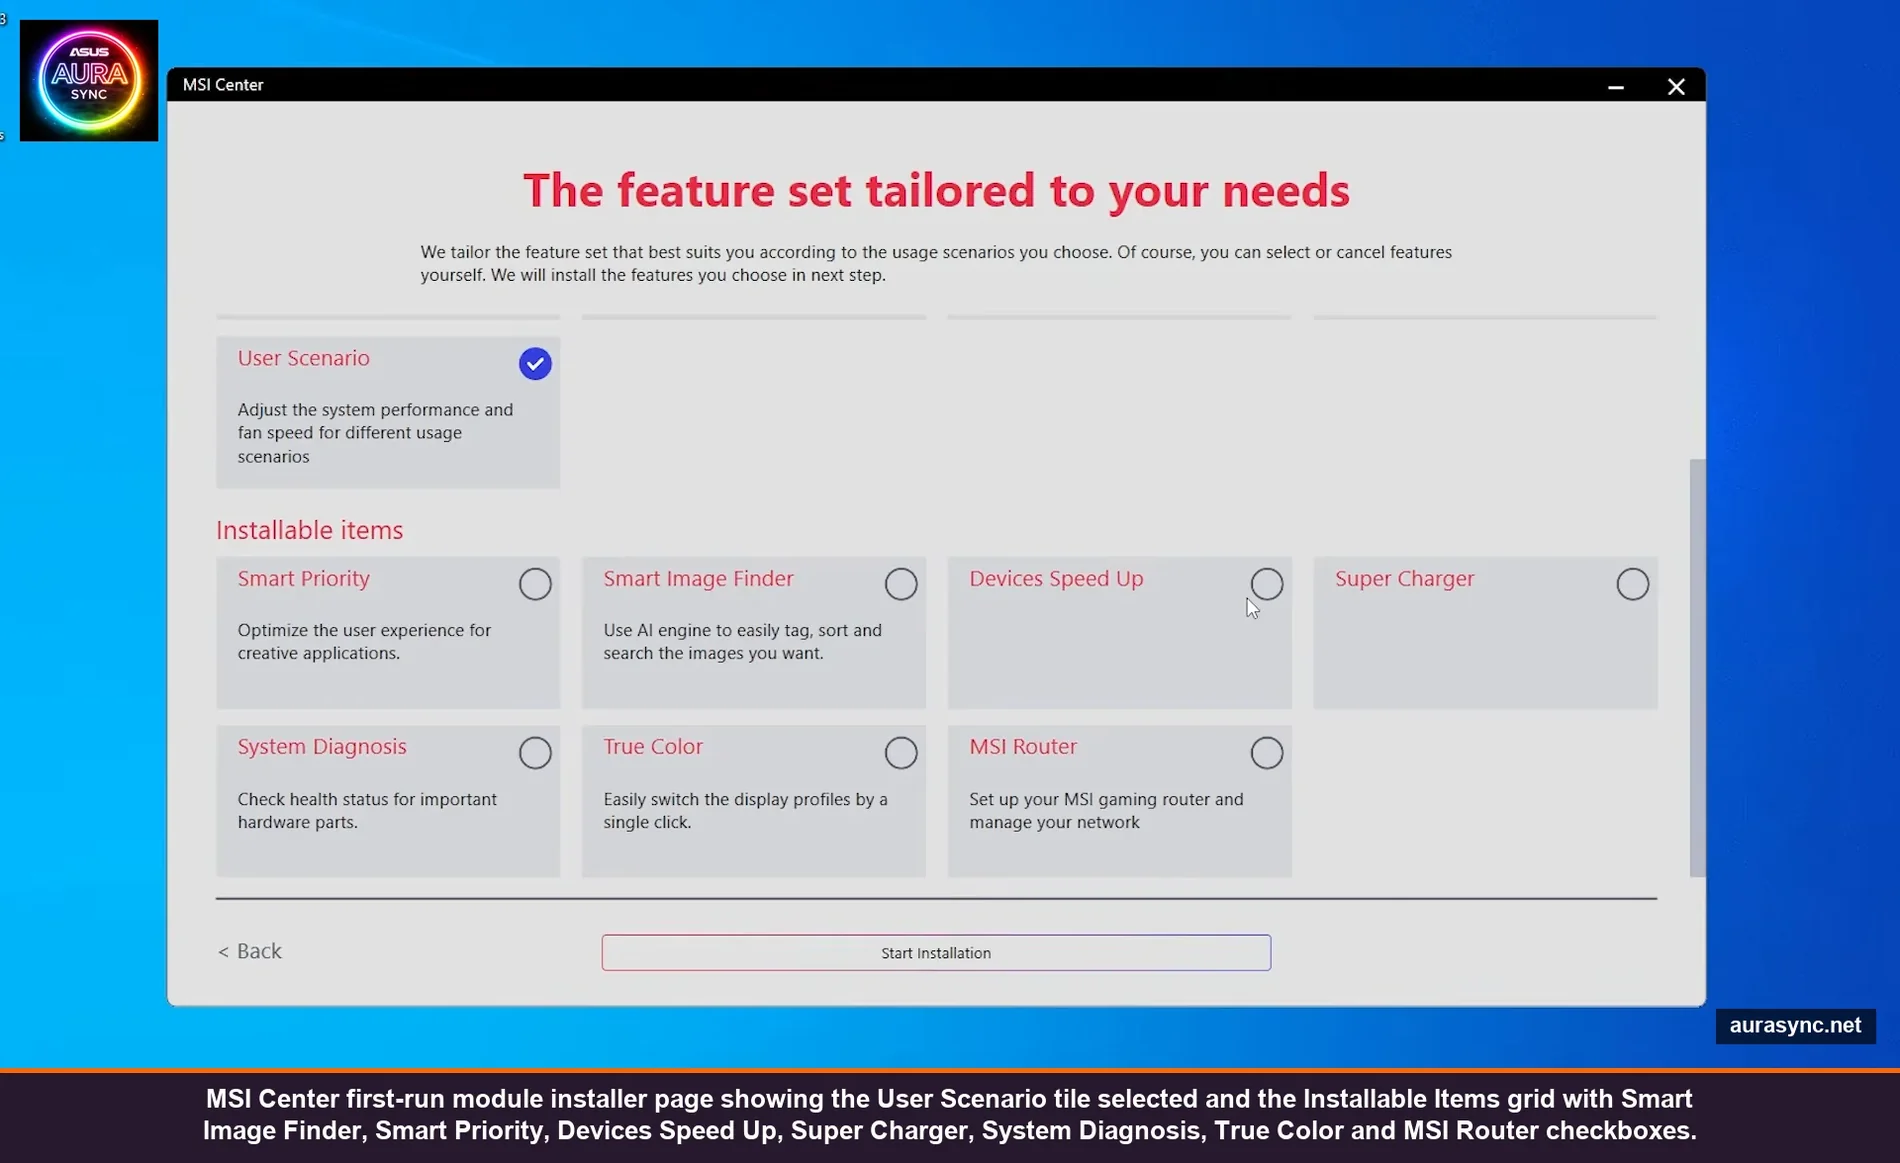
Click the Mystic Light tile to install it specifically. After it installs, you’ll find Mystic Light under MSI Center → Features tab → Mystic Light. That’s where you live from here on.
One thing worth knowing: MSI Center is annoyingly chatty about telemetry and updates. Settings → Notifications → turn off most of them or you’ll get a popup every time it detects something. Settings → Game Mode and Smart Priority can also be toggled off if you find them invasive.
Step 2: Update firmware (carefully)
This is more nuanced on MSI than other vendors. There’s a regular motherboard firmware update under MSI Center → Support, and there’s also sometimes a separate “LED firmware update” listed there. They are not the same thing.
Standard motherboard firmware: update normally if there’s one available, follow MSI’s instructions, do it through BIOS Flashback when possible.
LED firmware: MSI itself says don’t run this unless you’re actively having an RGB problem. The update requires shutting down, disconnecting all RGB devices, killing standby power, then running the update. If everything’s working, leave it alone. I haven’t done it on my board because nothing was broken and MSI’s documentation specifically warns against running it preemptively.
If your board has Wi-Fi (B550 Gaming Plus does NOT, but B550-A Pro Wi-Fi, X670E Carbon Wi-Fi, etc. all do), you’ll also see Ambient Link as an option. We’ll come back to that in Step 8. For non-Wi-Fi boards, Ambient Link won’t show up at all even though some user manuals mention it. That’s an MSI documentation inconsistency, not a missing feature on your install.
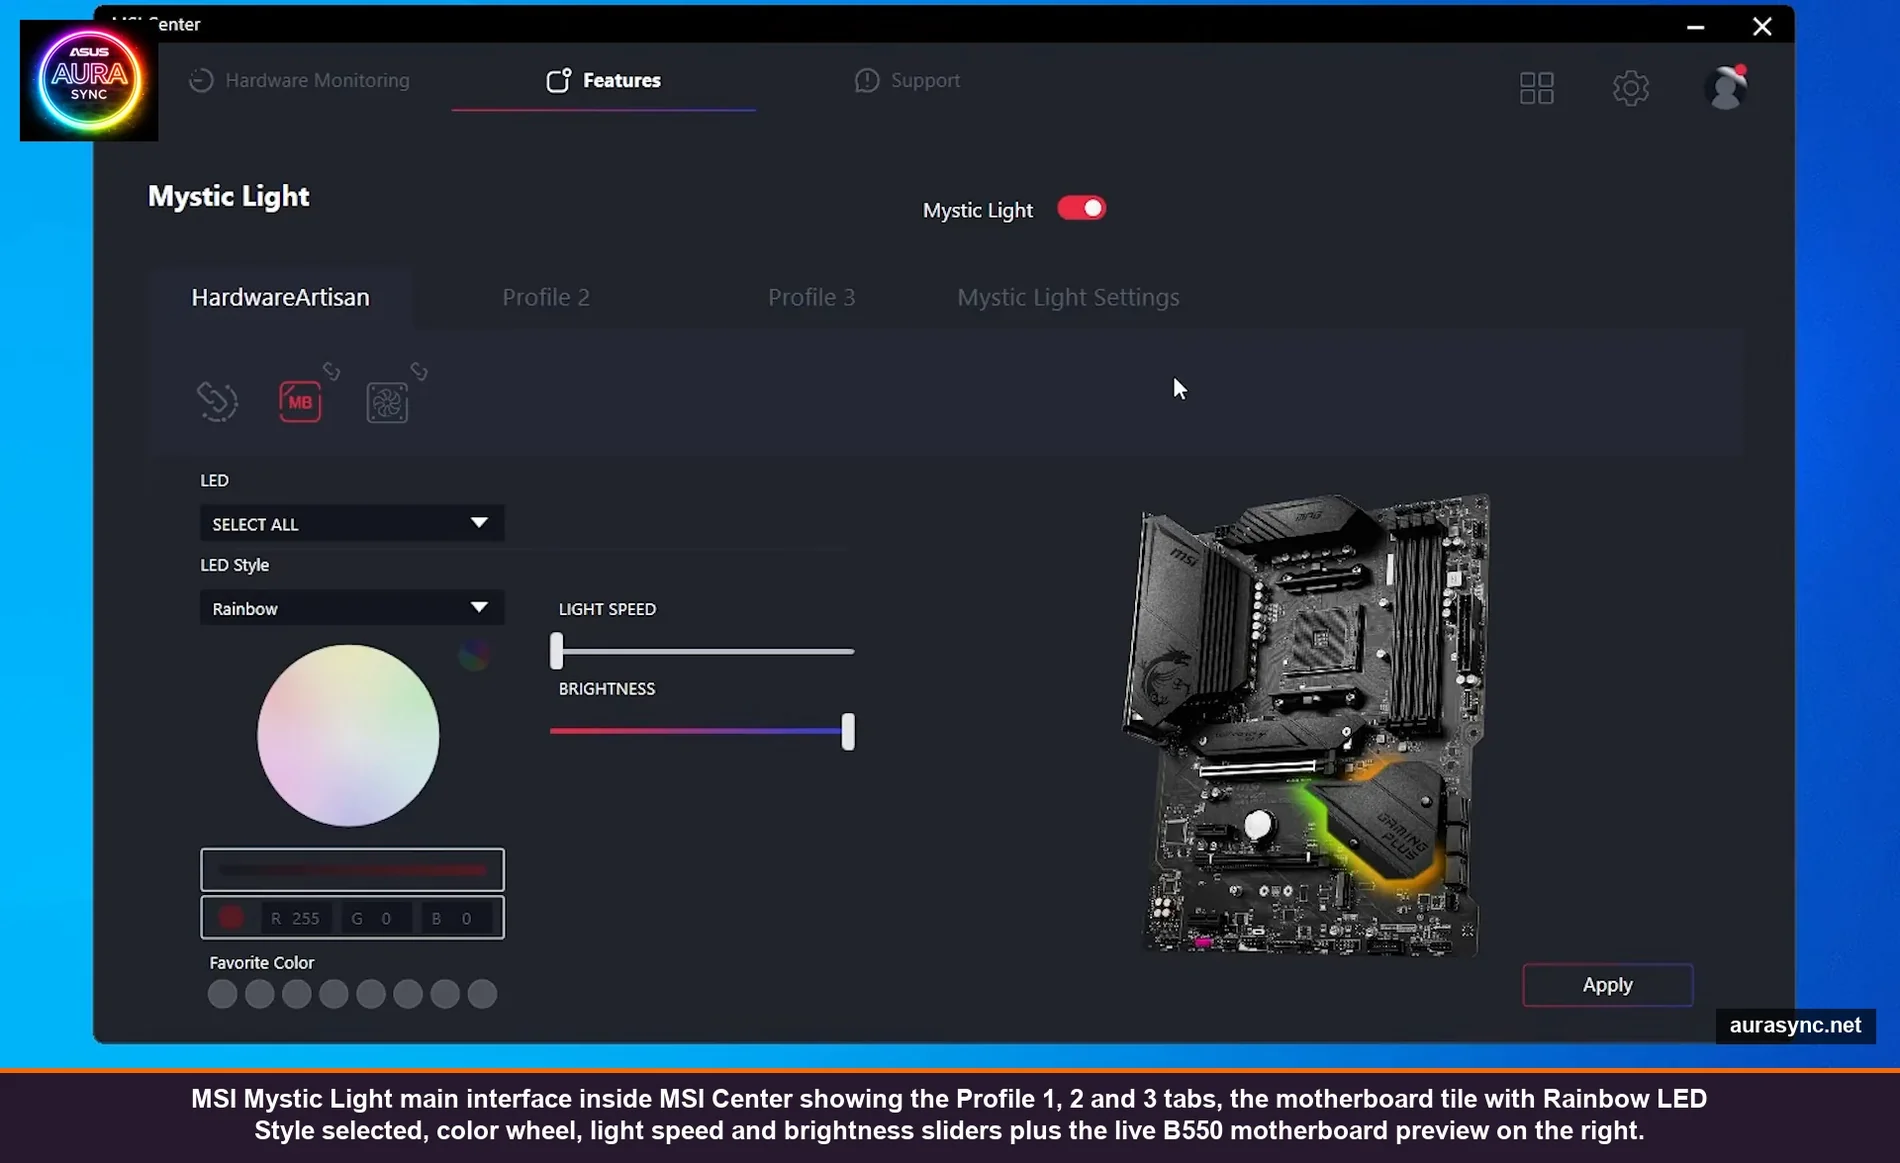
Step 3: Open Mystic Light and understand the layout
Mystic Light’s interface is genuinely simple. The top has three Profile tabs (Profile 1, Profile 2, Profile 3) plus a Mystic Light Settings tab. You can switch between profiles to set up different “looks” and quickly recall them. In practice I have Profile 1 as my normal setup, Profile 2 as my “movie night” minimal lighting, and Profile 3 as RGB off.
On the left side you have device tiles – one tile per detected RGB device. The motherboard tile is always there. Other tiles only show up if you have a Mystic Light Sync compatible device connected (more on that limitation in Step 6).
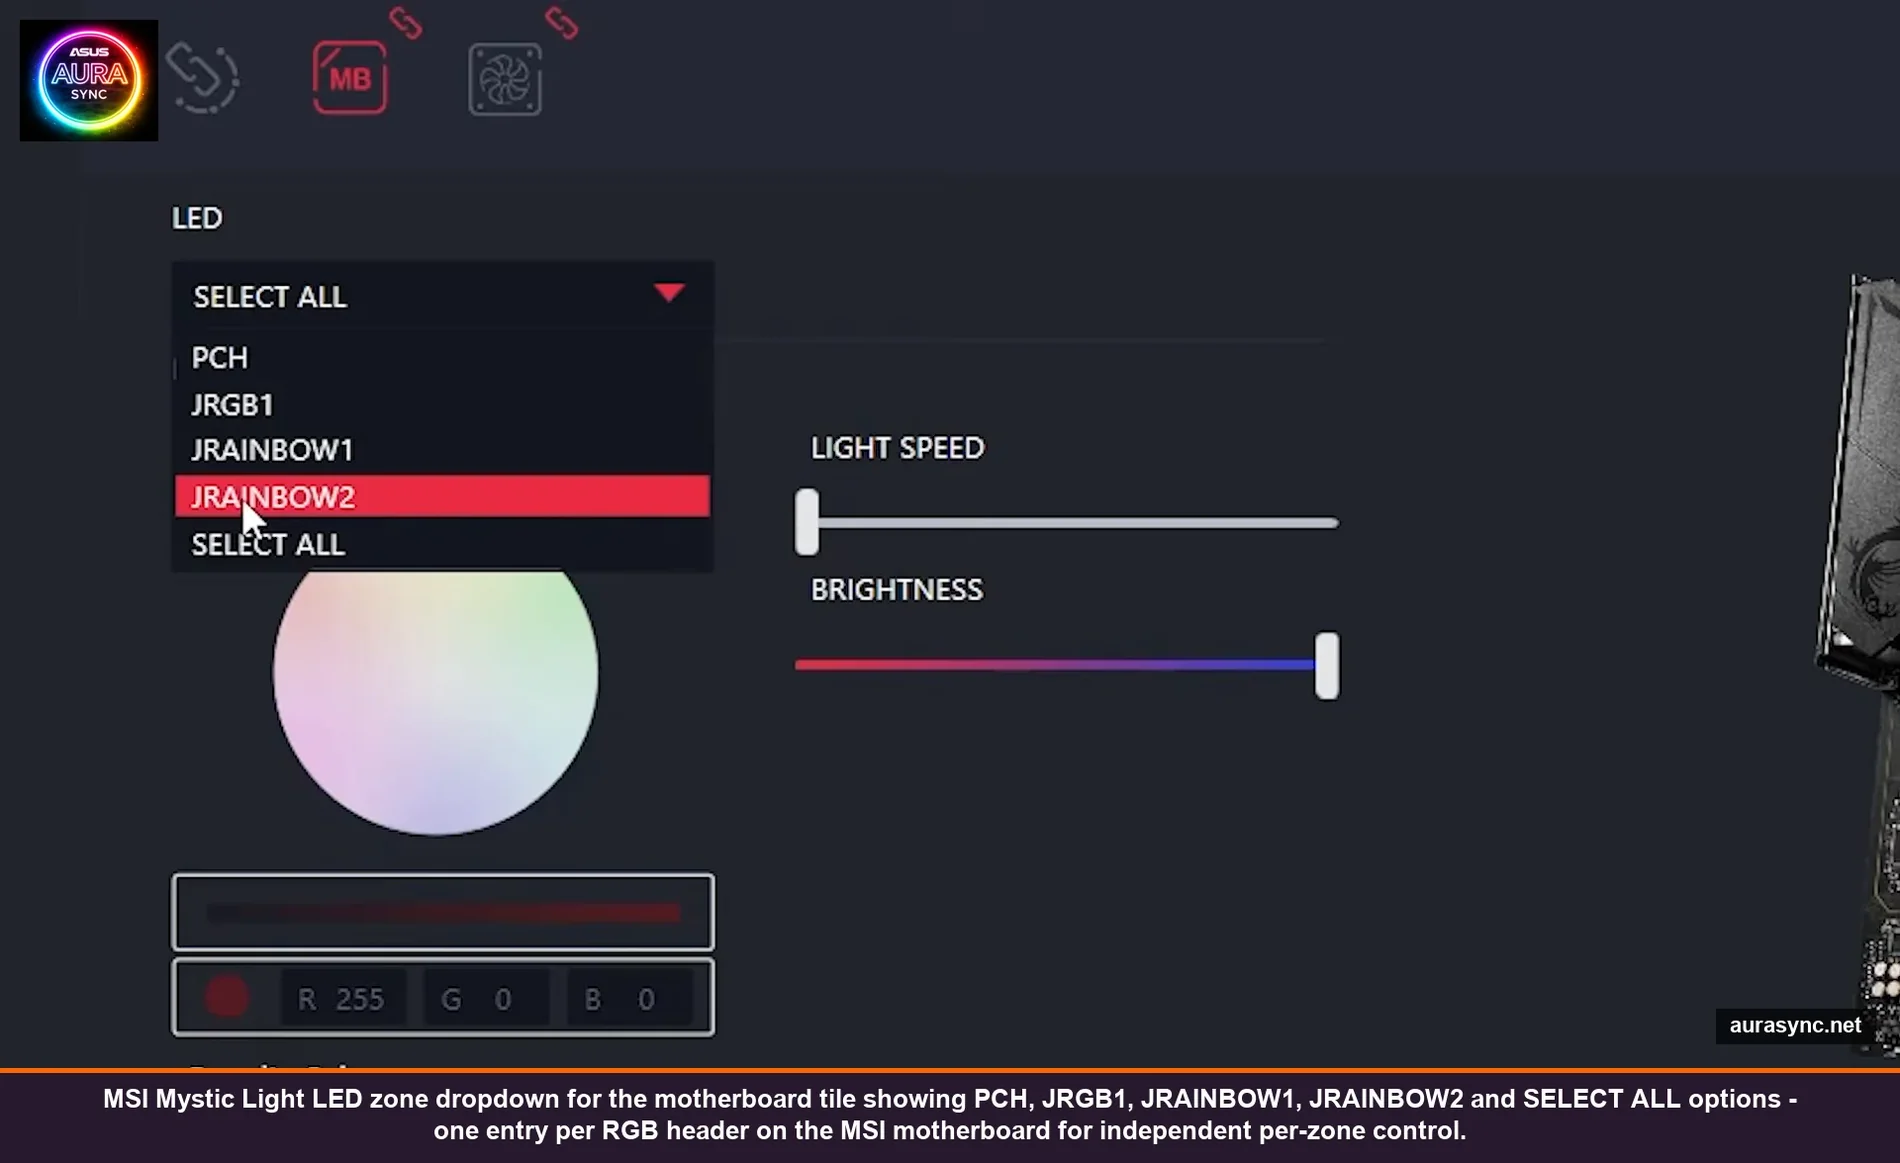
Click the motherboard tile and the LED dropdown shows all your individual zones:
- PCH – the chipset shroud LEDs (varies by board, B550 Gaming Plus has ~8 LEDs under the PCH cover)
- JRGB1 – the 12V header devices
- JRAINBOW1 – first 5V ARGB header devices
- JRAINBOW2 – second 5V ARGB header devices
- SELECT ALL – apply to every motherboard zone at once
Each zone gets its own LED Style (Steady, Breathing, Color Cycle, Rainbow, etc.), color, brightness, light speed, and cycle. You change one zone, hit Apply at the bottom right, and only that zone updates. Don’t forget to hit Apply – changes don’t auto-save like they do in Synapse 4 or iCUE.
💡 Pro tip: If you’re using a hub on JRAINBOW1 with multiple devices (fans, strips, etc.), all of those devices share the same effect because the hub is just a signal repeater, not an independent controller. To get truly different effects on different devices, you need them on physically different headers (JRAINBOW1 vs JRAINBOW2) or use a smart controller like the Lian Li L-Connect or Corsair Lighting Node Pro instead of a dumb repeater hub.
Step 4: Pick your effect (and the 12V vs ARGB limitation that catches everyone)
Here’s a catch that confuses people: the available effects depend on the header type. JRGB (12V) supports a subset of effects because 12V RGB strips can only display one color at a time across the whole strip. So even if you select “Rainbow” on a 12V strip, you’ll see it cycle through colors but the entire strip will be the same color at any given moment. It can’t do a gradient because the hardware doesn’t support per-LED addressing.
JRAINBOW (5V ARGB) supports the full effect set including true rainbow gradients, comet trails, ripples, and per-LED animations. That’s why if you have any choice at all when buying RGB strips or fans, get ARGB (5V). The visual difference is night and day.
The basic effect list:
- Steady – one color, no animation. Underrated. I run my main setup on a soft amber for work hours.
- Breathing – one color, fade in/out. Less twitchy than animations.
- Color Cycle – whole zone shifts through the rainbow over time. The “default” gamer look.
- Rainbow – on ARGB only, gradient across the strip. Looks proper.
- Flashing / Strobing – don’t.
- Random / Magic – random color shifts, surprisingly nice for a more chill ambient effect.
Each effect has Light Speed (animation rate), Brightness (0-100), and Cycle (the delay between firings for animated effects). The cycle slider is genuinely useful – cranking color cycle to a slow speed makes it look way more cinematic than the default Normal speed. Try it at 25-40% speed for a week and you won’t go back.
Step 5: Sync All vs per-device control
At the top of each device tile is a little chain link icon. When the chain is linked, that device is syncing with the master “Sync All” setting. When it’s broken, the device is independent and you control it separately.
Click the Sync All button at the top to make every device follow one effect. Click an individual chain link to break that device out for independent control. This is how you get a setup where the motherboard runs Color Cycle, but the CPU cooler stays on Steady red, and the fans do Rainbow – all without conflict.
One quirk: if you have very different device types linked (a single-color CPU logo and a multi-color ARGB strip, for example), Mystic Light will limit the available effects to whatever both devices can do. Usually that means Steady, Breathing, and basic Color Cycle. To get the fancy ARGB-only effects, break the chain on the simple device.
Step 6: Mystic Light Sync compatible devices (and why your Corsair RAM won’t show up)

Mystic Light Sync is MSI’s “we’ve tested this device and it just works” certification. Devices on the Mystic Light Sync compatible list show up automatically as their own tiles in Mystic Light. You don’t need to install separate software – MSI’s drivers cover them.
The Mystic Light Sync compatible list includes: most Cooler Master AIOs and CPU coolers (the AMD wraith prism shows up as “AMD SR4 RGB”), Phanteks fans and strips, Corsair Lighting Node Pro (via the JCorsair header), Lian Li UNI fans (via L-Connect 3 in motherboard sync mode), G.Skill Trident Z Royal RGB RAM, Patriot Viper RGB, and a chunk of others.
What does NOT work with Mystic Light, regardless of what people say in forums:
- Corsair Vengeance RGB Pro / Pro SL RAM – even though it should expose SMBus addressing, in practice Mystic Light usually doesn’t pick it up. iCUE works on it, SignalRGB works, Mystic Light just doesn’t see it.
- Razer peripherals – they need Synapse 4, not Mystic Light.
- Some Crucial Ballistix runs – vendor compatibility is hit or miss.
- Corsair AIOs without the Lighting Node Pro – need iCUE.
For Lian Li UNI fans specifically: plug them into your L-Connect 3 controller as normal, then plug the controller into a JRAINBOW header on your motherboard, then in L-Connect 3 set the controller to “Motherboard Lighting Sync” mode. Mystic Light then drives the lighting through L-Connect 3 like it’s any other ARGB strip. The fan curves stay in L-Connect 3, only the lighting goes to Mystic Light.
If you have devices Mystic Light can’t see, your two options are: run the vendor app alongside Mystic Light (works but each app fights for control), or jump to SignalRGB / OpenRGB which talk to almost everything from one app.
Step 7: Mystic Light Settings (the panel everyone misses)
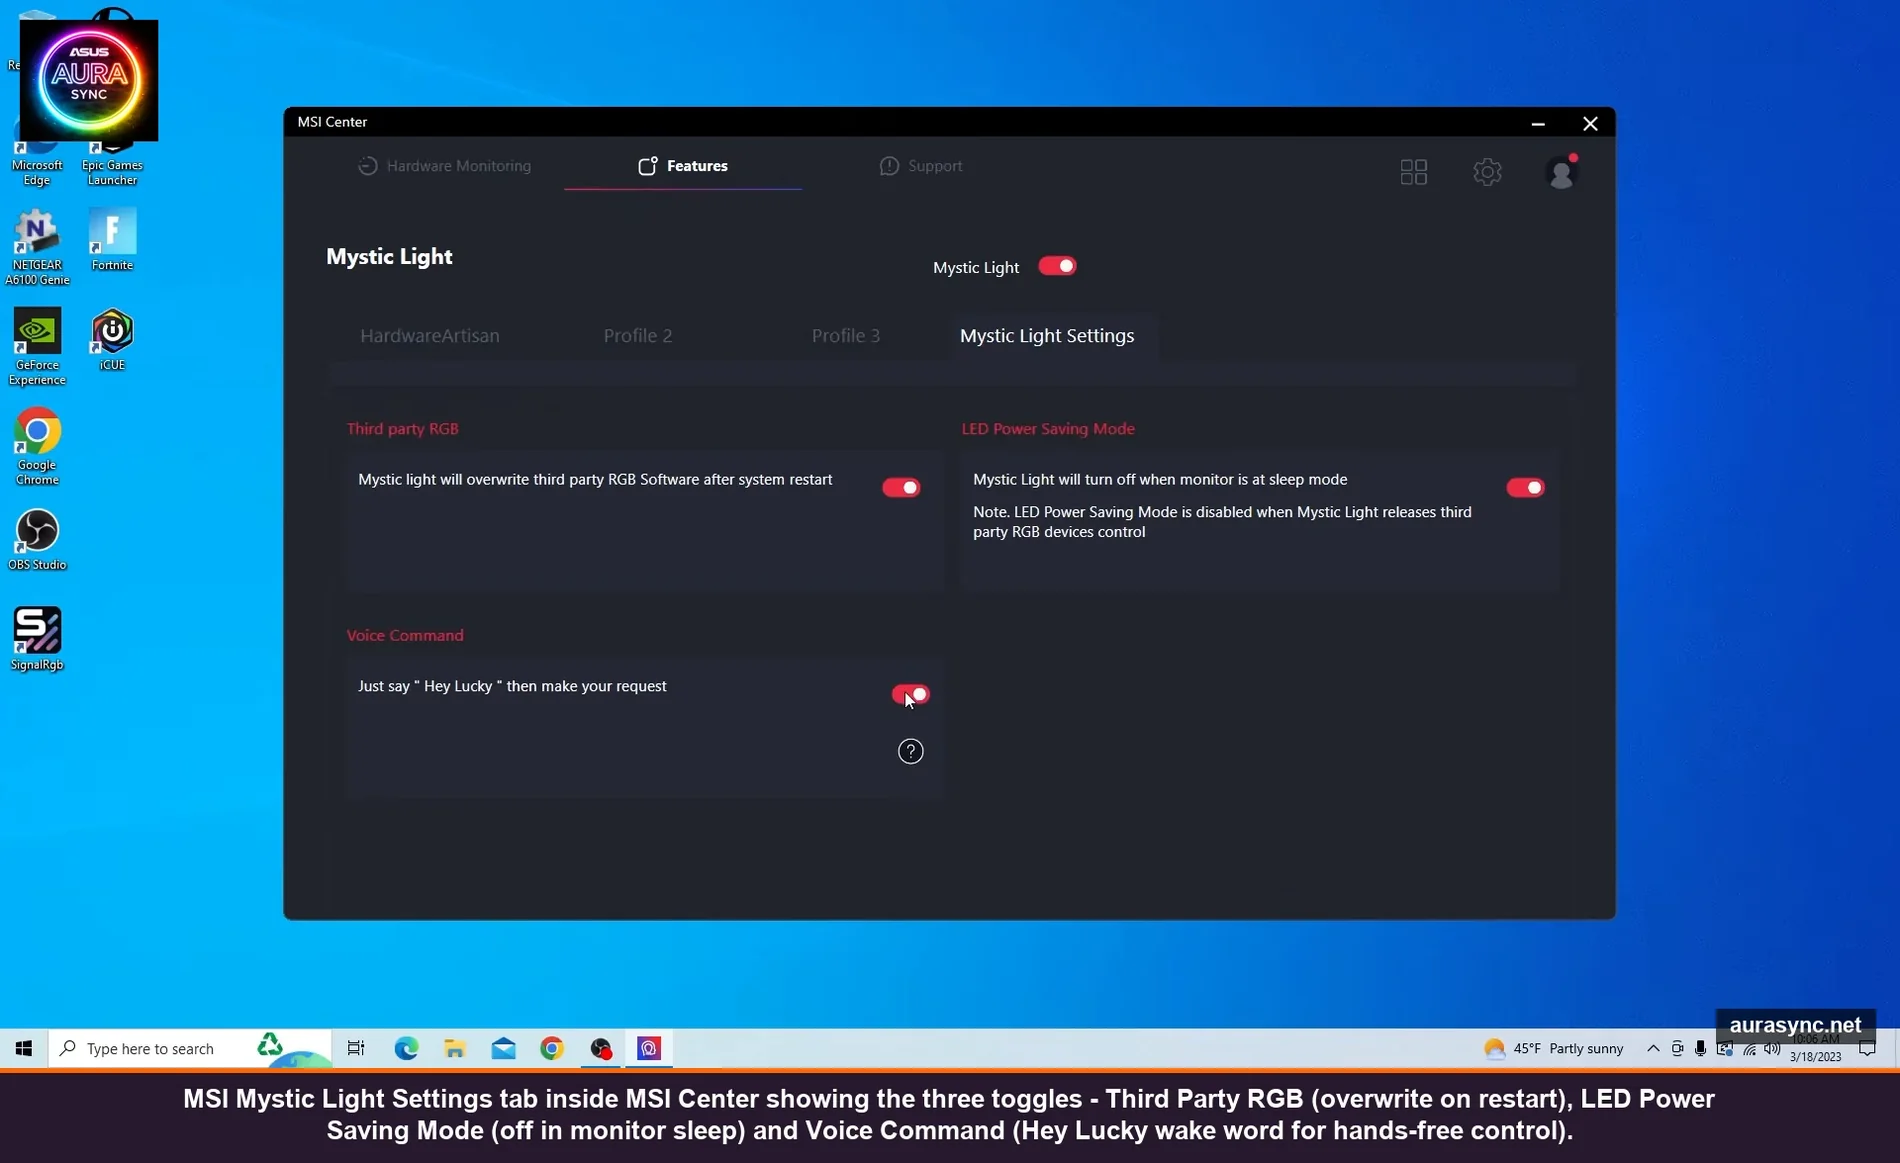
The Mystic Light Settings tab at the top has three toggles that matter:
Third party RGB – “Mystic Light will overwrite third party RGB software after system restart.” Translation: on reboot, Mystic Light grabs control of all the RGB hardware back from any other app that touched it. Turn this OFF if you’re using SignalRGB or OpenRGB as your primary controller, otherwise Mystic Light will yank control after every reboot and you’ll wonder why your other app’s effects “stopped working.”
LED Power Saving Mode – “Mystic Light will turn off when monitor is in deep mode (sleep).” Useful for stopping the RGB from staying on overnight. I leave this ON.
Voice Command – this one is a curiosity. Enable it and you can say “Hey Lucky” then a command like “Mystic Light rainbow” or “Mystic Light steady” and it’ll change the effect. It actually works (better than I expected) but the “Lucky” wake word is unchangeable and the recognition is just OK. Genuinely useful if you’re streaming and want a hands-free way to switch the lighting mid-stream. Otherwise it’s a gimmick.
One important note: enabling Voice Command blanks out the Profile tabs at the top because the system expects you to drive everything by voice from then on. Toggling it off restores the profile tabs.
Step 8: Ambient Link and the mobile app (don’t bother for most builds)
Ambient Link is MSI’s integration with Nanoleaf and Philips Hue ambient lighting – the idea is that game events drive both your in-case RGB and your room lighting in sync. Cool concept, fragile in practice.
It’s only available on MSI boards with built-in Wi-Fi. The B550 Gaming Plus, B650 Tomahawk, and other non-Wi-Fi boards don’t get the Ambient Link tab in Mystic Light at all, even though MSI’s user manuals sometimes still list it. Don’t waste time troubleshooting why it’s missing – it’s a hardware-side gating, not a missing install component.
For Wi-Fi boards: Ambient Link only fires during supported game sessions, and the supported game list is small. If you have Nanoleaf or Hue and want them to react to general gameplay (not just MSI-specific games), the Nanoleaf Razer Chroma integration or SignalRGB’s Hue support is more flexible.
The MSI Mystic Light mobile app on Apple Store and Google Play is also worth skipping. The reviews go back years, the app rarely successfully connects to a desktop install, and MSI doesn’t really mention it in current documentation. It feels abandoned. There’s no real first-party way to control your desktop’s RGB from your phone.
The bloat to skip in MSI Center
When you’re picking modules in the MSI Center installer, here’s what’s worth installing and what to skip:
Install:
- Mystic Light – obviously
- Hardware Monitoring – basic temps and fan speeds, useful
- System Diagnosis – one-click health report, occasionally useful
- True Color – if you have an MSI gaming monitor, color profile management
Skip:
- Smart Image Finder – AI duplicate finder. Random thing for an RGB app to ship.
- Devices Speed Up – “memory cleaner” snake oil. Modern Windows handles RAM management fine.
- Super Charger – phone fast-charging through USB. Niche.
- MSI Router – only if you have an MSI router, which basically nobody does.
- Smart Priority – vague “optimize for creativity” thing with no real description of what it does.
- ARGB vs RGB explained — the 5V vs 12V header background if JRGB vs JRAINBOW is news to you.
- MSI Mystic Light not working fix guide — the troubleshooting companion if Mystic Light isn’t behaving.
You can always come back to Features → Install and add modules later. There’s no penalty for skipping. The User Scenario “Gamer” preset I mentioned earlier mostly nails this list, but I’d manually deselect Smart Image Finder and Devices Speed Up.
Common Mystic Light problems and the actual fix for each
One device won’t show up in Mystic Light
First check if the device is on the Mystic Light Sync compatible list (linked from MSI’s website, search “Mystic Light Sync compatible devices”). If it’s not listed, Mystic Light can’t see it – period. If it IS listed and still doesn’t show: reboot, then if still missing, uninstall the device’s vendor app entirely (Cooler Master MasterPlus+, Phanteks Mythics Studio, etc.) since those can grab the device exclusively.
RGB resets to defaults after every reboot
Almost always Windows Dynamic Lighting fighting Mystic Light. Settings → Personalization → Dynamic Lighting → set MSI Center as the priority controller, OR turn Dynamic Lighting off entirely at the top of that page. I covered the full breakdown in this Dynamic Lighting guide.
Effects apply but only to half my fans
Hub power issue. SATA-powered RGB hubs will brown out if you have too many devices on the chain pulling more than the hub’s power budget. Either split the load across two hubs (one per JRAINBOW header) or upgrade to a powered controller like the Lian Li L-Connect.
Mystic Light says “device not detected” for my Corsair RAM
Mystic Light cannot reliably detect Corsair Vengeance RGB Pro or Pro SL even though it should via SMBus. There’s no Mystic Light fix. Run iCUE in parallel for the RAM (turn off iCUE for everything else), or move both to SignalRGB which talks to both vendors cleanly.
MSI Center is using 5%+ CPU at idle
Usually a stuck firmware check. Open Task Manager, find the offending MSI process, kill it. If it comes back hot, MSI Central Service is the usual culprit – Settings → Update → set check interval to weekly instead of “every startup.”
Mystic Light installed but the tile is grayed out and won’t open
Means MSI Center can’t talk to the motherboard’s RGB controller. Check for the latest LSI/RGB driver under MSI Center → Support → Live Update. If that doesn’t help, the dedicated MSI driver for the chipset (separately downloadable from the motherboard’s product page → Support → Driver) sometimes resolves it.
Mystic Light vs the alternatives
Honest assessment after living with Mystic Light for a year: it’s basic but functional. The interface is simple, the per-zone control works, and if you stay inside the Mystic Light Sync compatible device list it just works. The downsides are real though – no individual LED control, no per-fan effect when going through a dumb hub, no Photoshop-style layered effects like iCUE has, no AI generation like Aura Sync’s recent additions.
If you want individual fan-level control or layered effects, you need Corsair iCUE (which I covered in this iCUE guide) or jump to SignalRGB which handles MSI hardware fine and adds a much deeper feature set on top.
For a clean, MSI-pure build with one or two RGB strips and matching Mystic Light Sync devices, Mystic Light is enough. For a mixed-vendor or per-device-effect setup, you’ll outgrow it within a month.
FAQ
Is Mystic Light free? Do I need a subscription?
Free. No subscription, no Razer-ID-style account requirement, no online check. Install MSI Center, install the Mystic Light module, you’re done. It works fully offline.
Does Mystic Light work without MSI Center?
No. There used to be a standalone Mystic Light installer years ago but MSI deprecated it. Mystic Light is now a module inside MSI Center exclusively. You can disable most of MSI Center’s other features but the shell has to be there.
Will Mystic Light work on a non-MSI motherboard?
No. The motherboard control is tied to MSI’s chipset drivers and won’t see other vendors’ RGB hardware. For non-MSI boards, use the corresponding vendor app (Aura Sync for ASUS, RGB Fusion for Gigabyte) or go cross-vendor with SignalRGB / OpenRGB.
Can I export Mystic Light profiles to share or back up?
Sort of. The three profile slots inside Mystic Light don’t have a built-in export. The profile state lives in the MSI Center config files at %PROGRAMDATA%\MSI\One Dragon Center\. You can manually copy the relevant config files to back them up, but there’s no clean import/export UI for sharing.
Why is one of my JRAINBOW headers controlling devices on the wrong side of the board?
Mystic Light labels the headers based on the silkscreen on the motherboard, not on physical position. Some MSI boards have JRAINBOW1 in the top-right corner and JRAINBOW2 near the bottom edge. If your devices are on the “wrong” header label, the silkscreen on the board is the source of truth – check there.
Will MSI Center auto-update? Should I let it?
Yes by default. I let it auto-update Mystic Light and the basic modules. I disable auto-update for BIOS firmware (always do that manually through BIOS Flashback) and the LED firmware (don’t run it unless something’s broken).
Does Mystic Light support per-LED control like iCUE?
No. Mystic Light treats each header as a single zone. You can’t independently address LED #5 vs LED #6 on the same strip. For per-LED control you need iCUE (with Corsair hardware) or SignalRGB.
Wrapping up
Mystic Light’s biggest strength is also its biggest weakness: it’s simple. If you have an MSI motherboard, a couple of compatible fans, and a strip or two, it’ll get the lighting working in 15 minutes and you’ll never need to touch it again. If you want per-LED effects, layered animations, deep customization, or cross-vendor sync, it’ll frustrate you within an hour.
The two things that really matter from this guide: get the JRGB vs JRAINBOW pinout right (your strips’ lifespan depends on it), and don’t run Dragon Center alongside MSI Center (they’ll fight forever). Everything else is just preference.
If your build is mostly MSI Mystic Light Sync compatible, stay here. If you’re already mixing in Corsair, Razer, or Lian Li peripherals on top of the motherboard sync, you’ll get more out of SignalRGB or OpenRGB for the cross-device control. And if your Mystic Light just refuses to behave, the Dynamic Lighting priority fight in this troubleshooting guide is almost always the culprit.