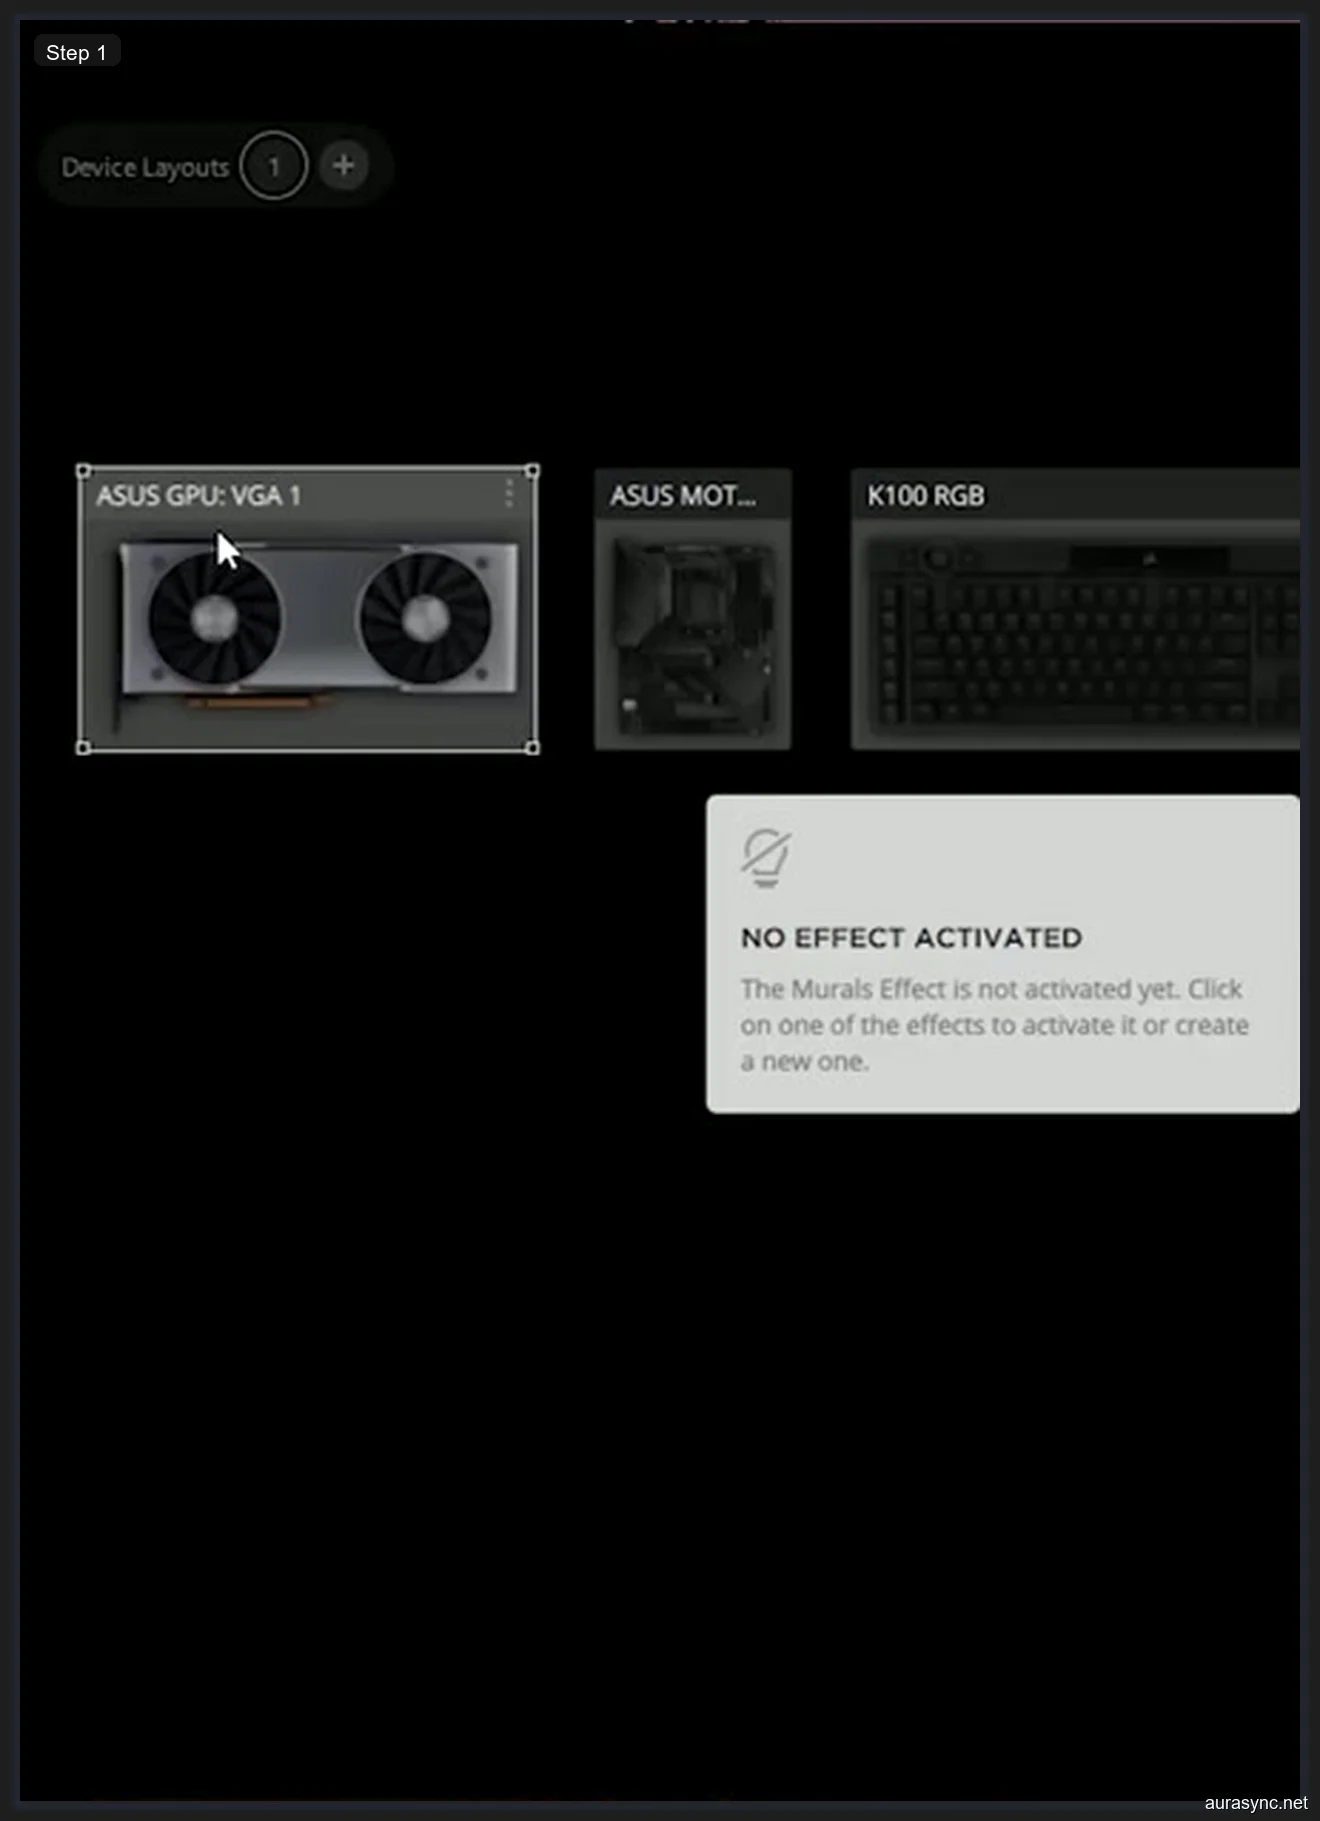
I opened iCUE yesterday and my entire Corsair setup was gone. I’m not talking about one device glitching out. I mean everything. My four sticks of Vengeance RGB PRO SL, my Lighting Node PRO, my Lighting Node CORE, and my K100 keyboard had all vanished from the device panel. The only things still showing up were my ASUS GPU and ASUS motherboard, which aren’t even Corsair products. I’ve been running iCUE version 5.18.106 on this build for months without a single problem, and then after a routine Windows update, it all fell apart.
I spent the better part of a full day trying to get everything back. I went through forums, Reddit threads, Corsair support articles, and probably twelve different YouTube videos before I finally pieced together what was happening. I tried nine different fixes in total. Some of them did nothing. A couple of them partially helped. And one combination of steps finally got every single device detected again. I’m writing this so you don’t have to waste an entire Saturday like I did.
The worst part about this problem is that iCUE gives you absolutely zero feedback about why devices disappear. There’s no error log you can easily check, no notification that says “hey, we lost connection to your RAM.” You just open the app and your devices are gone. If you’re staring at an empty device panel right now, I know exactly how frustrating that is. Let me walk you through everything I tried.
Why iCUE Loses Track of Your Devices
Before I get into the fixes, it helps to understand why iCUE drops devices in the first place. I used to think it was just buggy software, but the reality is more complicated than that. iCUE communicates with different device types through completely different channels, and each one has its own failure points.
For RAM sticks like the Vengeance RGB PRO, iCUE uses the SMBus (System Management Bus) to communicate. The SMBus is actually an I2C bus that sits on your motherboard and handles low-level communication between the CPU and various components. The critical thing to understand here is that the SMBus is shared. Your motherboard’s own RGB software, like ASUS Armoury Crate and its Aura Sync service, uses the exact same bus to control lighting. If two programs try to access the SMBus simultaneously, one of them loses, and in my experience it’s almost always iCUE that gets locked out. This is the single most common reason your Corsair RAM disappears from iCUE.
For USB-connected devices like the Lighting Node PRO, Lighting Node CORE, and Commander CORE, iCUE communicates through your motherboard’s internal USB 2.0 headers. These are physical connections inside your case, and they’re surprisingly fragile. A cable that’s slightly loose, a USB splitter that’s overloaded, or a Windows driver update that resets the USB controller can all kill the connection. I’ve also seen iCUE updates corrupt the device profile database, which makes iCUE “forget” that a device exists even though the hardware connection is perfectly fine.
Windows updates are another major culprit. I’ve noticed that cumulative updates in particular like to reset USB driver configurations, which forces iCUE to re-enumerate all connected devices. If the timing goes wrong during that re-enumeration, you end up with phantom devices or missing devices. Understanding these root causes matters because the fix you need depends entirely on which type of failure you’re dealing with. If you’ve been running Armoury Crate alongside iCUE, your RAM issue is almost certainly an SMBus conflict. If your controllers disappeared, it’s probably a USB or software problem.
Fix 1: Full Shutdown, Not Just Restart
I know this sounds like the most generic troubleshooting advice ever, but hear me out. There’s a real technical reason why a full shutdown works differently than a restart, and most people don’t realize they’ve never actually done a full shutdown on Windows 10 or 11.
By default, Windows uses a feature called Fast Startup. When you click “Shut Down” normally, Windows doesn’t actually power off completely. Instead, it hibernates the kernel session and saves the state of your USB controllers to disk. When you boot back up, it restores that saved state, which means any USB communication errors from the previous session carry over. Your Lighting Node PRO that lost its connection? Windows just restores the broken state instead of reinitializing the USB stack from scratch.
To do a true full shutdown, you have two options. The first is to hold the Shift key while clicking Restart in the Start menu. This bypasses Fast Startup and forces Windows to completely reinitialize all hardware on the next boot. The second option is to open a command prompt and run shutdown /s /t 0, which performs an immediate full shutdown without the Fast Startup shortcut. I actually recommend the command line approach because it’s more reliable.
After the full shutdown, wait about 10 seconds before pressing the power button. This gives the USB controllers on your motherboard time to fully discharge. I’ve had devices come back just from this step alone, especially USB-connected controllers like the Commander CORE and Lighting Node PRO. If your RAM is the missing device, this step alone probably won’t fix it since that’s typically an SMBus issue, but it’s the right starting point regardless.
Fix 2: Check Your Physical Connections
I almost skipped this step because I hadn’t opened my case in months and assumed nothing had changed. That was a mistake. When I finally pulled off the side panel and traced my cables, I found that one of my USB header connections had worked itself slightly loose. These internal USB connections are not like the ports on the back of your case. They’re tiny 9-pin headers on your motherboard, and the connectors that plug into them don’t have any locking mechanism. Case vibration from fans, hard drives, or even just moving your PC can gradually loosen them over time.
Here’s what you should check. Start with your internal USB headers. Your Lighting Node PRO, Lighting Node CORE, and Commander CORE all connect to your motherboard’s USB 2.0 headers using either a standard 9-pin connector or, on newer models, a USB-C internal connector. Unplug each one, inspect the pins for any bent or dirty contacts, and plug them back in firmly. You should feel a definite click or seated resistance when the connector is properly inserted.
Next, check if you’re using a USB splitter cable. Corsair includes a 2-in-1 USB splitter with many of their controllers, and I need to be blunt about this: these splitter cables are not reliable. I’ve seen multiple reports on Reddit and the Corsair forums about the stock splitter causing intermittent detection failures. The splitter works by sharing a single USB header between two devices, and when both devices try to communicate simultaneously, one of them drops out. If you’re using a splitter, try connecting your controller directly to a motherboard USB header instead. Most motherboards have at least two or three internal USB 2.0 headers, so you should have a spare.
Don’t forget about SATA power. This one catches people off guard because it feels like it shouldn’t matter. Your Lighting Node PRO and Commander CORE need a SATA power connection from your PSU in addition to the USB data connection. The SATA connector provides the 5V power that drives the RGB LEDs on your fans and strips. Without it, the controller might appear in iCUE but show no devices connected to its channels, or it might not appear at all. I’ve seen builds where the SATA cable was plugged in but the PSU-side modular connector had come loose. Check both ends of every cable.
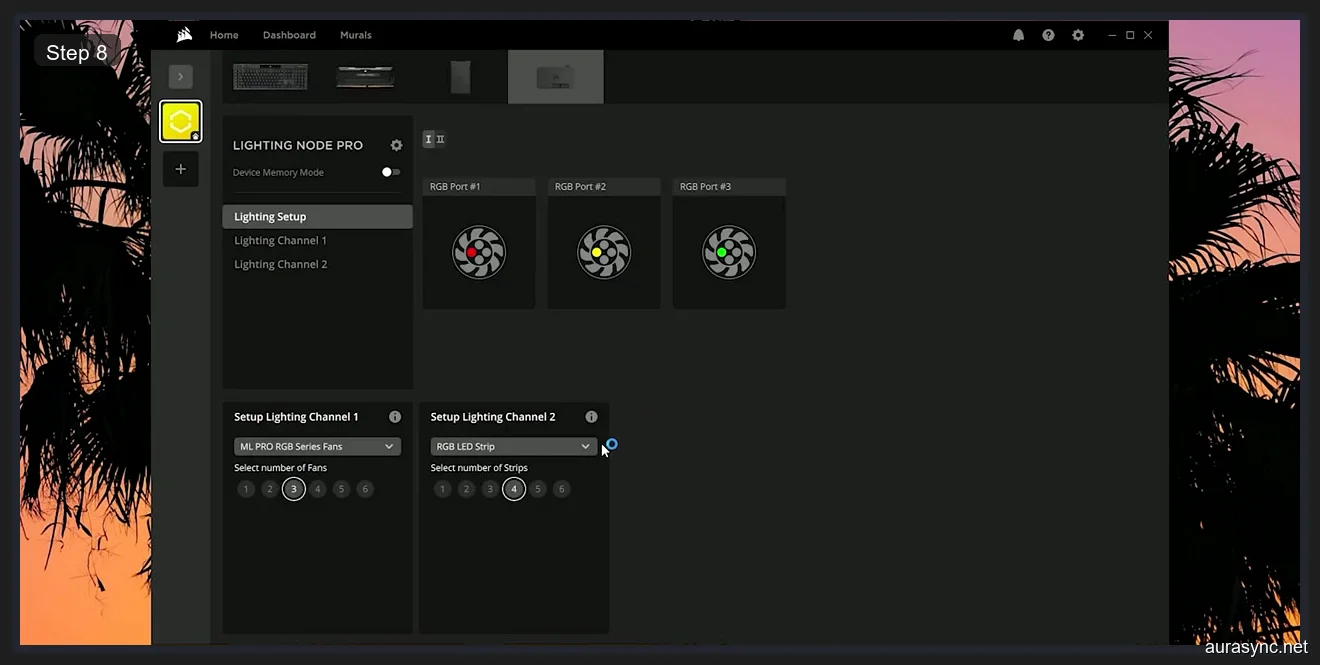
In the screenshot above, you can see the Lighting Node PRO’s three RGB ports after re-detection, with ML PRO RGB Series Fans on Channel 1 and an RGB LED Strip on Channel 2. If your port view looks empty or shows no fans at all, your physical connection is the likely culprit. A properly seated USB header and solid SATA power are prerequisites for everything else in this guide.
Fix 3: Restart the iCUE Service
If your cables are all solid and a full shutdown didn’t help, the next thing to try is restarting the iCUE service itself. iCUE runs a background service that handles all device communication, and sometimes that service gets into a bad state where it stops polling for devices even though it’s technically still running.
The easiest way to do this is from within iCUE itself. Click the gear icon in the top right corner to open Settings, then go to the General tab. You’ll see a button that says “Restart iCUE Service.” Click it and wait about 15 to 20 seconds. iCUE will briefly disconnect from everything, the window might flicker or minimize, and then it should come back with a fresh device scan.
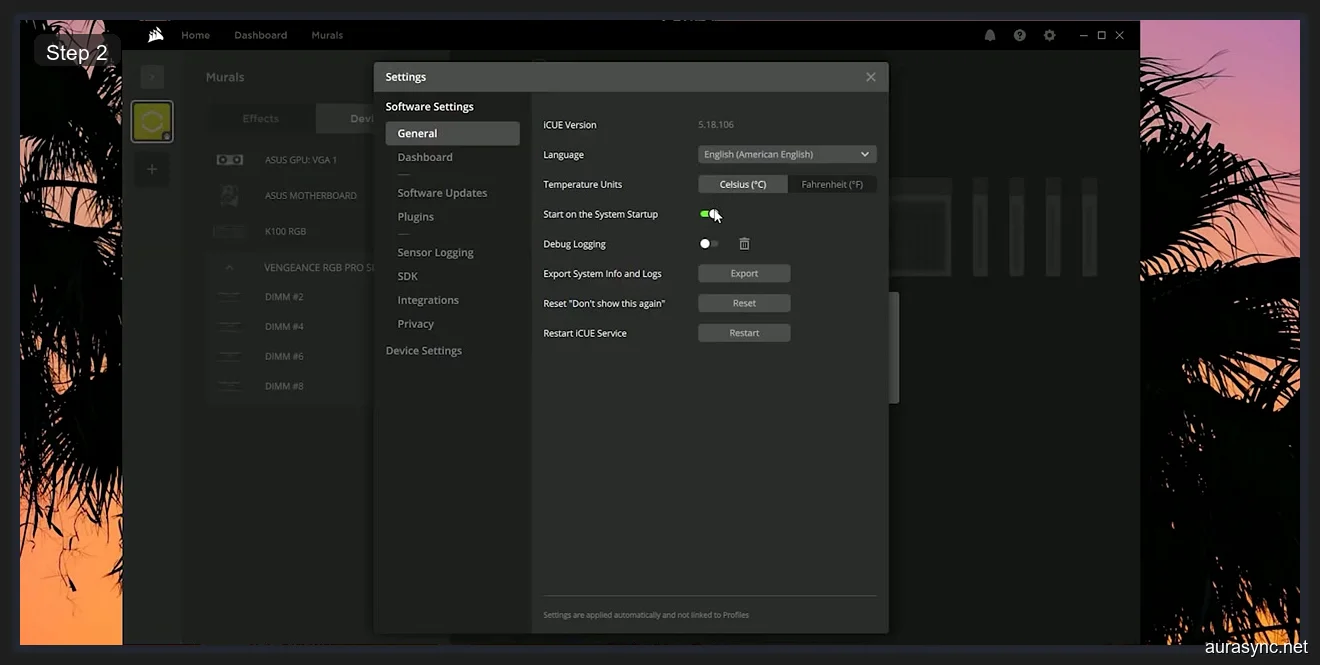
Open Settings by clicking the gear icon in iCUE’s top right. Under General, you’ll see the Restart iCUE Service button shown in the screenshot. I’ve had this fix work on its own about 40% of the time, especially for USB-connected controllers that dropped out during a Windows sleep/wake cycle.
If the in-app button doesn’t work, you can restart the service manually through Windows. Press Win + R, type services.msc, and hit Enter. Scroll down to find “Corsair iCUE Software” in the services list. Right-click it and select Restart. If the service status shows as “Stopped” rather than “Running,” that’s your problem right there. Something crashed the service, and it didn’t auto-restart. Click Start to bring it back up, then open iCUE and check your device panel.
Fix 4: Update All Device Firmware
This is the step that actually surprised me the most. I assumed that if my devices weren’t showing up in iCUE’s main panel, they wouldn’t show up anywhere in the software. I was wrong. Go to Settings and then click on Software Updates. Even when your devices are invisible in the device layout, they sometimes appear in the firmware update list.
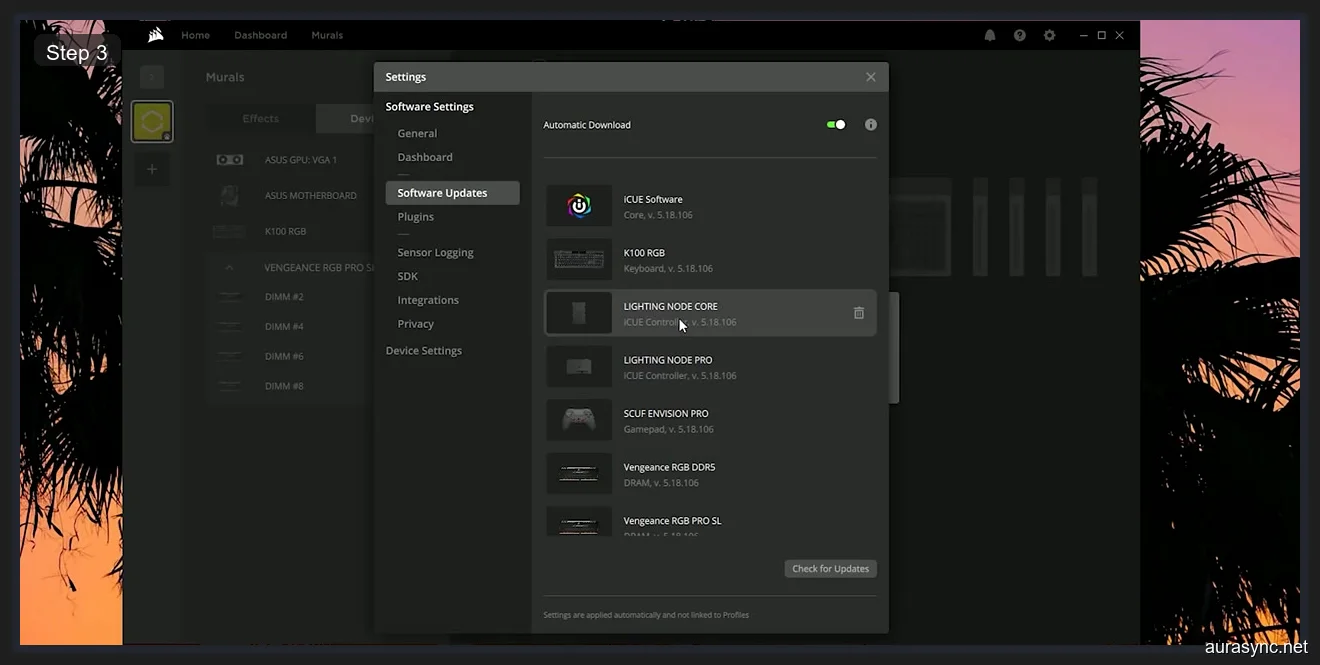
Here’s the interesting part. As you can see in the Software Updates panel, my Vengeance RGB DDR5 and Vengeance RGB PRO SL both show up here even though they were invisible in the device layout. This means iCUE knows they exist at the hardware level but can’t establish the full communication channel needed to control them. It can see the firmware version but can’t send lighting commands.
I updated the firmware on every device that showed up in the update list. This included my RAM sticks, both Lighting Nodes, the K100 keyboard, and even my SCUF Envision Pro controller that I forgot was connected. The firmware update process takes a couple of minutes per device, and iCUE will warn you not to unplug anything during the update. Take that warning seriously because a failed firmware flash can brick your controller.
The reason firmware updates fix detection problems is that iCUE maintains an internal compatibility matrix between its software version and each device’s firmware version. When you update iCUE but your devices are running old firmware, or vice versa, the handshake protocol can fail. iCUE 5.18.106 expects certain firmware responses during device enumeration, and if your Lighting Node PRO is running firmware from two years ago, the communication protocol might have changed enough to cause a mismatch. Updating firmware brings everything back into sync.
Fix 5: Check for SMBus Conflicts (The RAM-Specific Fix)
If your Corsair RAM specifically isn’t showing up in iCUE but your USB controllers are fine, you’re almost certainly dealing with an SMBus conflict. This was the root cause of my RAM detection problem, and it took me longer than I’d like to admit to figure it out.
Let me explain what the SMBus actually is and why it matters. The System Management Bus is a two-wire interface (it’s technically I2C-based) that runs across your motherboard and connects the CPU to various low-level components. One of its primary jobs is reading the SPD (Serial Presence Detect) data from your RAM sticks, which is how your system knows what speed, timings, and capacity your memory has. But the SMBus also carries RGB control signals to and from your RAM. When iCUE wants to change the lighting on your Vengeance RGB PRO, it sends commands over the SMBus to the RGB controller chip on each DIMM.
The problem is that the SMBus can only handle one master at a time. If Armoury Crate’s Aura Sync service is running, it’s constantly polling the SMBus to control whatever RGB devices it manages, and that locks iCUE out. Same thing with OpenRGB, SignalRGB, or any other RGB control software that accesses memory lighting. They all fight over the same bus, and the result is that one or more of them simply can’t see the RAM.
To check for conflicts, open Task Manager and look at the Details tab. Search for these processes: LightingService.exe (this is Armoury Crate’s Aura Sync), AuraService.exe (older ASUS Aura installations), and any instances of OpenRGB.exe. If any of these are running, close them. If LightingService.exe keeps restarting on its own, you’ll need to either disable the Aura Sync module inside Armoury Crate or remove Armoury Crate entirely. I went with removal because Aura Sync was causing more problems than it solved on my build.
There’s also a BIOS-level setting that affects RAM detection. Look for “SPD Write Disable” in your BIOS. On ASUS boards, it’s usually under Advanced or the AI Tweaker section. On MSI boards, check OC Settings. If SPD Write is disabled, it means the BIOS is blocking all write access to the SPD bus, which includes RGB control commands. iCUE needs write access to the SPD bus to control your RAM’s lighting. Make sure SPD Write is set to Allow or Enabled. I’ll cover this in more detail in Fix 9 since it’s critical enough to deserve its own section.
For a deeper explanation of how the SMBus interacts with RGB hardware at the electrical level, check out my ARGB vs RGB guide. The short version is that your motherboard’s RGB headers and SMBus are fundamentally different communication protocols, and software that confuses the two will cause problems.
Fix 6: Repair iCUE (Don’t Start Fresh)
If the service restarts, firmware updates, and SMBus fixes didn’t solve your problem, it’s time to repair your iCUE installation. I want to emphasize the word “repair” here because there’s a big difference between repairing and reinstalling, and choosing the wrong one can cost you hours of work.
Go to the Corsair website and download the latest iCUE installer. As of writing this, the current version is 5.18.106 but check for anything newer. Once the installer downloads, run it. You’ll see a language selection screen first. After picking your language, the installer gives you options for how to proceed. The critical choice here is clicking Repair.
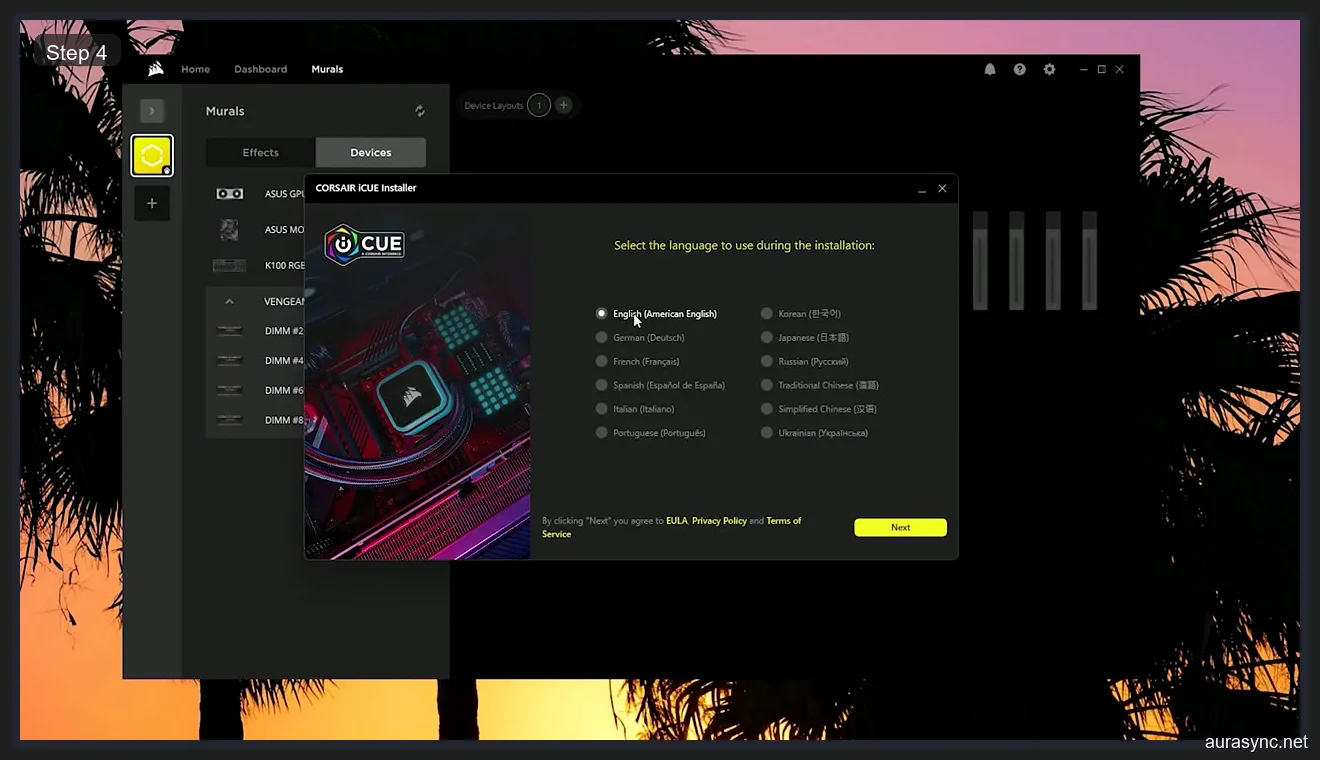
When the installer opens, you’ll see the language selection screen shown below. The critical choice is clicking Repair rather than starting fresh. If you’ve spent hours customizing lighting profiles, creating hardware lighting layers, and setting up macros on your K100, a repair saves all of that work. A fresh install wipes your entire profile database.
What the repair process actually does is interesting. It checksums every iCUE file on your system against the expected versions from the installer package. Any file that’s been corrupted, modified, or deleted gets replaced with a clean copy. It also re-registers the iCUE service with Windows, resets the USB device enumeration database, and rebuilds the plugin cache. But critically, it leaves your user data folder untouched. Your profiles, macros, and hardware lighting configurations all survive the repair.
The repair process takes about three to five minutes. iCUE will close during the repair, and you might see a UAC prompt asking for administrator permissions. After the repair completes, restart your computer (a full shutdown, not a fast restart, using the Shift+Restart trick from Fix 1). When iCUE opens after the reboot, it should re-scan all connected devices. In my case, this is the step that brought back my Lighting Node PRO and Lighting Node CORE. My RAM was still missing at this point because that was an SMBus issue, not a software corruption issue, but all my USB controllers came back.
Fix 7: Re-setup Your Device Configuration
After a repair or reinstall, your devices might reappear in iCUE but with default configurations. This is normal and doesn’t mean the repair failed. What happened is that iCUE rebuilt its device database and assigned default profiles to everything. You’ll need to go back into each device and re-select the correct hardware configuration.
For controllers like the Lighting Node CORE and Lighting Node PRO, this means opening each device in iCUE, going to the Lighting Setup or Lighting Channel tab, and telling iCUE what’s actually connected to each port. If you have six LL120 fans connected to your Lighting Node CORE, you need to select the correct fan type and count for each channel. iCUE can’t auto-detect the exact fan model or LED strip type because there’s no handshake protocol between the controller and the fans. The fans are just dumb LED arrays that receive data and light up accordingly.
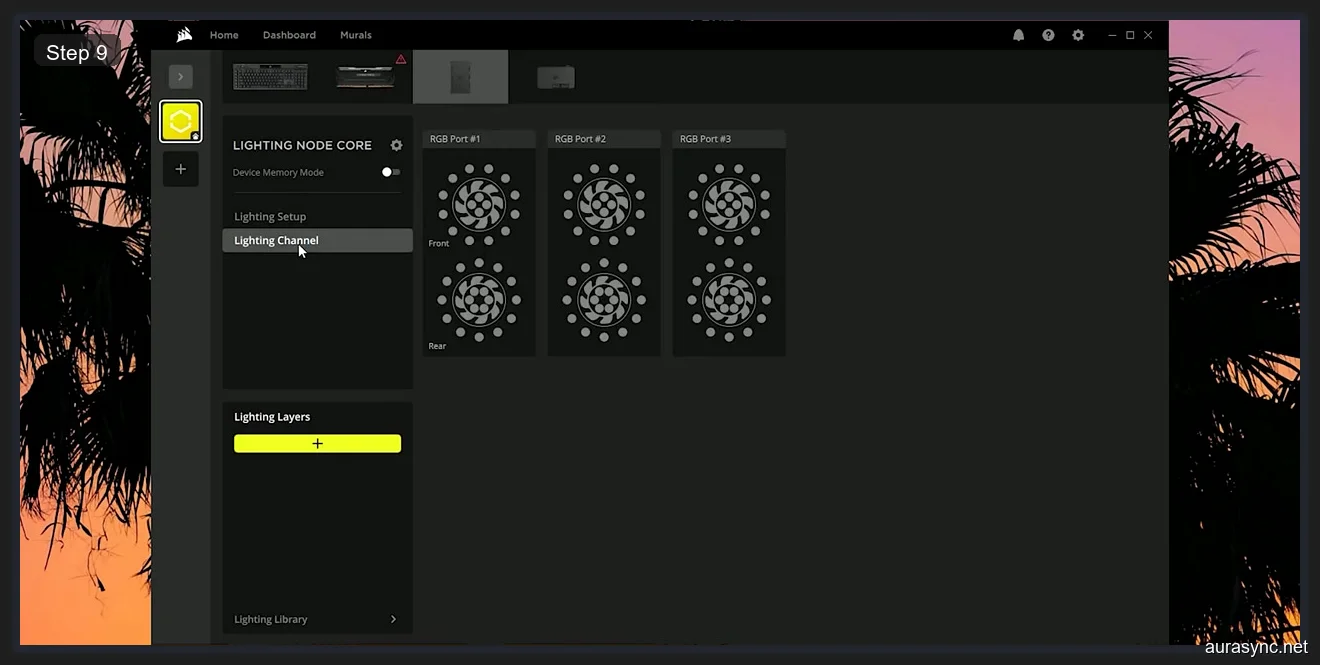
After the repair, my Lighting Node CORE came back but with all fans reset to default. As shown in the screenshot, I had to go back into Lighting Channel and re-select the correct number of fans for each port. I have three QL120 fans on the front intake and three on the rear and top exhaust, so I needed to set up each channel to match my physical layout. If you skip this step, your lighting effects will look wrong because iCUE will try to animate the wrong number of LEDs.
For RAM sticks, you typically don’t need to do any manual configuration once they’re detected. iCUE reads the SPD data and automatically identifies the model, capacity, and LED count. The lighting profiles you had saved to your iCUE library should still be available since the repair preserves user data.
Fix 8: Nuclear Option, Full Reinstall
If the repair didn’t work, it’s time for a full reinstall. I want to be clear: I only recommend this as a last resort because you’ll lose all your custom profiles, macros, and lighting configurations unless you manually export them first.
Before uninstalling, open iCUE and go to Settings. If you can still access the application, export any profiles you care about by going to your Profile Library, right-clicking each profile, and selecting Export. Save these files somewhere safe. You’ll also want to write down your hardware lighting configurations (what fans are on which controller channel) because you’ll need to set those up again from scratch.
Now uninstall iCUE. Go to Windows Settings, then Apps and Features, find Corsair iCUE, and click Uninstall. The uninstaller will ask if you want to keep or delete your settings. If the repair didn’t fix your problem, there might be something corrupted in your settings, so I’d recommend deleting them this time. After the uninstall completes, restart your computer.
Here’s the part most people miss. Don’t download iCUE from the in-app update or from a Google search result. Go directly to corsair.com/downloads and get the latest installer from there. The in-app updater is known to sometimes deliver older builds or partial updates that don’t include the latest device compatibility fixes. A direct download from corsair.com ensures you’re getting the most current version with all device drivers and firmware packages included.
After downloading the fresh installer, run it and select the full installation option. Let it complete, restart your computer one more time, and then open iCUE. Your device panel should start populating within 30 to 60 seconds as iCUE discovers each connected device. You’ll need to redo all your lighting profiles and controller configurations from scratch, but at least your devices should be detected.
Fix 9: Enable SPD Write in BIOS (For RAM Specifically)
I mentioned this briefly in Fix 5, but it deserves its own section because it’s the single most overlooked setting for RAM detection problems. If your Corsair RAM sticks specifically won’t show up in iCUE, and you’ve already eliminated SMBus conflicts, check your BIOS for the SPD Write setting.
SPD Write controls whether software can send write commands over the SMBus to your RAM’s SPD EEPROM. At the hardware level, the SPD chip on each DIMM has a small region that’s writable and used for things like XMP profile storage and, critically, RGB lighting control data. When SPD Write is disabled in your BIOS, the motherboard physically blocks write commands to the SPD bus. iCUE can still read your RAM’s basic information (that’s why it might show up in the firmware update list), but it can’t send the lighting control commands needed to fully detect and manage the device.
To change this setting, reboot your computer and enter BIOS (usually by pressing Delete or F2 during POST). On ASUS boards, navigate to Advanced and then to the AI Tweaker or DRAM Timing section. Look for “SPD Write Disable” and set it to Disabled (which means writes are allowed, the double negative is confusing). On MSI boards, go to OC Settings and look for a similar option. On Gigabyte boards, it’s sometimes under Tweaker or Peripherals. If you can’t find the setting at all, your BIOS might not expose it, in which case it’s likely already enabled by default.
After changing the setting, save your BIOS configuration and reboot. iCUE should detect your RAM within a minute of Windows loading.
When Nothing Works: Alternatives
If you’ve gone through all nine fixes and your devices still aren’t showing up, it might be time to consider alternative software. I know that’s not what you want to hear, but iCUE isn’t the only option for controlling Corsair RGB hardware.
OpenRGB is a free, open-source RGB control tool that supports Corsair RAM, some Corsair peripherals, and most motherboard RGB. It communicates with your RAM over the SMBus just like iCUE does, but it’s lighter weight and doesn’t have the service conflicts that iCUE sometimes creates. The trade-off is that OpenRGB doesn’t support as many Corsair-specific features like hardware lighting layers or iCUE Murals. For a detailed comparison, check out my SignalRGB vs OpenRGB guide.
SignalRGB is another option that has been expanding its Corsair device support. It can control Corsair RGB RAM, keyboards, mice, and some controllers through its own driver layer. It also has the advantage of supporting devices from multiple brands simultaneously, which is something iCUE can only do for Corsair hardware.
One more option worth mentioning: hardware playback. If you save an RGB profile to your device’s onboard memory (supported on most Corsair RAM and many peripherals), the lighting effect runs directly on the device’s hardware without any software. Go to iCUE, create the profile you want, then right-click the profile and select “Save to Device Hardware.” After that, your RGB will run even if iCUE is completely uninstalled. If you’re dealing with persistent RGB software issues similar to Gigabyte’s RGB Fusion problems, hardware playback eliminates the software variable entirely.
The Problem State vs The Fixed State
I want to show you the before and after so you know what success looks like. Compare the first screenshot in this article, where my device panel showed only the ASUS GPU and ASUS motherboard with every Corsair device missing, to the screenshot below. Every Corsair device is now detected and the RGB effects are running again. My Vengeance RGB PRO SL sticks, both Lighting Nodes, my K100 keyboard, everything is back.
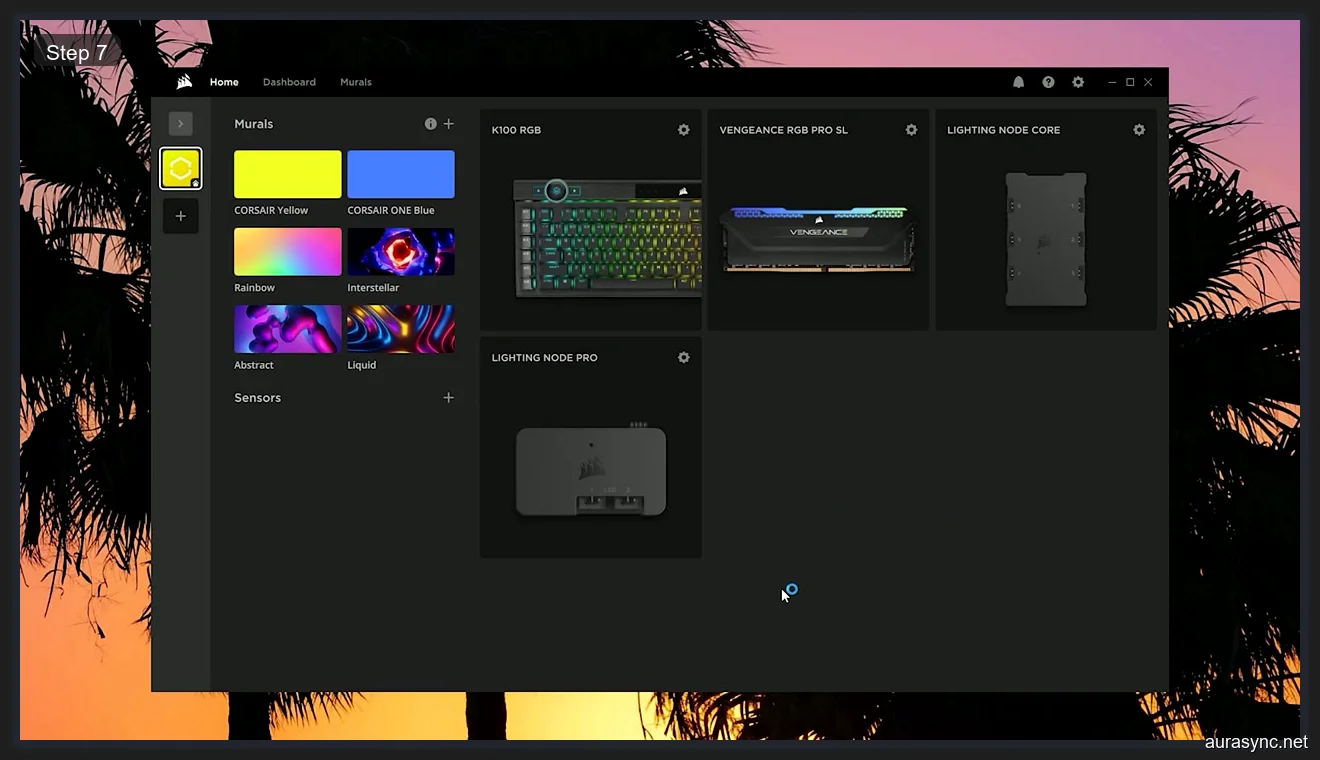
The combination that finally fixed my complete setup was: full shutdown (Fix 1) to clear the USB state, repairing iCUE (Fix 6) to fix the corrupted service, updating all device firmware (Fix 4) to resolve the version mismatch, and then closing Armoury Crate’s LightingService.exe (Fix 5) to free up the SMBus for my RAM. Your specific solution might be different depending on which devices are missing and what caused them to disappear, but working through these fixes in order will cover every common scenario.
FAQ
Why does iCUE stop detecting my RAM after a Windows update?
Windows cumulative updates sometimes reset USB driver configurations and re-register SMBus drivers. When the SMBus driver gets reset, any software that was using it (like iCUE) loses its connection to RAM RGB controllers. The update can also restart background services like Armoury Crate’s LightingService.exe, which then grabs the SMBus before iCUE can reconnect. The fix is to close competing RGB software after the update, restart the iCUE service, and if needed, do a full shutdown to reinitialize the SMBus controller.
Can I run iCUE and Armoury Crate at the same time?
You can, but with limitations. iCUE and Armoury Crate can coexist for controlling different device types. For example, iCUE for Corsair peripherals and Armoury Crate for motherboard and GPU lighting. The conflict happens specifically on the SMBus when both try to control RAM RGB. If you want to use iCUE for your Corsair RAM, you should disable Aura Sync’s RAM control within Armoury Crate, or disable the LightingService.exe entirely. Alternatively, removing Armoury Crate eliminates the conflict completely.
Is it safe to update firmware through iCUE?
Yes, firmware updates through iCUE are generally safe. Corsair signs their firmware packages and iCUE validates the signature before flashing. The main risk is interrupting the update process. Don’t unplug the device, don’t close iCUE, and don’t shut down your computer while a firmware update is in progress. A partially flashed controller can become unresponsive and may need to be RMA’d. I’ve updated firmware on dozens of Corsair devices through iCUE and never had a failure, but I always make sure my PC is on a stable power source and I don’t touch anything until the progress bar completes.
Why does my Lighting Node Pro keep disappearing from iCUE?
The Lighting Node PRO connects via an internal USB 2.0 header, and these connections are inherently less stable than external USB ports. The most common cause of intermittent disconnection is a loose USB header cable or an overloaded USB splitter. If your Lighting Node PRO is connected through the 2-in-1 splitter that Corsair includes, try connecting it directly to a motherboard USB header instead. Also check that the SATA power cable is firmly seated on both ends. If the Lighting Node PRO only disappears after your PC wakes from sleep, it’s a USB power management issue. Go to Device Manager, find each USB Root Hub, open Properties, go to the Power Management tab, and uncheck “Allow the computer to turn off this device to save power.”
Does iCUE work with non-Corsair RAM?
No. iCUE only controls Corsair memory modules. It uses a proprietary protocol over the SMBus that’s specific to Corsair’s RGB controller chips. If you have RAM from G.Skill, Kingston, TeamGroup, or any other brand, you’ll need their respective software or a universal tool like OpenRGB. Some non-Corsair RAM with standard SMBus RGB controllers can be controlled by OpenRGB, but iCUE will simply ignore them.
How do I save RGB profiles to device memory so they work without iCUE?
Open iCUE and go to the device you want to configure. Create your desired lighting effect in the Lighting Layers tab. Once you’re happy with the effect, go to Hardware Lighting in the device settings. Drag your lighting layer into one of the hardware lighting slots. The number of slots varies by device: most Corsair RAM sticks support two hardware profiles, while controllers like the Commander CORE support one per channel. After saving to hardware, the lighting effect runs on the device’s onboard processor and persists even if iCUE is closed, uninstalled, or if the PC is in BIOS. Hardware profiles are more limited than software profiles (you can’t use as many layers or complex effects), but they guarantee your RGB works regardless of software issues.
Related Guides
- Corsair iCUE 5 setup guide — the from-zero walkthrough once detection works.
- iCUE high CPU usage fixes — the sibling iCUE pain.
- OpenRGB cross-vendor alternative — if iCUE keeps refusing to see hardware.
- RGB sync troubleshooting playbook — the cross-vendor categorisation of detection failures.