I had every fan in my case strobing in time with the kick drum on a Bonobo track at 1am, and my partner walked into the room, looked at it for about four seconds, and said “okay that’s actually sick.” That basically never happens with RGB stuff. Usually I get the standard “are you twelve” sigh.
This is the SignalRGB audio visualizer system. Specifically the overhauled version that dropped recently, where every visualizer effect now exposes a bunch of separate “elements” you can map your physical devices onto. So instead of every fan and strip just doing the same generic music-reactive pulse, you can have your fans pulsing to bass density, your RAM bars shifting with frequency, your case strip sliding with the volume bar, and your single-zone peripherals slamming on every kick. It feels less like RGB and more like watching the song actually exist in your room.
Quick context before I get into it: I’m assuming you’ve already got SignalRGB installed and your devices configured. If you haven’t, I wrote the cross-brand setup walkthrough already (how to sync RGB across ASUS, Corsair, Razer and more) and that’s the prerequisite for any of this to look right. Audio visualizers are basically the payoff for sitting through the device-mapping work in that guide.
What changed in the audio visualizer overhaul
Old visualizer behavior: pick an effect, every device pulses to the same signal. It looked fine. Kind of generic disco. Every controller doing the same thing at once.
New behavior: every visualizer effect (so far Ripple Visualizer, Ray Visualizer, and the new Eye of Sauron) has a layout grid with named slots called elements. Each element responds to a different chunk of the audio signal, and you drag your devices onto the slot you want them reacting to. Suddenly the same song is showing different things on different parts of your build at the same time.
The transcript from the official overhaul announcement breaks the elements down like this, and I’ll add my own notes from actually living with it for the past couple weeks.
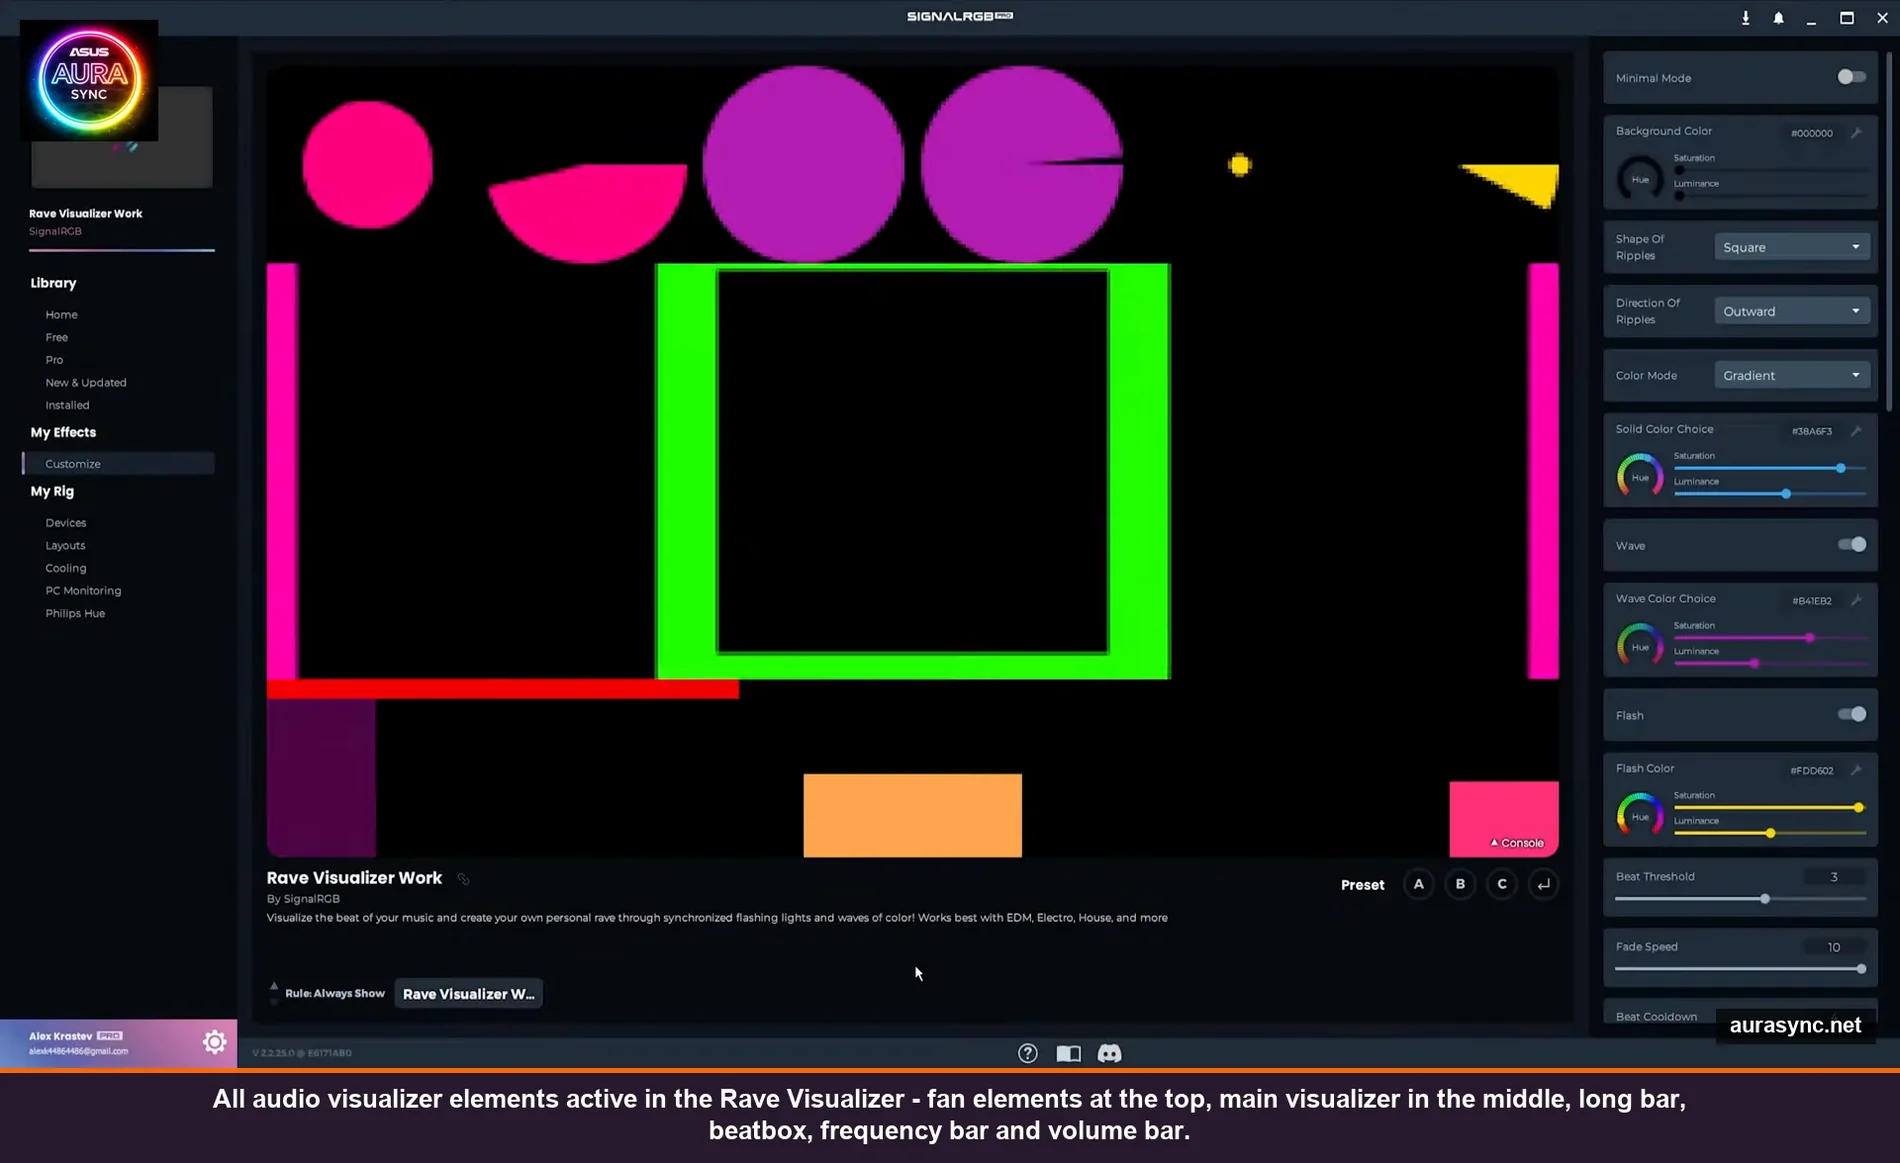
The main visualizer effect
This is the centerpiece. Whatever effect you’ve picked (Ripple, Ray, etc.) plays in the middle slot, and you can full-screen it with a toggle if you want it to take over the whole layout. I keep it as the main slot and put my keyboard there because the keyboard has the most LEDs and it’s the most “screen-like” device I own. It actually looks like a tiny visualizer screen sitting on my desk.
The six fan elements (top row)
Six slots designed for RGB fans, but obviously you can put anything there. They’re split into pairs:
- Two volume fans – react to overall loudness
- Two frequency fans – react to frequency content (bass vs treble shifts)
- Two density fans – react to how busy the audio is (think kick drum + hi-hat density vs a sparse vocal)
The density pair is the one that surprised me. I thought it’d be the boring one. It’s actually the most musical because density tracks the “energy” of a song way better than pure volume does. Quiet jazz with lots of detail can light it up. A loud sustained pad does basically nothing.
The long bar element
One wide horizontal slot. Made for RGB strips – case strips, monitor strips, whatever’s long and thin in your build. Mine has the strip on the front of my Lian Li case sitting here and it looks completely natural, like the strip was designed for this layout.
The beatbox element
Bottom-left corner. This one pulses on the beat, hard. It’s the workhorse for single-zone or low-LED-count devices – mouse, mousepad logo, GPU plate, motherboard chipset cover, anything with one or two zones that can’t really do “fancy.” The beatbox just blinks in time with kicks and snares, and on those low-zone devices it looks intentional instead of cheap.
The frequency bar and volume bar elements
These are the two horizontal bar visualizers most people picture when they think “audio visualizer.” Frequency bar shows you the spectrum (bass on the left, treble on the right, ish), volume bar swells with overall amplitude. I’ve got my GPU shroud over the frequency bar slot and the speakers over the volume bar slot. It just makes sense visually.
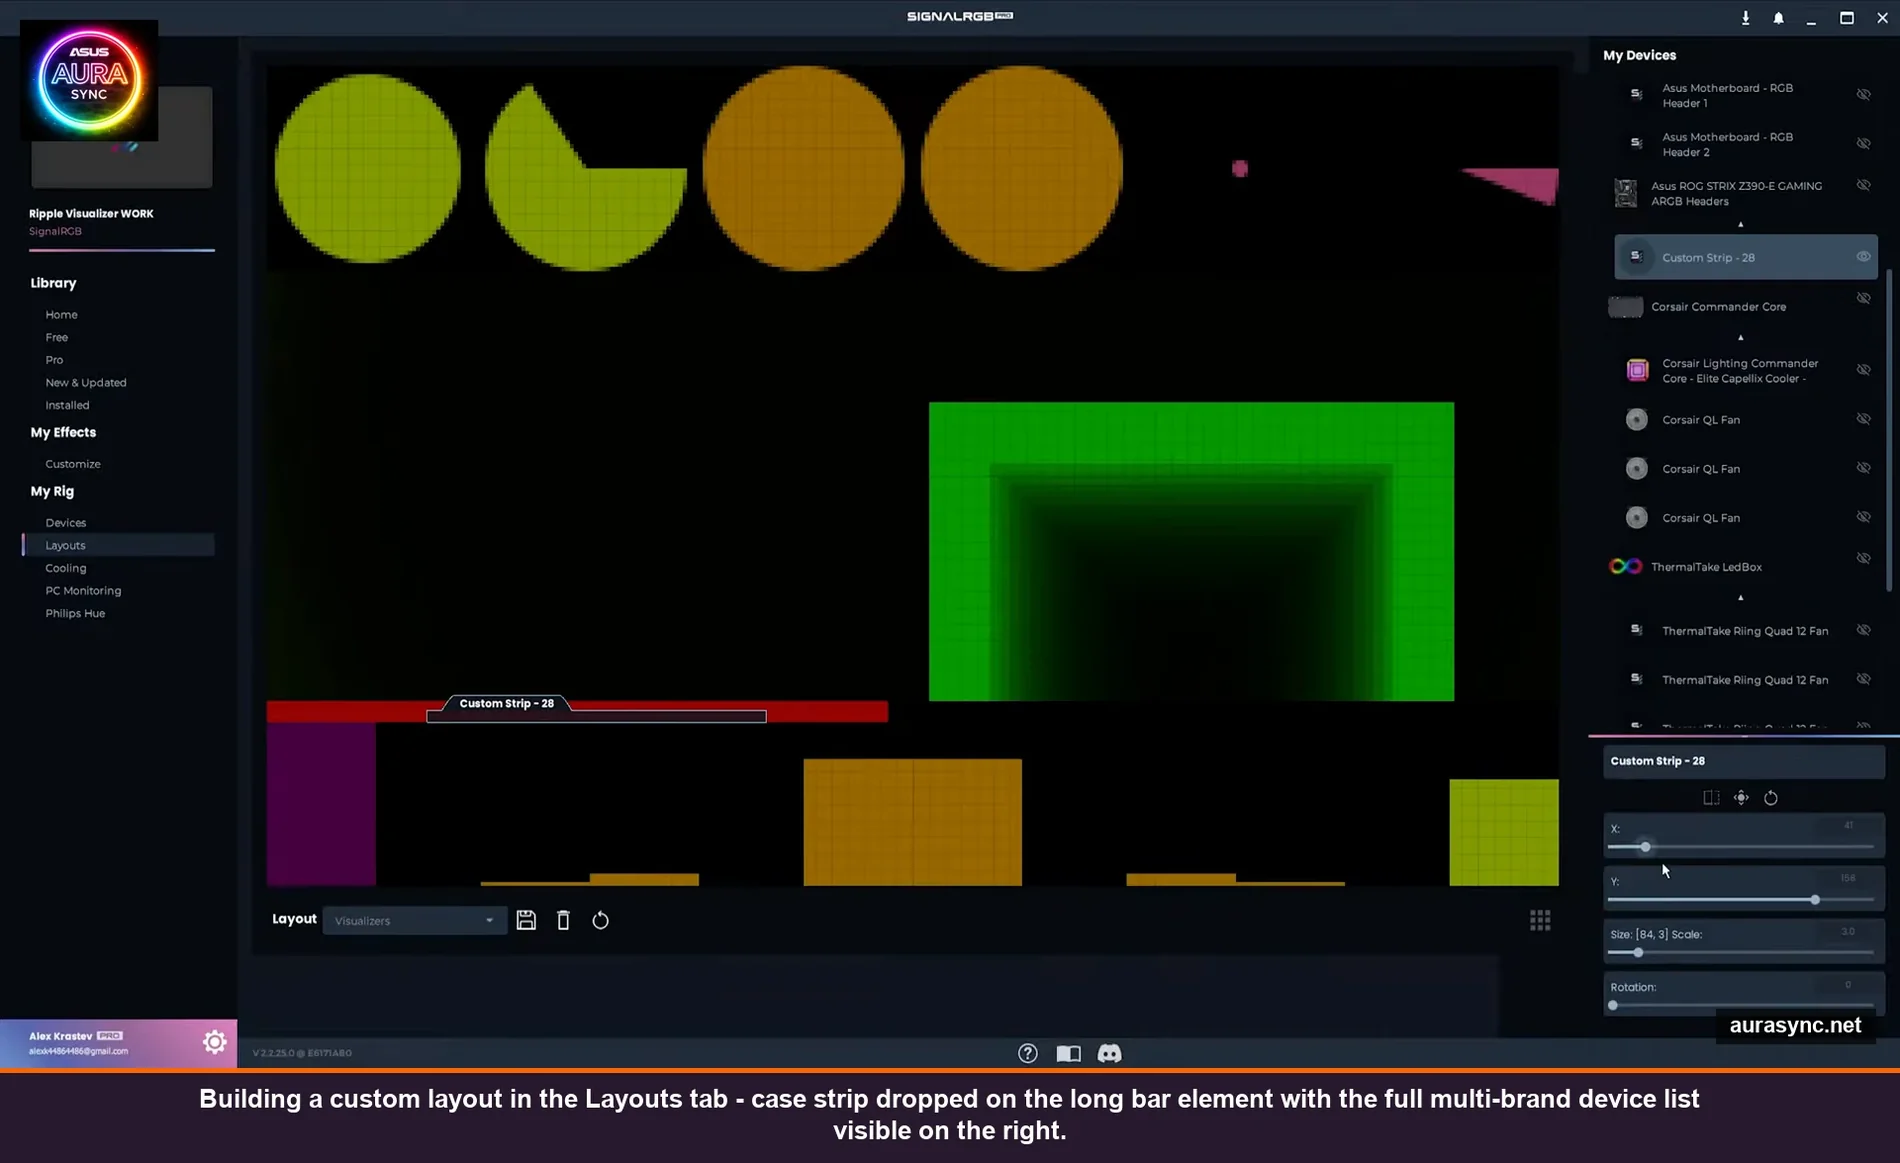
Building a layout, step by step
Open the Layouts tab with one of the supported visualizer effects loaded. Right now that’s Ripple Visualizer, Ray Visualizer, or Eye of Sauron. I’ll use Ripple for this because it looks the cleanest and Eye of Sauron is honestly a bit much for everyday listening (gorgeous for a one-off demo though).
You’ll see the element grid sitting in the middle – the main slot, the six fan slots up top, the long bar, the beatbox, the frequency bar, the volume bar. Your devices are listed on the right panel.
Step 1: Drop your screen-like device on the main slot
For me that’s the keyboard. If you don’t have a keyboard in SignalRGB, the next-best thing is whatever device has the highest LED density – a dense fan grid, a 60-LED strip, anything that can render a “video-like” effect. I tried putting my mousepad here once and it just looked muddy. Density of LEDs matters for the main slot.
Step 2: Volume-react devices on the volume slots
I put my RAM bars here. RAM is the perfect “volume meter” device because it’s already shaped like a vertical bar. When the volume swells, the RAM swells. It’s stupid how satisfying that is.
If you don’t have RGB RAM, the speakers usually work great here too. Anything that visually represents “loudness” in your head will feel correct on the volume slots.
Step 3: Long strips on the long bar
Case strip, monitor strip, anything horizontal and skinny. I also have my Lian Li UNI fans set up as a custom strip (you can group multiple fans into one virtual strip in SignalRGB) and dropped that on the long bar element too. The fans feel like they’re part of the strip when you do this. 📝 Note: set the fans to “act as a custom strip” in the device config first, otherwise they’ll get treated as individual fans and you can’t drop them as a group.
Step 4: The rest of your fans on the frequency or density slots
Personal preference here. Frequency makes the fans feel “musical” – they shift and morph with what’s happening melodically. Density makes them feel “rhythmic” – more pulse, less morph. I split mine: top row of intake fans on density, exhaust fans on frequency. There’s no rule. Try it both ways for a song you know well.
Step 5: Single-zone stuff on the beatbox
GPU backplate, motherboard chipset cover, mousepad logo, headset stand, anything with one or two LEDs. They all go on the beatbox and they all blink together with the kick drum. It looks deliberate. Without this slot you’d just have those devices either staying static or doing some weird color cycle that has nothing to do with the music.
Step 6: Save the layout
Save As in the bottom right, give it a name, done. You can save multiple layouts and switch between them. I have one called “music” and another called “movies” because for movies I shift everything to a much more subtle setup with way less reactivity (otherwise it’s distracting during dialogue).
The customization layer most people skip
Once your layout is built, you can dig into the Customize panel for the visualizer effect itself. This is where the polish actually happens. The defaults are fine but they’re defaults – they’re tuned to look okay across every possible song. Yours probably has a specific vibe.
Things worth tweaking:
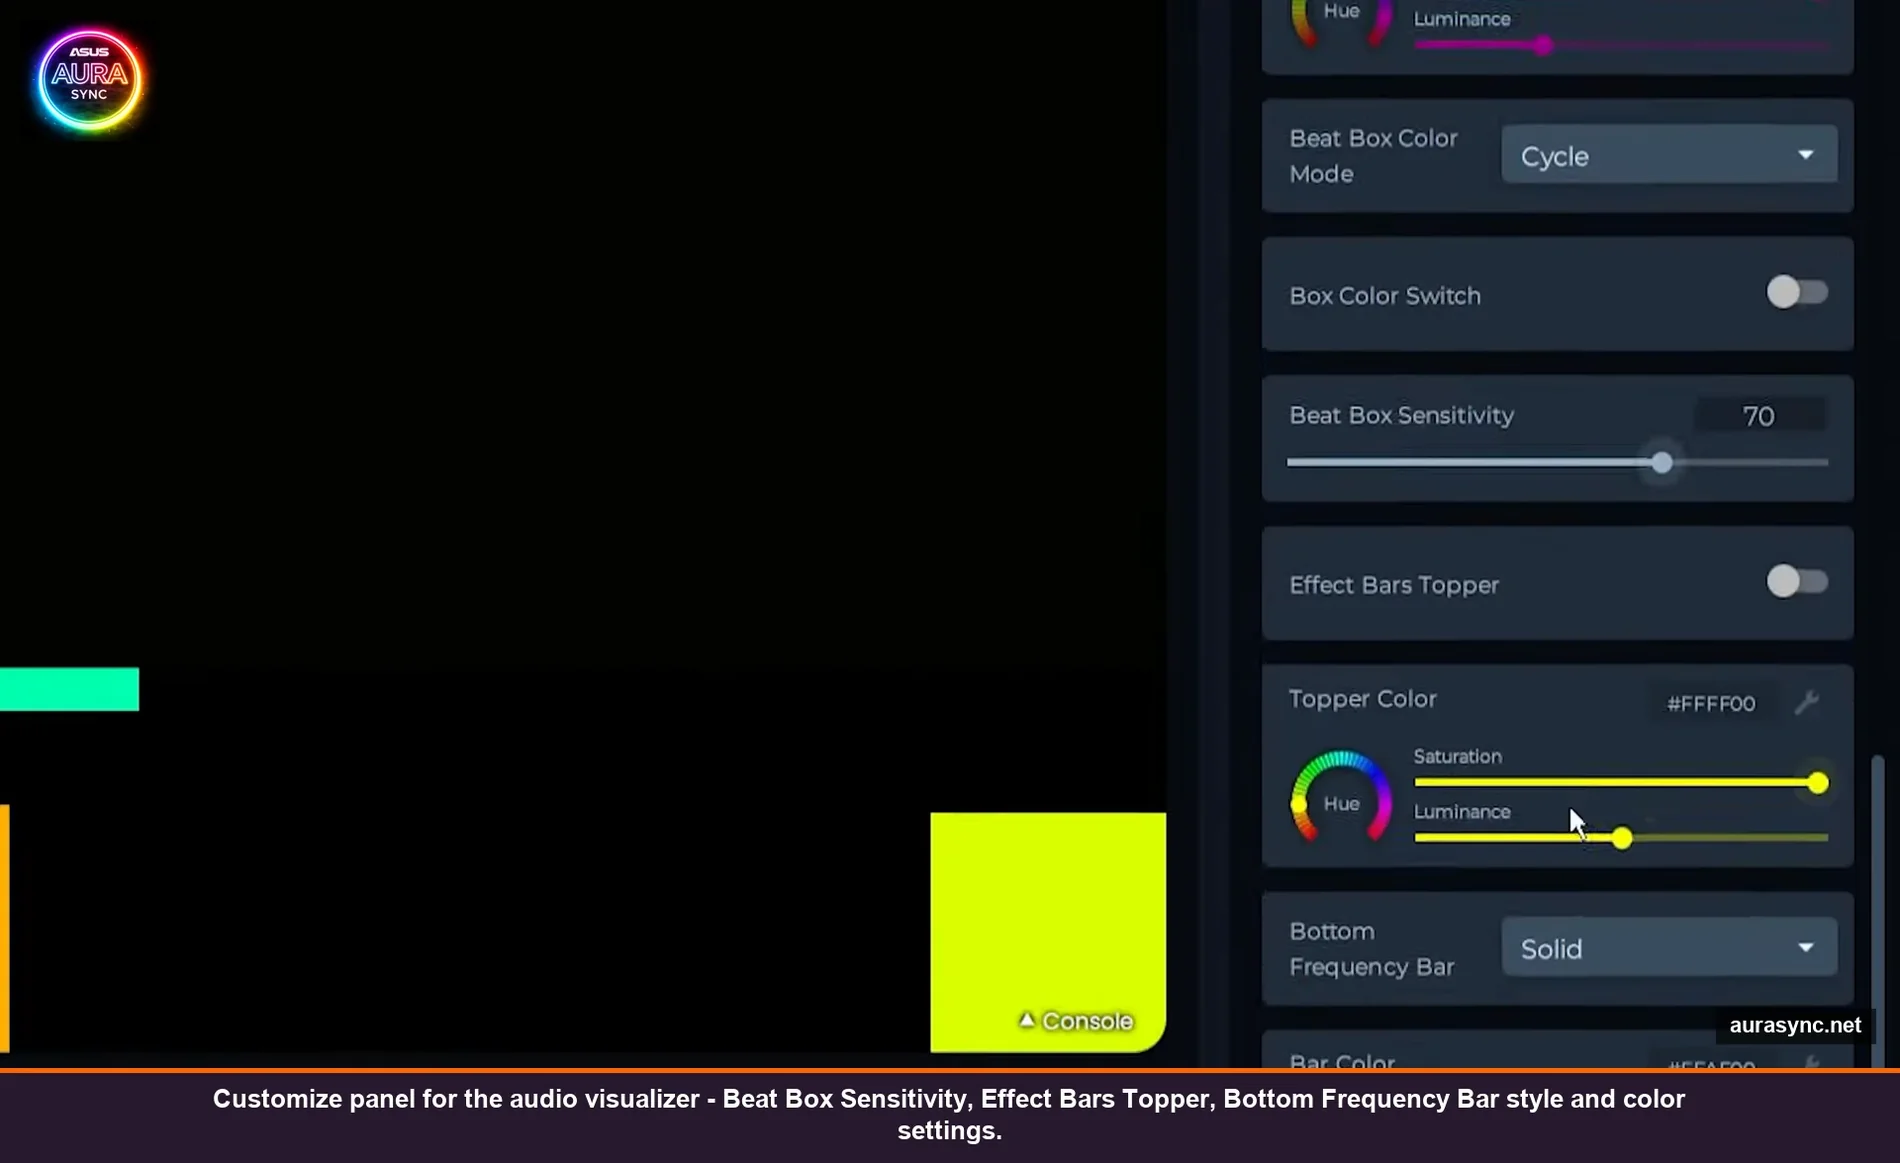
- Beat Box Sensitivity – default sits around 70. If you mostly listen to electronic with strong kicks, drop it to 50-60 so it doesn’t flash on every transient. If you listen to acoustic stuff, push it up to 80+ so you actually get hits.
- Beat Box Color Mode – Cycle, Solid, Audio. Cycle is the default and it shifts color over time. I keep mine on Solid white because the beatbox is the most aggressive visual element and a constant color makes it less seizure-y.
- Bottom Frequency Bar – has its own bar style (Solid, Gradient, etc.) and color. The gradient option makes it feel more like a real spectrum analyzer. Worth turning on.
- Effect Bars Topper – adds a little colored line at the top of each bar that hangs in place and slowly drops, like a real volume meter. Off by default. I always turn it on. It’s the single biggest “this looks expensive” toggle in the whole app.
- Color cycle vs solid for everything else – I default the whole layout to color cycle because it makes the build feel alive even between tracks, but for specific moods I’ll lock it to a solid color. Putting everything on solid red while listening to Burial at 1am is a vibe.
You can also save the customized effect as a preset under any name you want, so once you’ve dialed it in for your taste you don’t have to rebuild it every time you want a different vibe. I have presets called “loud”, “chill”, “movie”, and one embarrassingly named “rave” that I never actually use.
The simple layout, for people who just want it to work
Everything I just described is the maximum-customization version. You don’t have to do all that.
The simplest setup that still looks great: drop your keyboard on the main slot, put literally everything else on the beatbox element. That’s it. Now your keyboard is doing the full visualizer effect and every other device is pulsing to the kick. Two minutes of work, and it looks 90% as good as the full layout for like 10% of the effort.
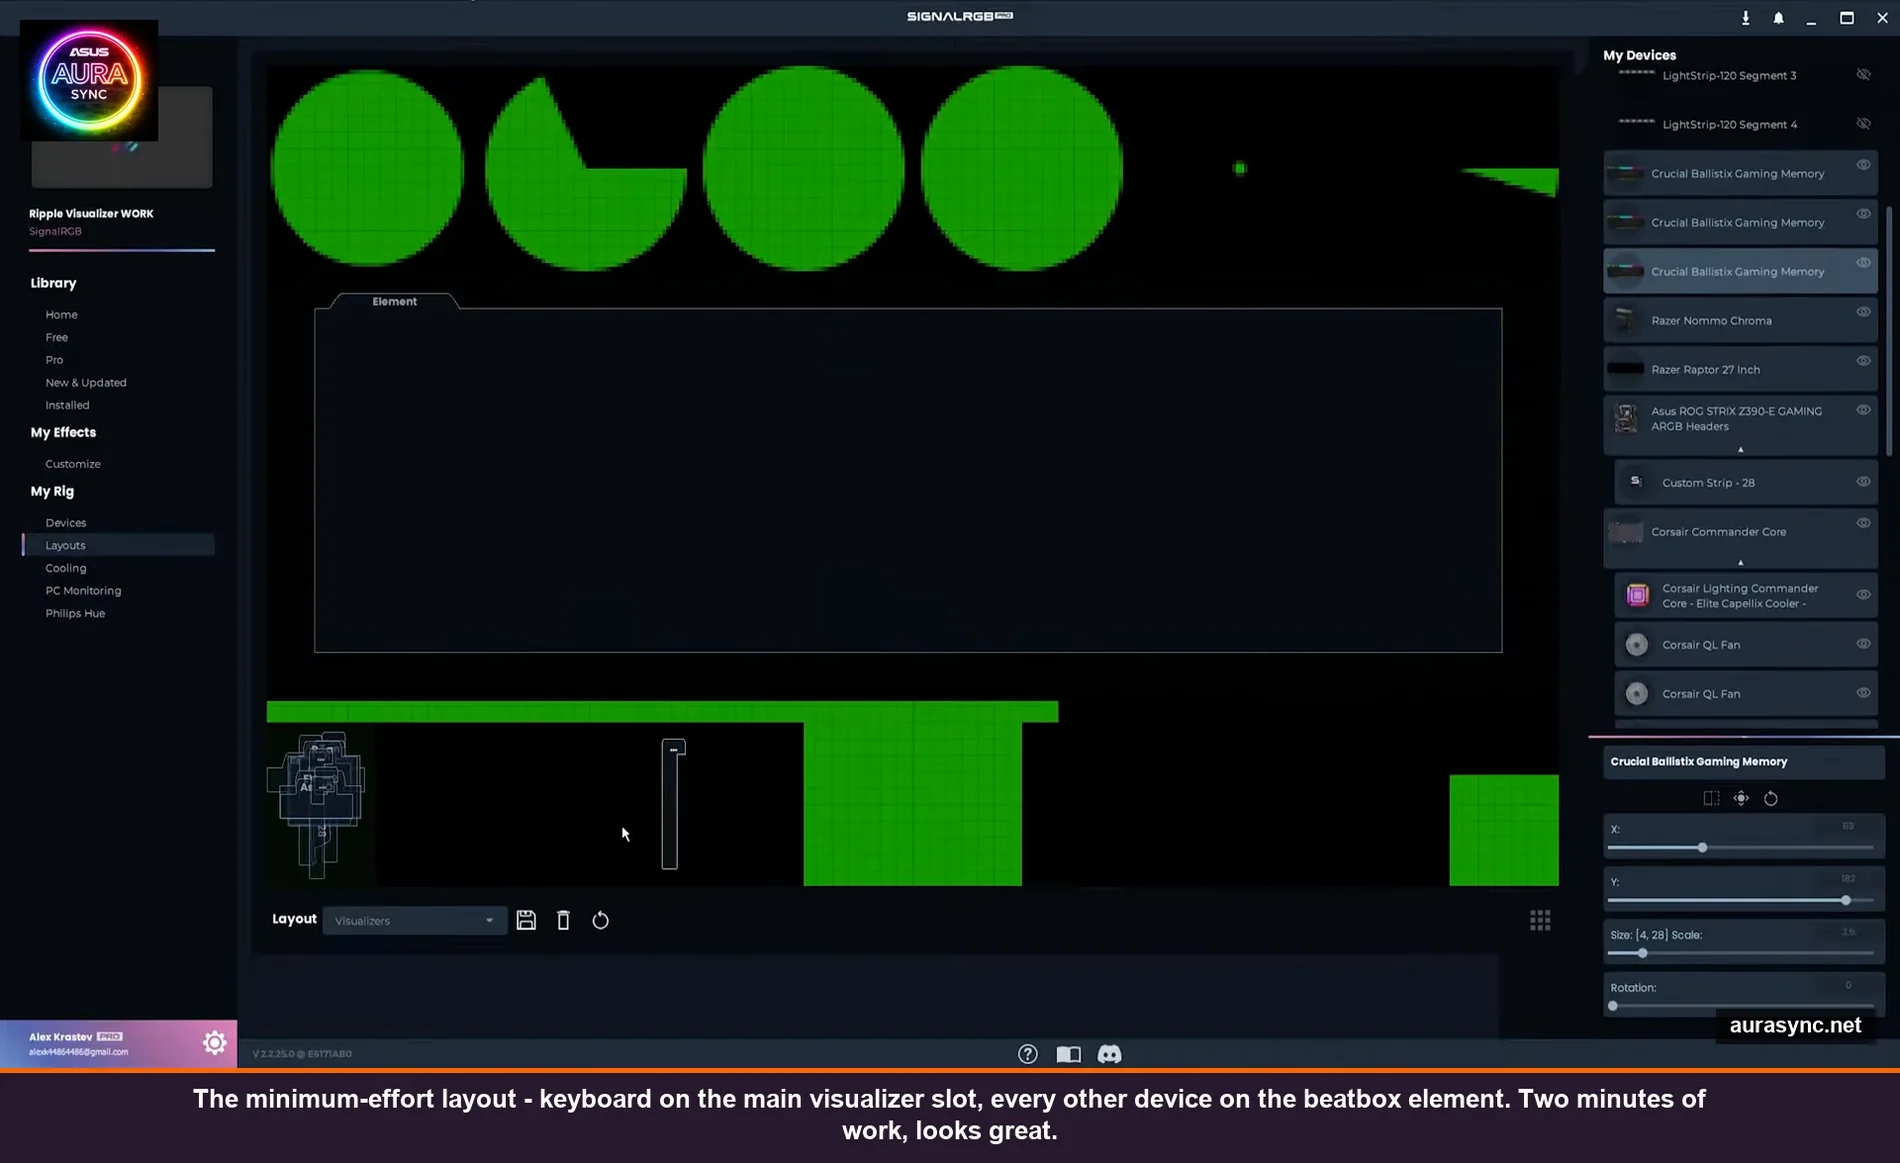
I’d actually recommend starting with this simple version, listening to a few songs, and then incrementally moving devices off the beatbox onto more specific elements as you start wishing for more variety. That’s how I ended up with my current layout. I didn’t sit down and plan it. I just kept tweaking it whenever a song made me think “this part should be doing something different.”
Which visualizer effect to actually use
As of right now, only three effects support the new element layout system: Ripple Visualizer, Ray Visualizer, and Eye of Sauron Visualizer. The team has said they’re rolling it out to all the others gradually, so if you’re reading this in a few months there’ll probably be more.
My honest ranking after living with all three:
- Ripple Visualizer – the most musical. Looks great with melodic stuff, electronic, hip hop, anything with a clear groove. This is my daily driver.
- Ray Visualizer – more intense, more spiky. Better for genres with sharp transients (drum & bass, harder electronic, metal). Can feel exhausting for casual listening.
- Eye of Sauron – looks incredible for about ten minutes and then I always switch off it. It’s the kind of effect you show your friends, not the kind you have running while you’re doing your taxes.
If you’ve never tried any of them, start with Ripple. If you find yourself wishing it was more aggressive, try Ray. If you want to just stare at your PC for ten minutes, Eye of Sauron.
Two gotchas that wasted an hour each
First one: your audio source matters more than you’d think. SignalRGB picks up whatever your default playback device is outputting. If you have music going through your speakers but you’re also wearing headphones plugged into a separate DAC, you might be looking at audio coming from your system mixer rather than what you’re actually listening to. The fix is to make sure the device you’re listening on is set as the default Windows playback device. There’s no in-app way to pick a specific source as far as I’ve found.
⚠️ Heads up: exclusive-mode audio apps (some DAW setups, ASIO drivers, certain music players in WASAPI exclusive) will completely cut SignalRGB off from the audio stream. If your visualizer suddenly goes flat while you’re playing music, that’s almost certainly what happened. Switch the player back to shared mode.
Second one: some devices just have too few LEDs to do meaningful audio reactivity. I tried putting my mouse (which has like 3 zones) on the frequency bar element and it looked completely random. Three pixels can’t represent a frequency spectrum. Move stuff like that to the beatbox element where it just needs to blink, and put your high-LED-count devices on the elements that actually need detail. Match the resolution of the device to the resolution of the visual.
Does this need SignalRGB Pro?
The base audio visualizer effects (including Ripple and Ray) are free. The element layout system is free. Eye of Sauron at the moment is also free in the new/updated section. Some of the more elaborate audio-reactive presets are Pro-only, but you can build a really impressive layout without paying anything.
I covered the actual free vs pro breakdown in this comparison if you want to figure out whether the upgrade is worth it for your use case. Short version: if you only care about audio visualizers, the free tier is fine. If you want the full effect library and the best presets, Pro pays for itself in like the second week.
FAQ
Why isn’t my visualizer reacting to YouTube/Spotify/anything?
Check your default Windows playback device. SignalRGB grabs from whatever’s set as default. If you switched headphones recently, it might be listening to a device that has no audio playing on it.
Can I have different visualizer layouts for different effects?
Yes. In the Customize panel for any effect there’s a “preferred layout” option. So you can save a “loud” layout for Ray Visualizer and a “subtle” layout for Ripple Visualizer, and SignalRGB will auto-switch when you change effects.
Does it work with Bluetooth audio?
It works with anything that’s the system default playback device, including Bluetooth. There’s some lag with Bluetooth though (the audio reaches your headphones with a delay, but SignalRGB sees it instantly), so if you’re listening on Bluetooth headphones the lights will be slightly ahead of the music. Wired or built-in speakers are tighter.
Will the audio visualizer eat my CPU?
Not really. SignalRGB itself is reasonably lightweight, and the audio analysis is a tiny percentage on any modern CPU. Where it can get heavy is if you have a ton of devices with high LED counts all updating at once, but that’s an LED count problem, not an audio problem.
What about non-music audio – games, movies?
Works the same way. Game gunshots will hit the beatbox. Explosions will swell the volume elements. It’s actually amazing in horror games for that reason – your room dims with the ambient soundtrack and then the lights fire on every jumpscare. I do not recommend this if you live with anyone.
Final thoughts
The audio visualizer overhaul is the first time RGB on my PC has felt less like decoration and more like an actual interface for the music. Once you spend ten minutes building a layout that maps to your specific build, you don’t really go back. Generic music-reactive RGB feels like a screensaver after this.
If you haven’t done the cross-brand device setup yet, do that first (walkthrough here) because the audio visualizer system depends on SignalRGB knowing what every device is and where it lives in your build. Without that, even the perfect layout will look randomly assigned. With it, this whole thing finally clicks.
Have fun. And maybe close the blinds first if your build faces a window.
Related Guides
- SignalRGB setup guide — the install-side companion.
- SignalRGB Free vs Pro — audio visualizers and the Pro tier.
- How to sync RGB across vendors with SignalRGB — the cross-vendor audio flow.
- OpenRGB Effects Plugin audio reactive — the open-source equivalent.