I spent two years using exactly one feature of Corsair iCUE: the rainbow wave effect on my keyboard. Everything else in the app existed as unexplored tabs I’d never clicked. Then I got a Commander CORE XT and six LL120 fans, and suddenly I had to actually learn the software. There’s genuinely a lot going on under the hood.
This guide covers iCUE 5 as it stands in 2026. I’m running it on a build with a Corsair K100 RGB keyboard, a Commander CORE XT managing six fans, and Vengeance RGB PRO SL RAM. Whether you’re figuring out Lighting Layers for the first time, trying to understand how profiles and the library system work, or wondering what the REMAP section actually does, I’ll walk through all of it with what’s actually visible in the interface.
If iCUE isn’t detecting your devices at all, that’s a separate problem covered in our iCUE not detecting devices guide. If it’s spiking your CPU, see the iCUE high CPU usage fix. This guide assumes the app is open and your hardware is showing up correctly.
What iCUE Is Actually Running in the Background
Before getting into the interface, it’s worth knowing what iCUE actually runs on your system. If you open Task Manager and expand the Corsair.Service process, you’ll see three child processes.
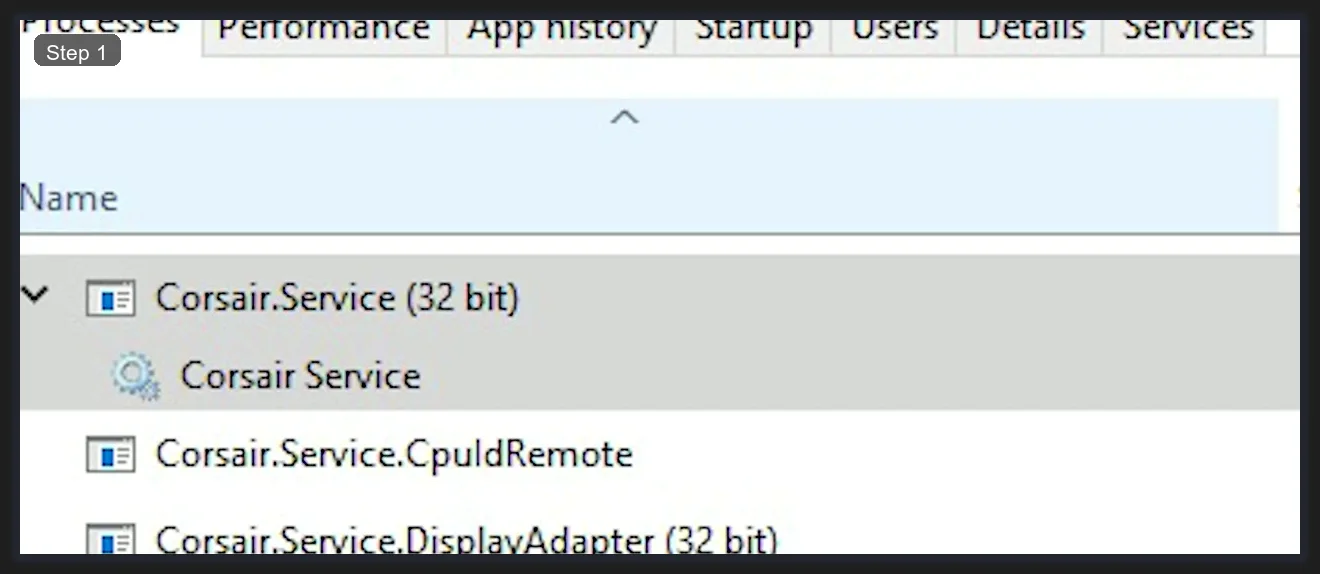
Those three are: Corsair Service (the main controller that talks to your hardware), Corsair.Service.CpuIdRemote (handles CPU/motherboard hardware monitoring like temperatures and fan RPM), and Corsair.Service.DisplayAdapter (the bridge to your GPU for temperature data and screen ambient lighting). All three run even when the iCUE window is closed, because profiles and lighting need to stay active in the background.
This is why iCUE shows up in startup programs and why it uses RAM even when you’re not actively using it. I’ve seen people kill these processes trying to reduce startup load, which works until you notice your lighting resets to default. If you genuinely don’t want iCUE running on startup, you can disable it via Task Manager’s Startup tab, but your hardware will run factory defaults until you reopen it manually.
The Profile System: How It All Fits Together
Profiles are the top-level container for everything in iCUE. Each profile stores lighting effects, key assignments, actions, and performance settings for all your connected devices together. When you switch profiles, everything changes at once across all your Corsair hardware simultaneously.
I name my profiles after games or use cases rather than generic names. You can see this pattern in the screenshots: profiles named Cyberpunk2077, Modern Warefare (their spelling, not mine), Eldenring, Avatar, GeforcePower, Default Profile. The active profile shows in the top-left dropdown across the entire app. Switching between them is a single click on the dropdown and selecting a different name.
The Automatic profile switching feature is the one most people don’t set up but should. In Settings, under the General tab, there’s a section for linking profiles to application executables. Add your game’s .exe file and point it at a profile, and iCUE automatically activates that profile when the game launches and reverts when you close it. I’ve got Cyberpunk2077 linked to a profile with purple/cyan Color Shift, and the keyboard lighting changes the moment the game starts.
Lighting Effects: Layers, Types, and Zones
Click any device in the top device bar to open its settings. For the K100 RGB keyboard, the Lighting Effects tab is the one you’ll spend most time in. The layout has three panels across the bottom of the screen and a live keyboard preview above.
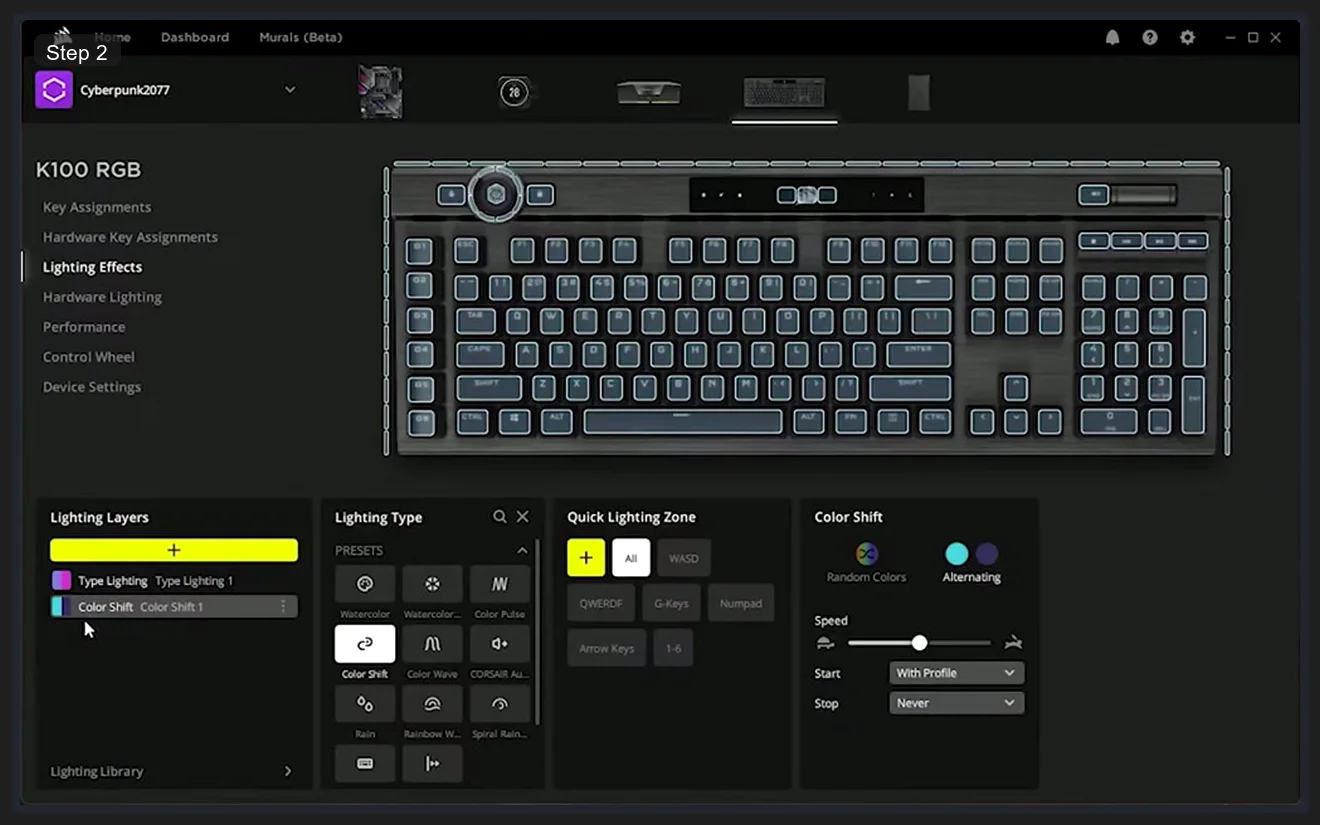
The Lighting Layers panel on the left is where iCUE gets genuinely interesting. Unlike most RGB software that applies one effect to one device zone at a time, iCUE stacks effects as layers. Each layer renders on top of the one below it. I’ve got “Type Lighting” as a base layer (keys light up on each keypress) with “Color Shift” running as a persistent background effect underneath. The combination means my keyboard shifts through colors normally but each keypress creates a separate reactive glow on top. You can add layers using the yellow + button.
The Lighting Type panel in the center is where you pick effects. The PRESETS section at the top has the most commonly used effects: Watercolor, Color Pulse, Color Shift (the one selected in this screenshot), Color Wave, CORSAIR Audio (audio-reactive), Rain, Rainbow Wave, Spiral Rainbow. Scroll down past PRESETS and you’ll find DYNAMIC, STATIC, OVERLAY, and LIBRARY sections with additional effect types.
The Quick Lighting Zone panel on the right lets you restrict an effect to specific key groups without having to manually select individual keys. For a keyboard like the K100, the zones are: All, WASD, QWERDF, G-Keys, Numpad, Arrow Keys, and 1-6 (the macro keys). I use this constantly. It’s how you get WASD highlighted in a different color for gaming while the rest of the keyboard does something else, in about three clicks.
Each effect type also has its own configuration panel on the far right: Speed slider, color pickers, and options specific to that effect. Color Shift shows Speed, Start condition (With Profile or manual), Stop condition, Random Colors toggle, and Alternating toggle. These fine-tuning controls are what make the effects feel unique rather than generic.
Fan and Case Lighting Through Commander
If you’re running fans through a Corsair Commander CORE XT or Commander PRO, they show up as RGB Ports in iCUE rather than as individual fan devices. The Commander appears as its own device in the top device bar, and clicking it opens the six-port fan view.
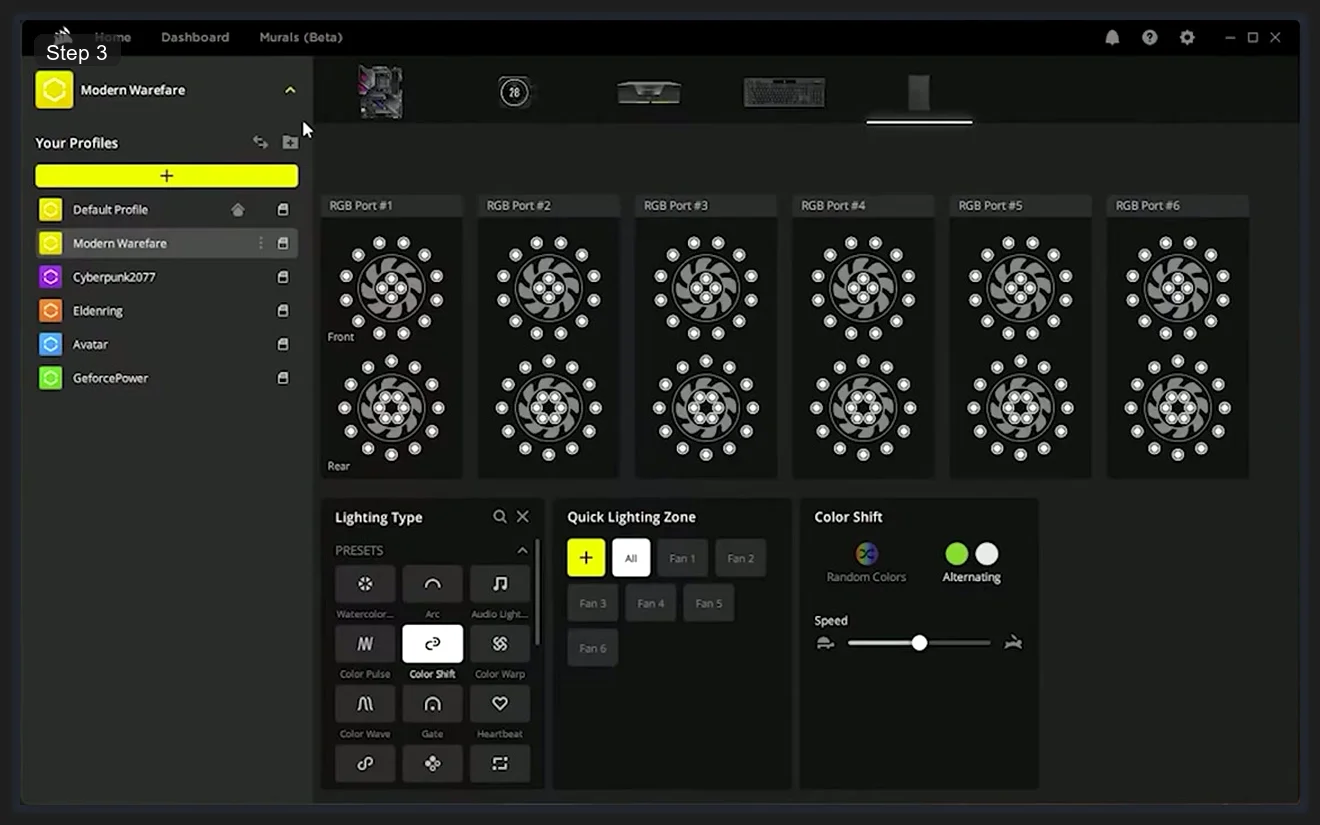
Each RGB Port card shows two fan ring visualizations labeled Front and Rear. These represent the two sides of a dual-ring fan like the LL120 or LL140. The outer ring and inner ring are physically separate LED arrays, and iCUE shows them both. The LED dots inside the rings update in real time to show whatever effect is active, so you can see exactly what your fans will look like without going into your case.
The Quick Lighting Zone buttons at the bottom let you apply effects per fan: All, Fan 1, Fan 2, Fan 3, Fan 4, Fan 5, Fan 6. I set Fan 1 (intake at front bottom) slightly different from the rest to break up the uniformity. It’s a subtle thing that I find looks more natural than every fan doing exactly the same thing at exactly the same phase in the animation.
⚠️ Heads up: The “Front” and “Rear” labels in the fan visualizations refer to the two LED rings on the fan itself, not front vs rear case fans. Both rings on a single LL120 are labeled Front and Rear in iCUE. Your physical case fan positions are reflected by which RGB Port number they’re plugged into on the Commander.
Exporting and Importing Profiles
iCUE profiles can be exported as .cueprofile files and shared between systems. This is useful if you’re rebuilding a PC and don’t want to recreate everything from scratch, or if you want to share a setup you’ve spent time building.
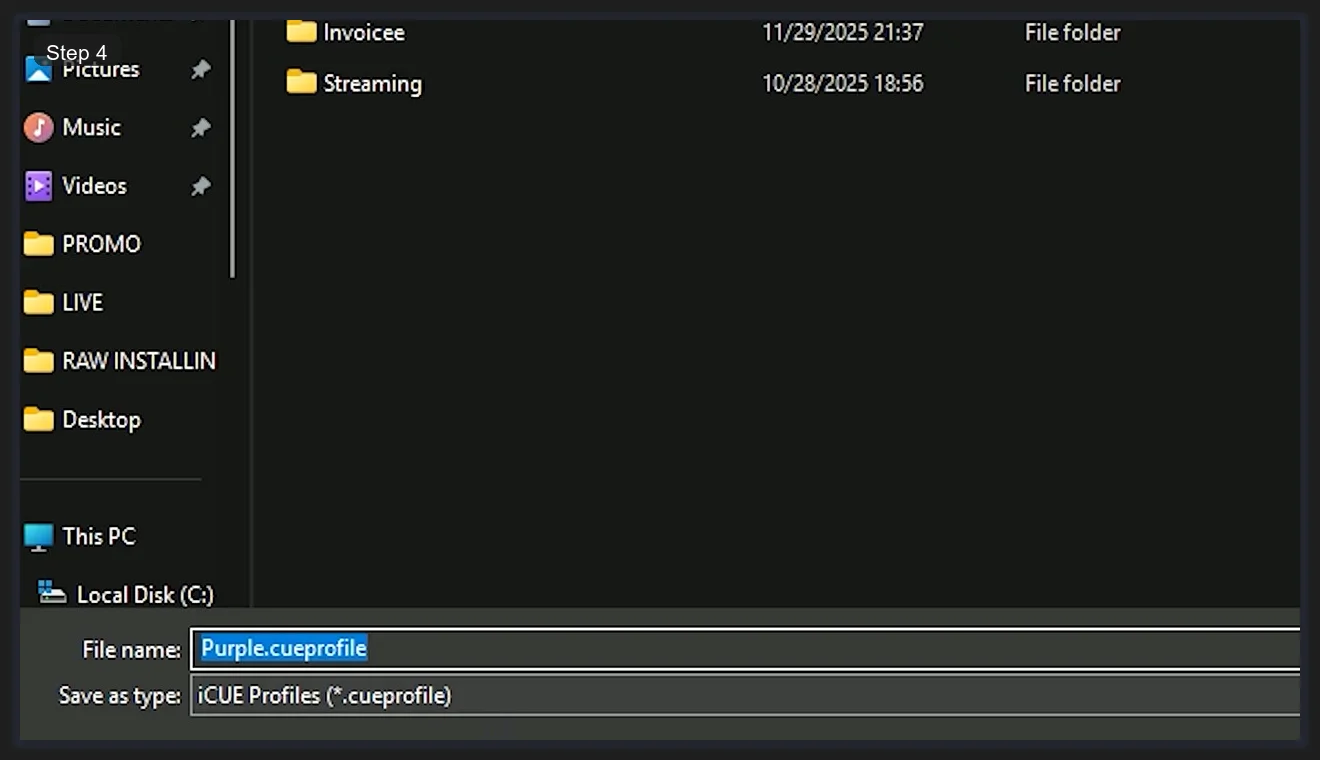
To export: right-click a profile name in the profile list and select Export. The standard Windows save dialog opens with the file type set to iCUE Profiles (*.cueprofile). Name the file whatever you want and save it anywhere. To import on a new system: right-click anywhere in the profile list area and select Import, then browse to the .cueprofile file.
Corsair also has a community section in the iCUE app (under the Home tab) where users share profiles publicly. I’ve downloaded a few community profiles for games I don’t have time to build setups for. The quality varies a lot, but for popular titles like Apex Legends or Valorant there are usually several well-made options.
💡 Pro tip: Export your profiles to a cloud folder (OneDrive, Google Drive, Dropbox) so they survive Windows reinstalls automatically. A full iCUE backup takes under 1 MB per profile.
Key Assignments and the Remap Library
The Key Assignments tab (accessible from the device sidebar when a keyboard is selected) is where you remap keys and build macros. The REMAP section handles simple key substitutions: swap a key to do something different, assign a macro to a G-key, or build complex multi-step action sequences.
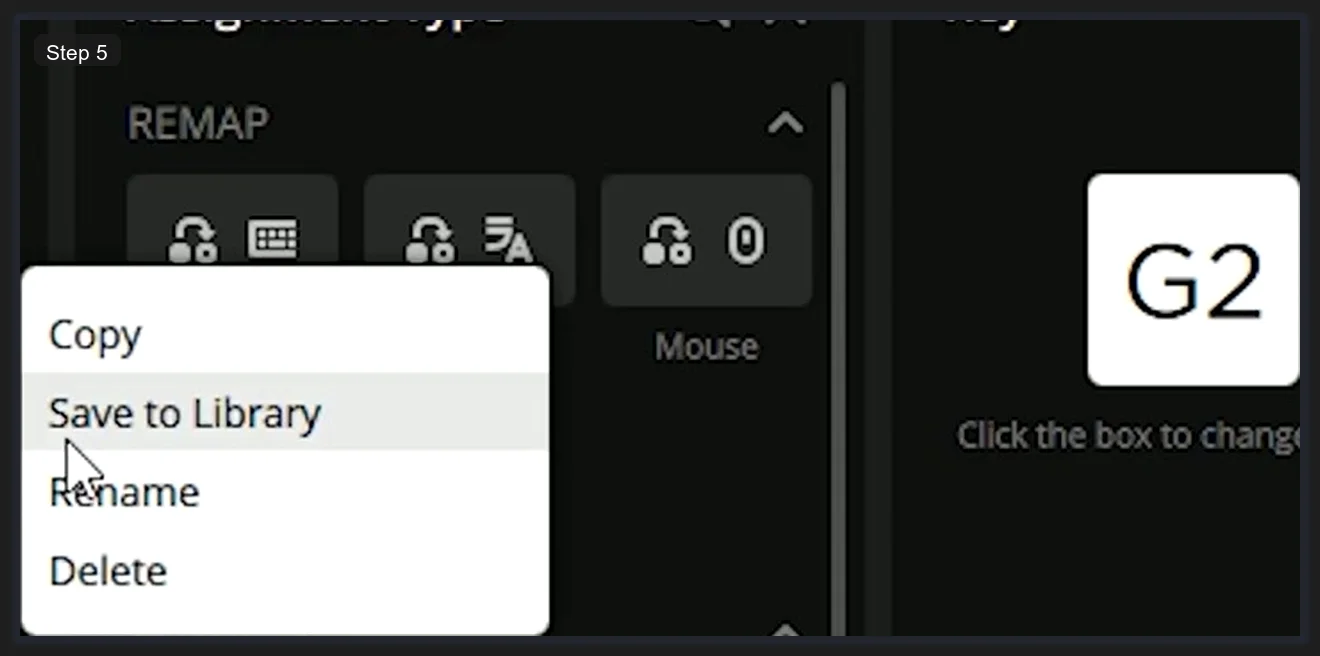
Right-clicking any remap assignment shows a context menu with four options: Copy, Save to Library, Rename, and Delete. The Save to Library option is the one most people miss. Library remaps are shared across all profiles. Once you’ve saved something to the library, you can apply it in any profile from the LIBRARY section without rebuilding it from scratch. I save my text expansion remaps (like a key that types my email address) to the library so they work in every profile automatically.
The three icons under the REMAP header represent what the remap applies to: keyboard-to-keyboard (key remapping), keyboard-to-text (text function), and keyboard-to-mouse (mouse button simulation from a keyboard key). The G2 label visible on the right side refers to the specific G-key being configured, in this case the second macro key on the K100 RGB’s left-side macro column.
The ACTIONS section (the tab below REMAP in the same sidebar) is where full macro sequences live. Actions support multiple steps, delays between steps, repeat conditions, and triggering other actions. That’s outside the scope of this guide, but the Corsair documentation covers it thoroughly if you want to build complex sequences.
Dashboard: Hardware Monitoring
The Dashboard tab (second option in the top navigation bar next to Home) is the hardware monitoring view. It shows live CPU temperature, GPU temperature, CPU usage percentage, GPU usage, RAM usage, and fan RPM for fans connected through the Commander. All data is pulled from the CpuIdRemote service I mentioned earlier.
I don’t use the Dashboard for anything critical since I run HWiNFO64 for serious monitoring, but it’s handy for a quick glance while you’re adjusting fan curves. Speaking of which: fan curve control for Commander-connected fans is in the Hardware tab under the Commander device settings. You can set custom curves per fan channel with temperature source from CPU, GPU, or a specific hardware sensor.
The Murals (Beta) option in the top nav is iCUE’s AI-generated lighting feature. It’s available as a preview and generates dynamic effects from text prompts. I’d treat it as experimental for now. The standard effects library is more than enough for most setups.
A Few Things That Aren’t Obvious
iCUE has some quirks that I wish someone had told me about upfront. Hardware Lighting is a feature that stores effects directly on supported devices’ onboard memory. The K100 RGB supports it. When hardware lighting is active, the device runs its stored effect even without iCUE running, which means your keyboard has lighting during Windows boot before iCUE loads. To enable it: go to the Hardware Lighting option in the K100’s sidebar, pick an effect, and save it to the device. Separate from and in addition to your profile’s software lighting.
iCUE conflicts with other RGB software. If you’re running OpenRGB, Aura Sync, or MSI Mystic Light alongside iCUE, one of them will lose. The SMBus that iCUE uses to talk to RAM and some motherboard controllers is shared, and only one app can hold it at a time. I run iCUE exclusively for Corsair hardware and use nothing else. If you need cross-brand sync, SignalRGB handles Corsair hardware plus other brands from one interface.
Finally, iCUE’s settings are stored in %APPDATA%\CORSAIR\iCUE 5. If you ever do a clean install and want to migrate settings, that folder is what you back up. It contains your full profile database, preferences, and library remaps. Copying it to a new install preserves everything including profiles that you haven’t exported as .cueprofile files.
Frequently Asked Questions
What is Corsair iCUE used for?
iCUE is Corsair’s device management software. It controls RGB lighting effects and profiles across all connected Corsair hardware (keyboards, mice, headsets, RAM, fans, coolers), handles macro and key remapping for keyboards, provides hardware monitoring (CPU/GPU temperature, fan RPM), and manages fan curves for Corsair Commander-connected fans.
How do I create lighting profiles in iCUE?
Click the + button in the profile list at the top left to create a new profile. Set a name, then select each device from the top device bar and configure its lighting effects under the Lighting Effects tab. Changes are saved automatically to the active profile. You can also link profiles to specific game executables in iCUE Settings under General so they activate automatically when that game launches.
What is Hardware Lighting in iCUE?
Hardware Lighting stores an effect directly on your device’s onboard memory. Devices with this feature (like the K100 RGB) run their stored hardware lighting effect even when iCUE is not open, so your keyboard has lighting during Windows boot. Configure it in the Hardware Lighting tab in the device sidebar. It’s separate from profile-based software lighting.
How do I export and share iCUE profiles?
Right-click any profile name and select Export. iCUE saves it as a .cueprofile file you can store or share anywhere. To import a .cueprofile on another system, right-click in the profile list area and select Import. Profile files are under 1 MB each and contain all device settings, lighting layers, and key assignments for that profile.
Can iCUE control fans?
Yes, for fans connected through Corsair Commander devices (Commander CORE XT, Commander PRO, Lighting Node CORE). Fan curve control is in the Hardware tab under the Commander device settings in iCUE. Fans plugged directly into motherboard headers are controlled by your motherboard’s software, not iCUE.
Does iCUE work with non-Corsair RGB devices?
iCUE includes Corsair Chroma Connect, which integrates with select devices from ASUS, Logitech, and a few other brands. For broader cross-brand RGB control, SignalRGB is a more capable solution that handles Corsair hardware alongside devices from Razer, ASUS, MSI, and many others from a single interface.
Related Guides
- Corsair iCUE 5 setup guide — the deeper from-zero install.
- iCUE high CPU usage fixes — for the resource bloat problem.
- iCUE not detecting devices fix — the detection failures.
- OpenRGB as the cross-vendor alternative — the lightweight escape hatch.