The first thing RGB Fusion 2.0 ever showed me was a white screen with “Please Wait…” that stayed on long enough for me to start searching whether my new AORUS motherboard was defective. It wasn’t. The software is just painfully slow on first launch, and nobody warns you about that. I’ve learned since then that most RGB Fusion frustrations have real fixes, but the app does almost nothing to help you find them.
I’m running this on a Z390 AORUS Pro with G.Skill Ripjaws V DDR4, two ARGB 120mm fans on the D_LED headers, and a Gigabyte RTX GPU. If your setup is somewhere in that range, this guide should cover your exact situation. I’ll walk through installation, device detection, effects, profiles, and the three fixes that solve 90% of reported issues. I’ll also tell you when you should be using Gigabyte Control Center instead.
Do You Actually Need RGB Fusion 2.0?
This is worth checking before you download anything. RGB Fusion 2.0 is the right software for most mid-generation Gigabyte boards from around 2018 to 2022: Z370, Z390, B365, B450, B550, and earlier X570 models. If you built your PC during that window on a Gigabyte platform, it’s almost certainly what you need.
Here’s the thing though: Gigabyte replaced RGB Fusion 2.0 with Gigabyte Control Center (GCC) on newer boards. If your motherboard is a Z690, Z790, B660, B760, X670E, B650, or any post-2022 Gigabyte board, you want GCC, not RGB Fusion 2.0. Installing the wrong app causes weird behavior because both tools share the same underlying RGB SDK. They compete for control of the same hardware layer, and whichever one started last wins. I’ve seen people chase a “lighting keeps resetting” bug for hours that turned out to be two Gigabyte apps overwriting each other every boot.
Quick check: go to your motherboard’s product page on gigabyte.com and scroll to the Software section. If it lists “RGB Fusion 2.0,” you’re in the right place. If it lists “Gigabyte Control Center” or “GCC,” grab that instead and skip this guide. There’s a comparison section near the end if you’re still not sure which applies to your board.
Downloading and Installing Correctly
The current version of RGB Fusion 2.0 is B24.1202.1, released December 29, 2024. It’s 93.4 MB. You can grab it directly from Gigabyte’s download server:
https://download.gigabyte.com/FileList/Utility/RGB_Fusion_B24.1202.1.zipRequires Windows 10 (64-bit) or Windows 11. There’s no 32-bit version.
Before you run the installer, do one thing first: uninstall every other RGB app on your system. I mean it. ASUS Aura Sync, Corsair iCUE, Razer Synapse, MSI Mystic Light, Polychrome Sync, Logitech G Hub, even Riot Vanguard if you play Valorant. They all write to the same Windows USB LED control layer, and conflicts are the number-one cause of RGB Fusion not working. Open Settings > Apps, sort by publisher, and clear out everything RGB-related from any manufacturer except Gigabyte.
Once those are gone: extract the zip, right-click the setup file, select Run as administrator, and follow the prompts. When it offers to install Gigabyte App Center, you can decline. RGB Fusion 2.0 runs fine standalone. Restart when prompted, then launch RGB Fusion as administrator again for the first run.
First Launch: Device Detection
Here’s where the experience gets frustrating if you don’t know what to expect. RGB Fusion 2.0 opens a loading screen that says “Please Wait…” and then… nothing for a while. It’s scanning for connected hardware. On a system with multiple RGB devices, this can run two to three minutes on the first load. I spent my first launch convinced the app had crashed. It hadn’t. Just wait it out.
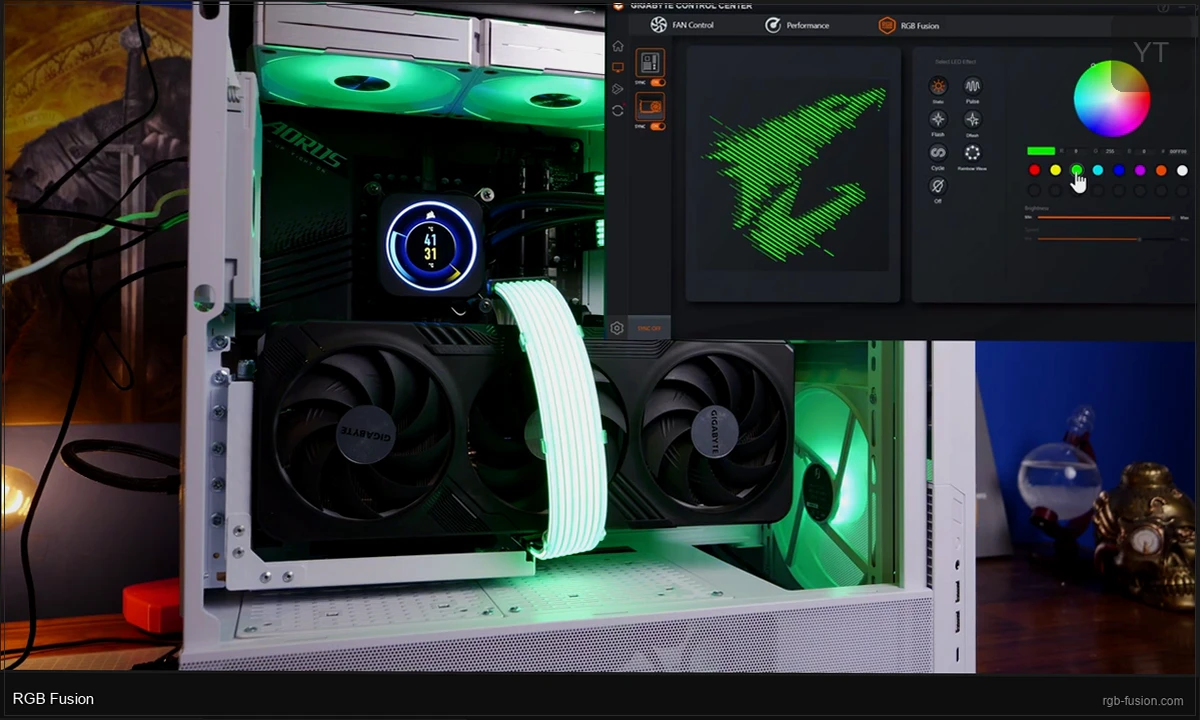
When it finally loads, you’ll see a visual map of your AORUS motherboard with LED zones highlighted. On my Z390 AORUS Pro the zones are: the CPU strip, PCH chip LED, D_LED1 header, D_LED2 header, and the IO cover zone. Clicking any zone selects it and opens the effects panel on the right side.
⚠️ Heads up: If your GPU isn’t showing up in the device list, don’t panic. Gigabyte GPU detection can take up to 10 minutes on first launch. Leave the app running in the background for a bit before assuming it’s broken. If it still doesn’t appear, the fix is usually uninstalling GeForce Experience and resetting Nvidia Control Panel to defaults, then relaunching RGB Fusion as admin. I had to do exactly this with my RTX 2070 Super. Took me longer than I’d like to admit to find that fix.
One hardware note that’s worth knowing upfront: G.Skill Trident Z series RAM doesn’t work with RGB Fusion 2.0. G.Skill uses a proprietary controller that requires their own Trident Z Lighting Control software. Gigabyte’s own RGB RAM modules and most other brands connected to ARGB headers work fine.
Setting Up Lighting Effects
Click any zone or device to select it. The effects panel opens on the right with these preset modes:
- Static — solid color, no animation
- Breathing — slow fade in and out
- Flashing — fast strobe
- Cycle — automatic color spectrum rotation
- Music — syncs to audio input through your system’s microphone or line-in
- Color Temperature — adjusts warm-to-cool white tone
- Custom — per-LED color control for granular setups

The color picker gives you 16.8 million colors via a color wheel or direct hex input. I prefer hex when I’m trying to match a specific color, like a brand orange at #FF6B00 or a specific blue to match my case fans. The wheel is fine for casual picking.
The speed slider under animated effects controls animation pace. Breathing on maximum speed turns into a strobe, which is genuinely uncomfortable to look at. Medium speed is where breathing and cycle effects actually look good. I leave mine around 40-50% for breathing. It’s a subtle pulsing that doesn’t demand your attention.
Music mode is surprisingly responsive. It picks up audio from your default input device and pulses your LEDs in sync. I’ve used it for music listening sessions but not for gaming. The color transitions can be distracting when you’re trying to focus on something competitive.
Syncing All Your Devices
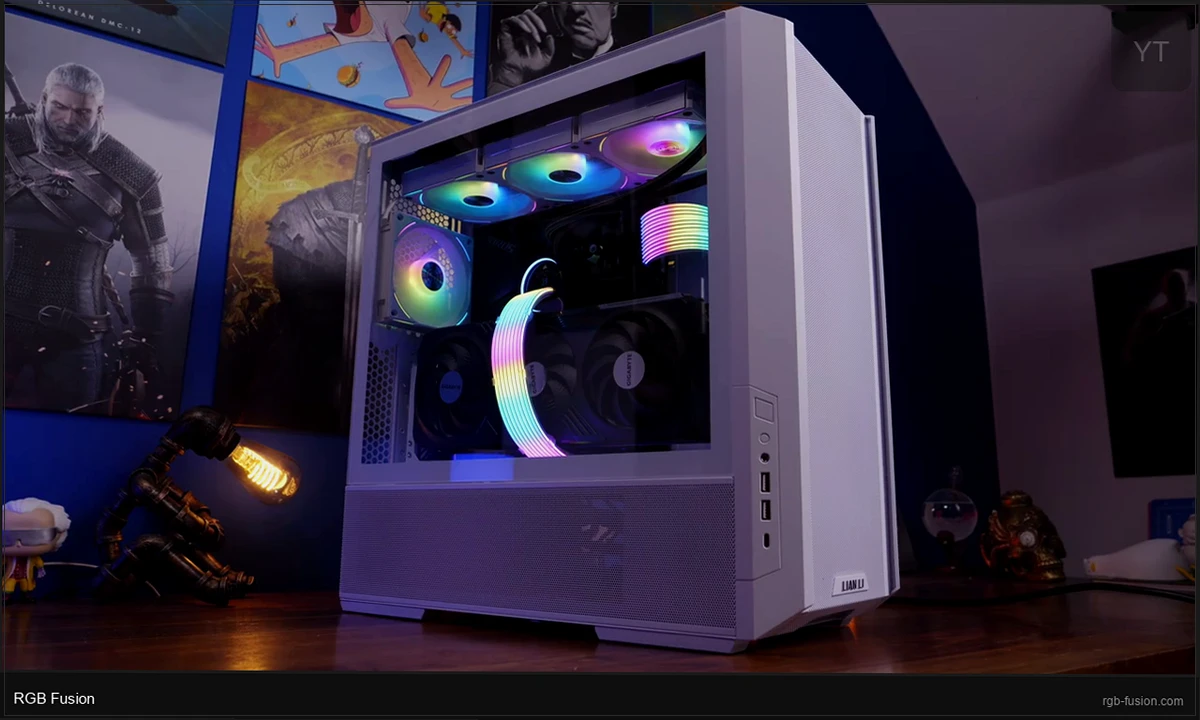
The Sync toggle at the top of the interface is the fastest way to get a unified look. Enable it and any effect you pick applies to every connected device simultaneously: motherboard zones, GPU, RAM strips, and anything on your ARGB headers.
With sync off, each zone is configured independently. That’s useful for two-zone setups where you want your case fans to run a different effect than your motherboard board. A common look I’ve seen is case fans on a slow white breathing effect while the motherboard runs a static color accent.
Sync state is saved with your profile, so you don’t have to re-toggle it every time you switch between presets.
Creating and Saving Profiles
Profiles let you save complete lighting configurations and switch between them. I’ve got three saved: Gaming (red breathing, sync on), Productivity (cool white static, 30% brightness), and Off (all zones set to black). The Off profile is useful for video calls and screen sharing when you don’t want your RGB bouncing light around the room.
To save a profile: set everything up the way you want it, then click the profile save button in the top right area of the interface. Name it, and check the Apply on Boot option if you want this profile active at startup even before Windows fully loads. RGB Fusion 2.0 stores up to 7 onboard profiles directly on the motherboard’s RGB controller chip. That means they survive reboots without the software running.
💡 Pro tip: Set your favorite profile as the boot profile and also keep a “Windows Loading” variant that’s just a simple static color. That way your PC looks intentional from the moment power button to Windows desktop, not random default blinking while it boots.
Configuring ARGB Headers (D_LED1 and D_LED2)
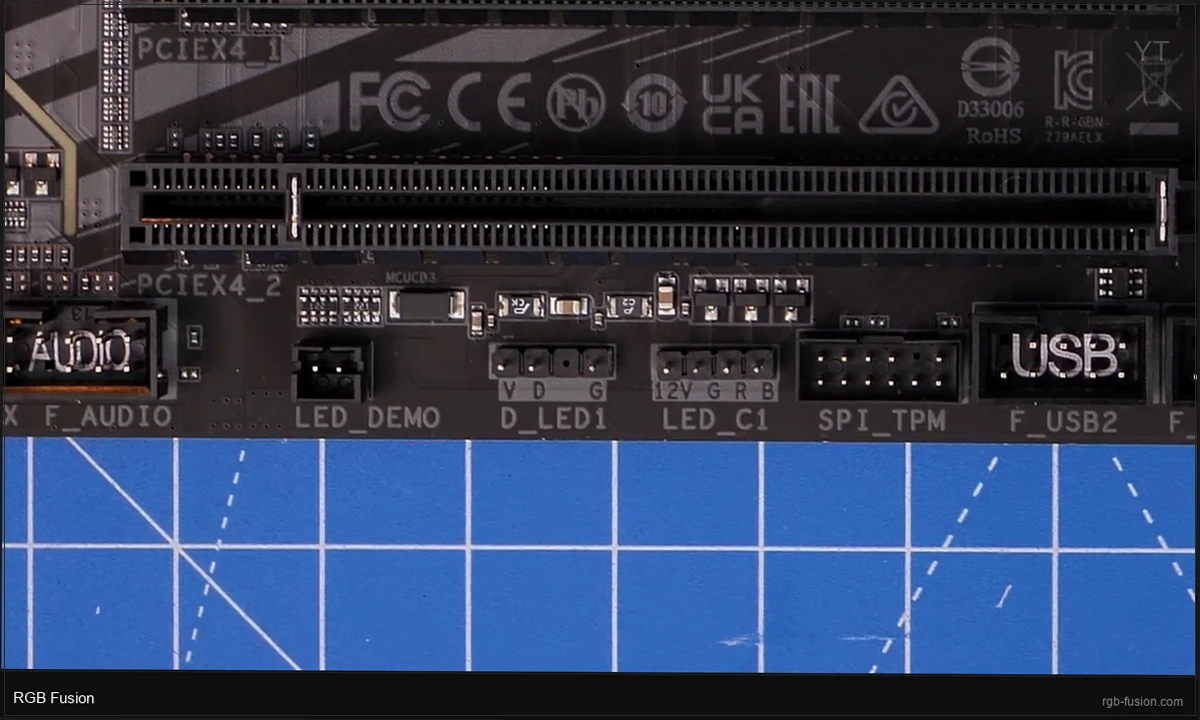
The D_LED1 and D_LED2 headers on Gigabyte boards are 5V ARGB (3-pin) connections. Any ARGB fan, LED strip, or ARGB hub plugged into these headers gets controlled through RGB Fusion. You configure them by selecting the D_LED1 or D_LED2 zone in the left panel.
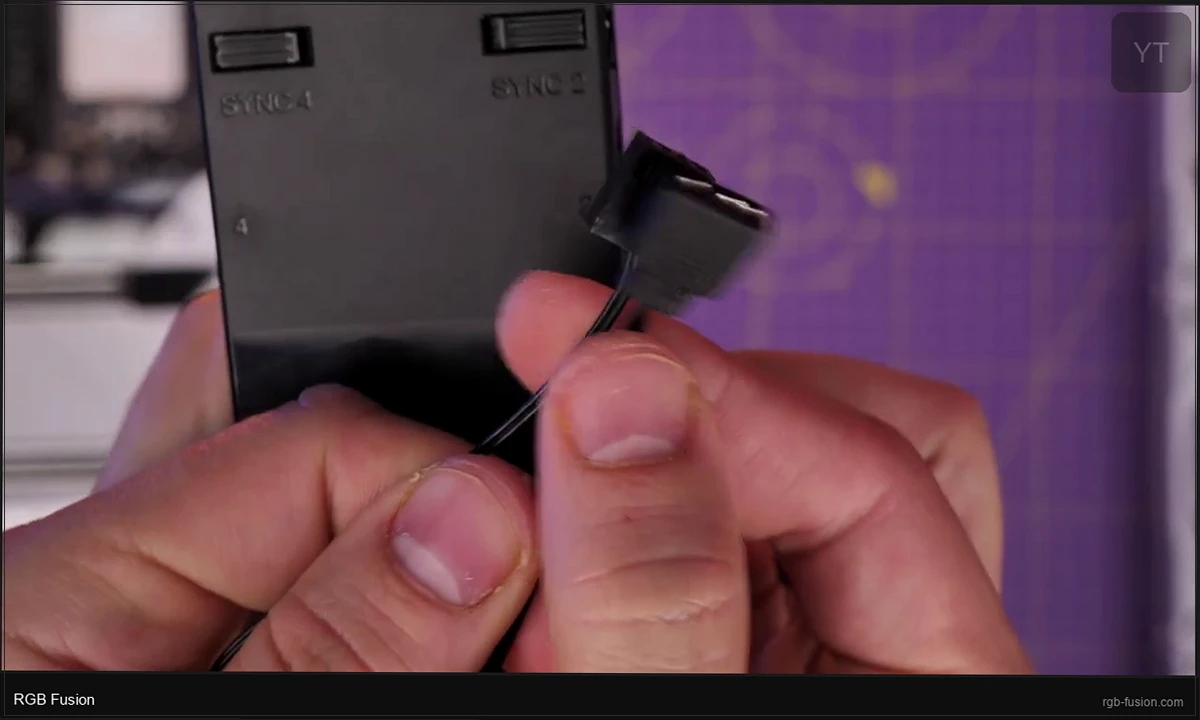
The key setting here is LED count. RGB Fusion needs to know how many individual addressable LEDs are connected so it can calculate effect transitions correctly. If you have three 12-LED ARGB fans daisy-chained on D_LED1, set the count to 36. If you get the count wrong, effects will visually clip or loop in the wrong place.
Most standard ARGB fans have 12 or 16 LEDs per fan. Check your fan’s product spec page if you’re not sure. ARGB strips vary more widely, anywhere from 30 LEDs per meter to 60 LEDs per meter depending on the product.
If your board has standard 12V RGB (4-pin) headers instead of or in addition to ARGB, those show up as separate zones. They support per-zone color control but don’t support per-LED addressable effects since the 4-pin standard doesn’t carry that signal.
Fixing the “Please Wait” Hang
This is the most-reported issue across every Gigabyte forum I’ve seen. The app opens, shows “Please Wait…,” then either freezes or the window disappears entirely. Here’s what actually works:
Fix 1: Delete the conflict files
- Navigate to
C:\Program Files (x86)\Gigabyte\RGB fusion - Delete the AtiTool folder
- Delete the GvBiosLib.dll file
- Restart your PC
- Launch RGB Fusion as administrator
This clears old GPU detection files that sometimes corrupt on update. It’s the quickest fix to try first.
Fix 2: Clean registry reinstall
If Fix 1 doesn’t work, do a full clean reinstall:
- Uninstall RGB Fusion 2.0 from Settings > Apps
- Press Win+R, type
regedit, press Enter - Navigate to
HKEY_LOCAL_MACHINE\SOFTWARE\GIGABYTE - Delete the entire Gigabyte key
- Reboot
- Download fresh from Gigabyte’s server and reinstall as administrator
Fix 3: BIOS toggle (for color-change issues)
If your lighting is detected but color changes aren’t applying, try this BIOS toggle:
- Restart your PC and press F2 or Delete to enter BIOS
- Navigate to the Peripherals tab
- Find the RGB Fusion toggle and set it to Disabled
- Save and exit, then re-enter BIOS
- Set RGB Fusion back to Enabled, save and exit
- Boot into Windows and launch RGB Fusion as administrator
This forces a full hardware handshake reset between the BIOS and the RGB controller. I’ve seen this fix persistent color-stuck issues that survived multiple software reinstalls.
RGB Fusion 2.0 vs Gigabyte Control Center: Which Do You Need?
This comes up constantly in Gigabyte communities, so I want to be specific here instead of vague.
| Board Era | Correct Software |
|---|---|
| Z370, Z390, B365, B360 (Intel 8th/9th gen) | RGB Fusion 2.0 |
| B450, X470, B550, X570 (AMD Ryzen 2000/3000) | RGB Fusion 2.0 |
| Z490, B460 (Intel 10th gen) | RGB Fusion 2.0 or GCC (check product page) |
| Z690, Z790, B660, B760 (Intel 12th/13th/14th gen) | Gigabyte Control Center (GCC) |
| X670E, B650, B650E (AMD Ryzen 7000+) | Gigabyte Control Center (GCC) |
GCC is the future-facing tool. It adds system monitoring, fan curve control, and BIOS update functionality that RGB Fusion 2.0 doesn’t have. If both are listed as compatible with your board (which happens on some Z490 models), I’d install GCC and not RGB Fusion. Don’t install both. They share the same RGB SDK and whichever loads last overwrites the other’s settings, causing the constant lighting-resets that a lot of people blame on “buggy software.”
When to Use Something Else Instead
RGB Fusion 2.0 works well for Gigabyte-only builds. The moment you add hardware from other brands, it gets messier. Here are the alternatives worth knowing:
OpenRGB is fully open source, works on Windows and Linux, and directly communicates with many Gigabyte boards through USB. I’ve used it on a Z390 build when RGB Fusion kept crashing after a Windows update. It’s more technical to configure but very stable. No sign-in, no telemetry, no auto-updates that break your settings. Full OpenRGB guide here. [INTERNAL LINK: how-to-use-openrgb]
SignalRGB is the right choice if you’ve got a mixed-brand setup: Gigabyte motherboard, Corsair peripherals, Razer mouse. It consolidates all manufacturer apps into one interface and handles cross-brand sync better than any single manufacturer tool. We cover it in the SignalRGB setup guide.
I’d stick with RGB Fusion 2.0 if you’re on a pure Gigabyte platform and it’s working. It’s lightweight (it doesn’t run browser-engine processes in the background like some RGB apps do) and it stores profiles onboard. For most people, it’s enough.
Frequently Asked Questions
Is RGB Fusion 2.0 compatible with Windows 11?
Yes. The current version B24.1202.1 runs on Windows 10 and Windows 11 (64-bit only). The “Please Wait” hang that some Windows 11 users report isn’t an OS compatibility issue. It’s typically caused by conflicting RGB apps from other manufacturers. Uninstall everything else RGB-related and try again.
Can RGB Fusion 2.0 control third-party RGB fans and LED strips?
Yes, anything plugged into your motherboard’s 5V ARGB (3-pin) or 12V RGB (4-pin) headers shows up in RGB Fusion and gets controlled through it regardless of brand. USB-connected peripherals from other manufacturers (Corsair, Razer, Logitech) require their own software or a third-party tool like SignalRGB.
Why isn’t my GPU showing in RGB Fusion 2.0?
Leave the app running for up to 10 minutes. GPU detection takes longer than motherboard detection on first launch. If it still doesn’t appear: uninstall GeForce Experience, reset Nvidia Control Panel to defaults, and relaunch RGB Fusion as administrator. Most people report their GPU appears after that. If you’re on AMD, make sure Adrenalin software isn’t conflicting.
Do I need RGB Fusion 2.0 if I also have iCUE or Razer Synapse?
You can’t run both reliably. They conflict at the USB LED driver level. If your Corsair or Razer peripherals are more important to control precisely, use iCUE or Synapse and let your motherboard run its BIOS default lighting. If you want everything controlled from one place, switch to SignalRGB which handles cross-brand sync. Running RGB Fusion alongside iCUE causes the classic symptoms: lighting randomly resets, one app overrides the other on boot.
How do I uninstall RGB Fusion 2.0 completely?
Go to Settings > Apps and uninstall RGB Fusion 2.0. Then open regedit, navigate to HKEY_LOCAL_MACHINE\SOFTWARE\GIGABYTE, and delete that key. Also delete the folder at C:\Program Files (x86)\Gigabyte\RGB fusion if it remains. This prevents leftover config from interfering if you reinstall or switch to GCC.
Related Guides
- RGB Fusion not working fix guide — for when it stops cooperating.
- Best RGB software for Windows — where RGB Fusion ranks.
- OpenRGB cross-vendor alternative — the universal alternative.
- RGB sync troubleshooting playbook — for cross-vendor failures.