I used to run four manufacturer RGB apps at the same time. Corsair iCUE, ASUS Armoury Crate, Razer Synapse, and NZXT CAM, all running simultaneously because each one controlled a different piece of hardware in my build. The bloat was real. My task manager looked like a startup company threw a party in my RAM. SignalRGB is the answer to that problem, and it’s one I actually use every day now.
SignalRGB (currently on v2.5.28, released January 2026) supports over 3,500 products from Corsair, ASUS, Razer, MSI, Logitech, Lian Li, and dozens of other brands. It replaces all of those manufacturer apps with one interface. The free version handles basic device control and syncing. The Pro tier (subscription-based) unlocks the full effects library, screen capture, and ambient lighting features. I’ll be upfront: the screenshots here are from the Pro version, but I’ll flag which features are Pro-only throughout.
If you’re trying to decide whether SignalRGB is worth it versus sticking with manufacturer apps, we’ve got a full breakdown in our SignalRGB vs OpenRGB comparison. This guide assumes you’ve already installed SignalRGB and want to actually understand what you’re looking at.
Setting Up Your Devices
After launching SignalRGB, head to My Rig > Devices in the left sidebar. This is where you configure every piece of hardware SignalRGB detected. For most devices, SignalRGB detects them automatically on launch. For others, especially fans connected through a USB hub like the Corsair Commander Core XT, you’ll need to configure the channel mapping manually.
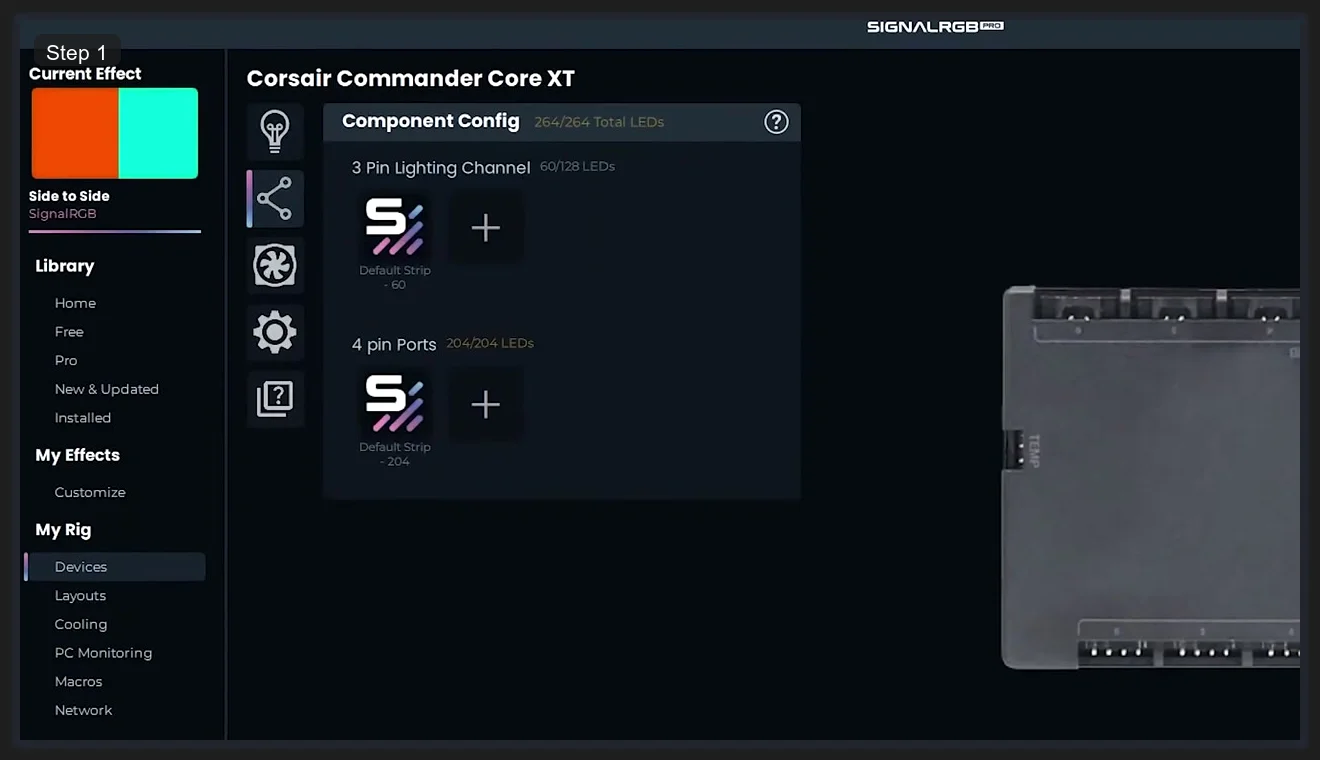
Clicking a device like the Corsair Commander Core XT opens its Component Config panel. For a Commander, you’ll see its physical channels: 3-pin lighting channels and 4-pin ports. Each channel shows how many LEDs are currently mapped versus how many the channel supports. In this example, the 3-pin channel has 60 of a possible 128 LEDs assigned, and the 4-pin ports have all 204 LEDs mapped. You add LED assignments by clicking the + button on each channel and selecting the device type (ARGB strip, ARGB fan, etc.) and LED count.
The sidebar shows the Library categories (Home, Free, Pro, New & Updated, Installed) and the My Rig sections (Devices, Layouts, Cooling, PC Monitoring, Macros, Network). You’ll work across all of these. The Library is where you browse effects; everything else in My Rig is where you configure hardware.
⚠️ Heads up: If a device shows up in the list but its LEDs aren’t responding, click the device row and look for a configuration needed prompt. Many devices need a one-time setup before SignalRGB can control them. The SignalRGB Discord is the fastest place to get help with specific device issues, because the community maintains most of the device support plugins.
Per-Device Lighting Settings
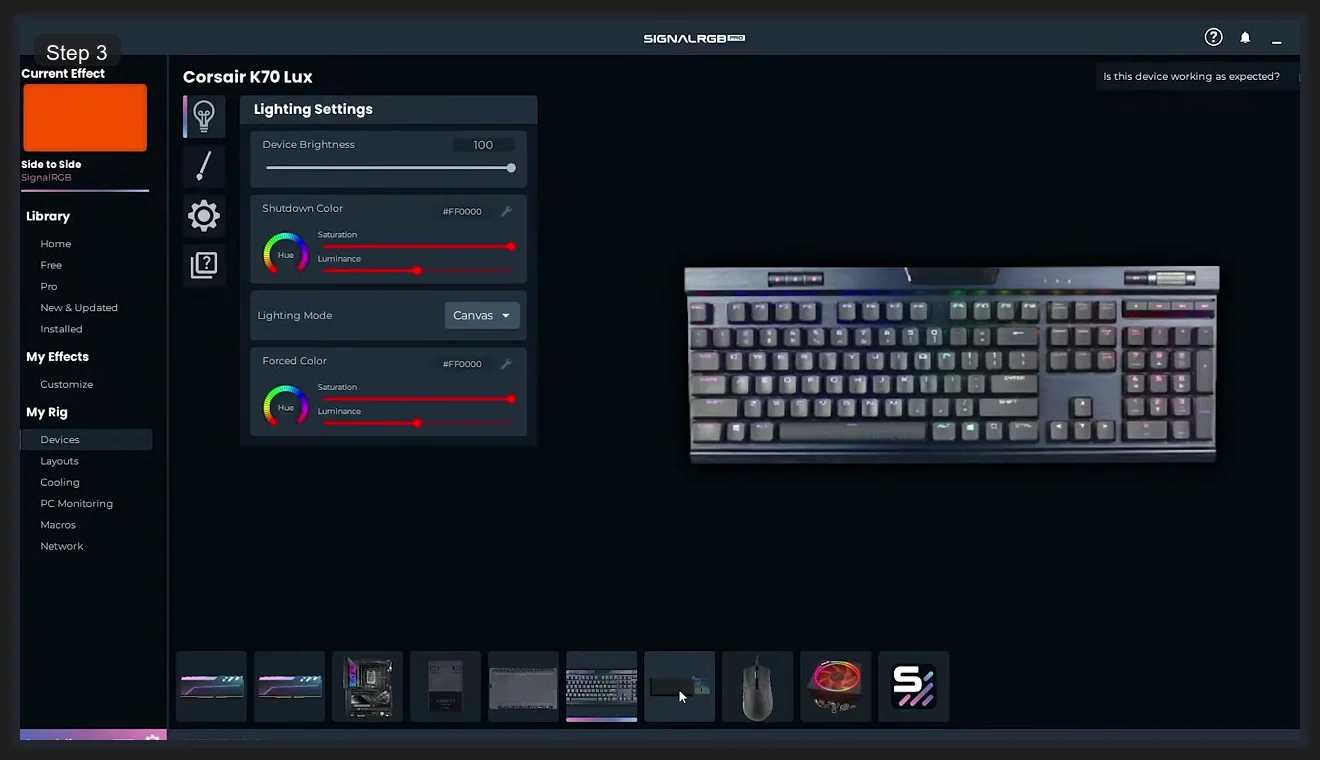
Every device in SignalRGB has its own Lighting Settings panel, accessible from the Devices tab. This is separate from what effect is playing. Think of it as the device-level layer underneath the effect layer.
Three settings here matter most:
- Device Brightness — scales the output brightness of that device independently. If your keyboard is blowing out the rest of your setup visually, lower its brightness here instead of changing your effect colors.
- Shutdown Color — the color your device shows when SignalRGB closes or your PC shuts down. Set it to black (off) if you don’t want your keyboard glowing after shutdown, or match your case color if you want a clean look during boot-up.
- Lighting Mode — the key setting. Canvas means the device shows whatever effect is active on the canvas (the global effect you selected). Forced means the device ignores the canvas and shows a specific static color you set below. Use Forced for devices you don’t want changing, like a mousepad you want always white.
The in-app visualization on the right side of the panel shows your device (for keyboards, a keyboard render; for mice, a mouse render) with the current lighting mode applied. It updates live as you adjust settings. The device thumbnail strip at the bottom of the panel lets you quickly jump between all your configured devices without going back to the main Devices list.
Layouts: Matching Your Physical Desk Setup
This is the feature that makes SignalRGB feel different from every manufacturer app. The Layout editor lets you arrange your devices on a virtual canvas that matches their physical positions on your desk. When an effect moves across your setup (a wave, a ripple, a color transition), it flows correctly from device to device based on their real-world positions.
Without a proper layout, an effect might start on your mouse, jump to your keyboard on the other side of the screen, then skip back to your RAM. With a proper layout, it flows left to right the same way your devices sit on your desk.
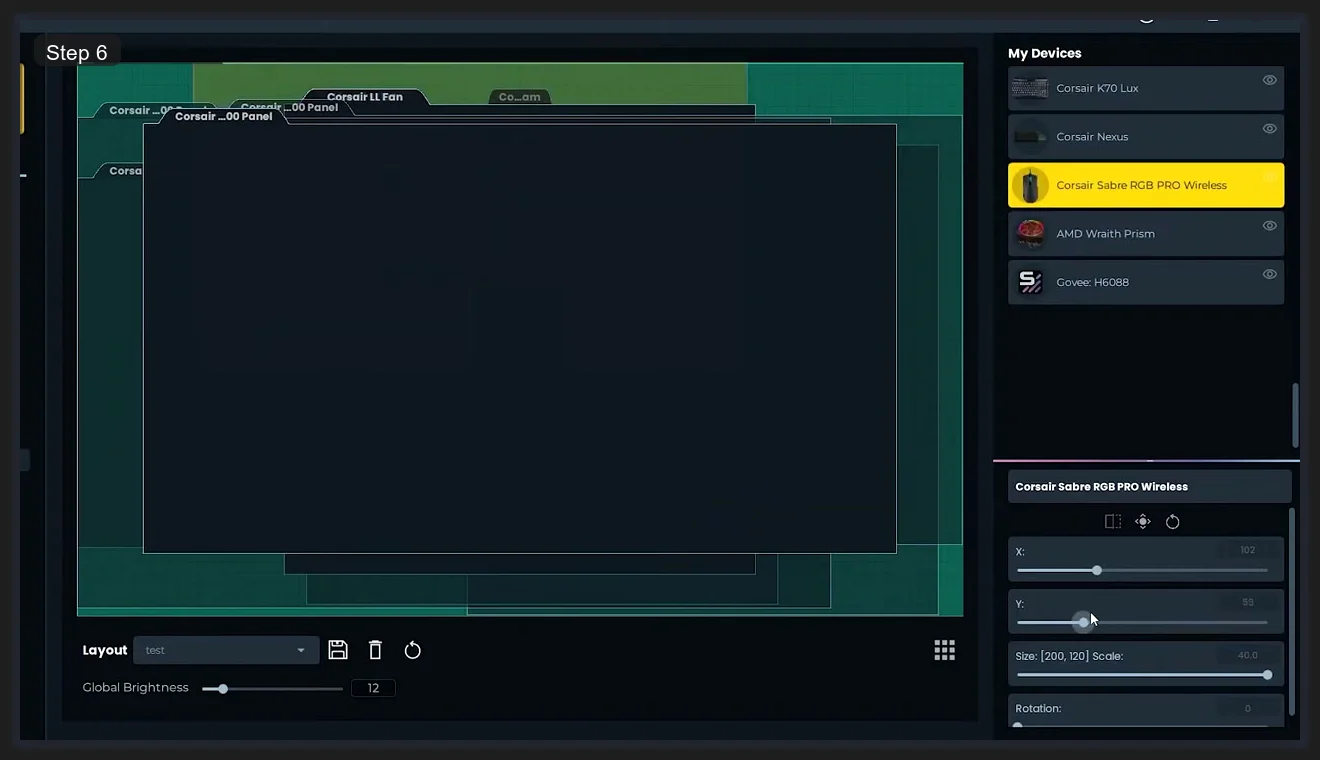
Click any device in the My Devices panel on the right to select it. The position controls appear below: X, Y coordinates, Size (width and height in pixels), Scale, and Rotation in degrees. You can also drag devices directly on the canvas. The Global Brightness slider at the bottom adjusts all devices simultaneously. I’d set your layout before you spend any time picking effects, because effect quality looks completely different before and after proper layout setup.
The Layout dropdown at the bottom lets you save multiple named layouts. I keep one for my gaming setup (monitor in front, keyboard and mouse on desk, case to the left) and one for music listening (different device arrangement, different effect behavior). Switching layouts is one click.
Cooling: Fan Control Through Compatible Hubs
SignalRGB includes fan control in the My Rig > Cooling section for fans connected through supported USB controllers (primarily Corsair Commander Core XT, Commander Pro, and similar Corsair hubs, plus some Lian Li and NZXT hardware). If your fans are plugged directly into your motherboard headers, they don’t appear here.
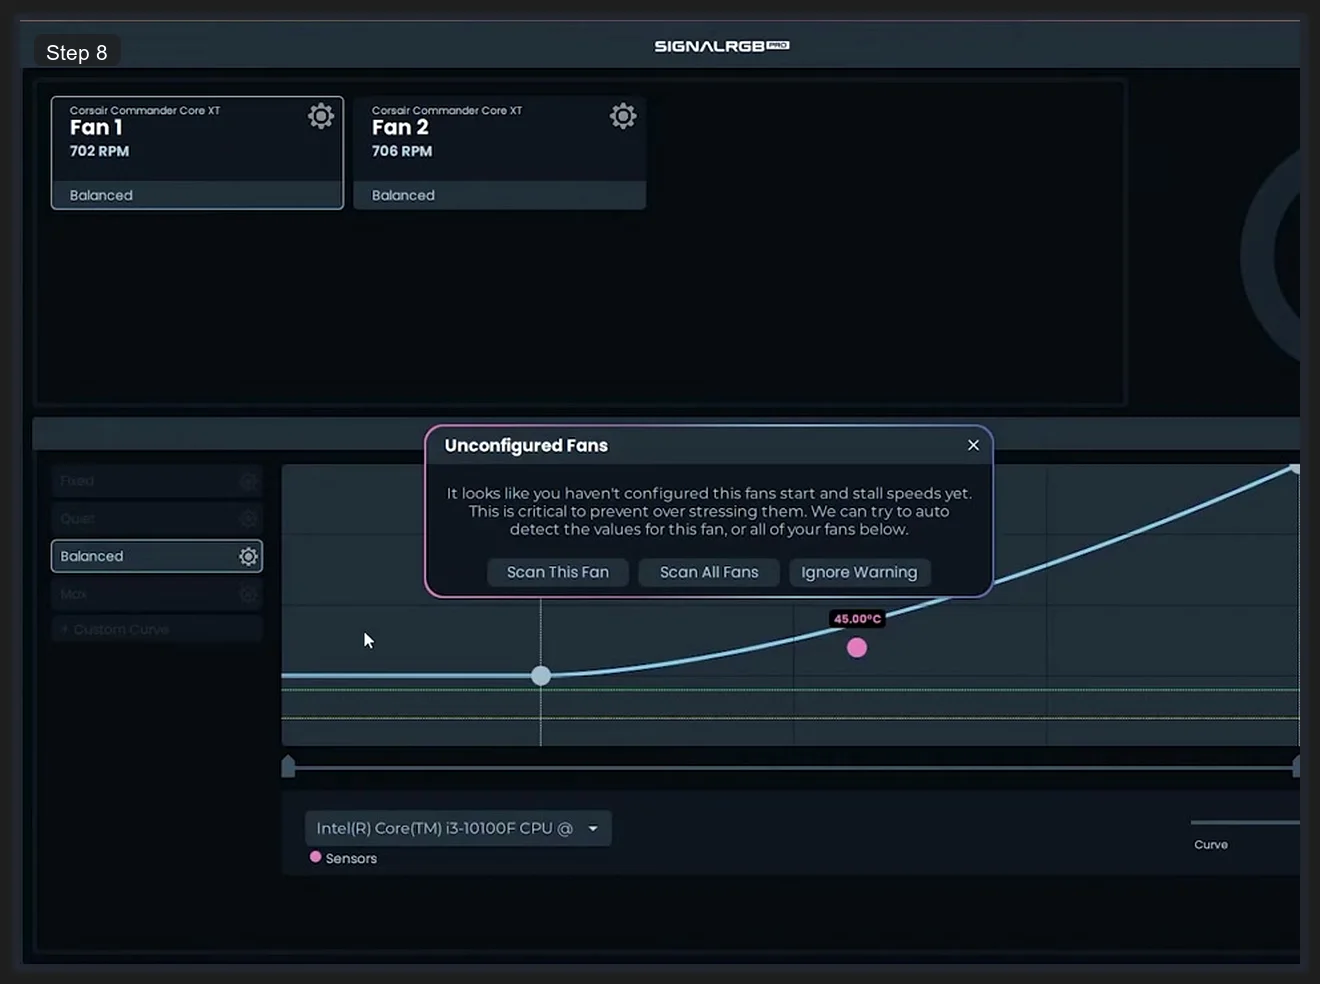
When you first open Cooling, you might see the Unconfigured Fans warning. This is important to address before setting any curves. The dialog offers Scan This Fan and Scan All Fans options. The scan measures each fan’s start speed (minimum RPM at which the fan actually spins up from stopped) and stall speed (minimum RPM to keep it running without stalling). Setting a fan curve point below the stall speed causes the fan to hunt (spin up, stall, spin up, stall) which stresses the motor. Run the scan once and SignalRGB handles the safe limits automatically.
Fan curve presets include Quiet, Balanced, Max, and Custom Curve. The Balanced preset is a reasonable default. Custom Curve opens a draggable spline editor with the temperature sensor (CPU in most cases) on the X-axis and fan speed percentage on the Y-axis. The live temperature indicator (the pink dot on the curve at 45°C in the example above) shows where your current CPU temperature sits on the curve in real time as you tune.
The Effects Library: Free vs Pro
The Library in the left sidebar is where you pick your active effect. It has four categories:
- Home — featured and recently added effects
- Free — the full catalog of effects available without a Pro subscription
- Pro — effects that require a Pro subscription, generally more complex or animated ones
- Installed — effects you’ve already added to your library, regardless of Free or Pro status
Free effects cover the basics well: solid colors, gradients, waves, pulse patterns, and plenty of community-made effects. Pro effects tend to be more elaborate: screen-reactive ambient lighting, audio-reactive patterns, game-specific effects, and the large catalog of community Pro effects. I’d spend time in the Free library before deciding if Pro is worth the subscription cost for your use case. Most people I know using SignalRGB are on the free tier and happy with it.
Screen Capture (Pro) is the headline feature that people ask about most. It samples your display output and translates it into ambient lighting on your devices. I use it occasionally for movie watching but not for gaming, because the input lag introduced by the sampling pipeline is noticeable when you’re paying attention.
Macros: Auto-Switching Effects When Games Launch
The Macros section (currently labeled Beta in the app) is the feature that replaces the manual profile-switching workflow. Instead of remembering to switch your SignalRGB effect every time you launch a game, you set up a Macro that does it automatically.
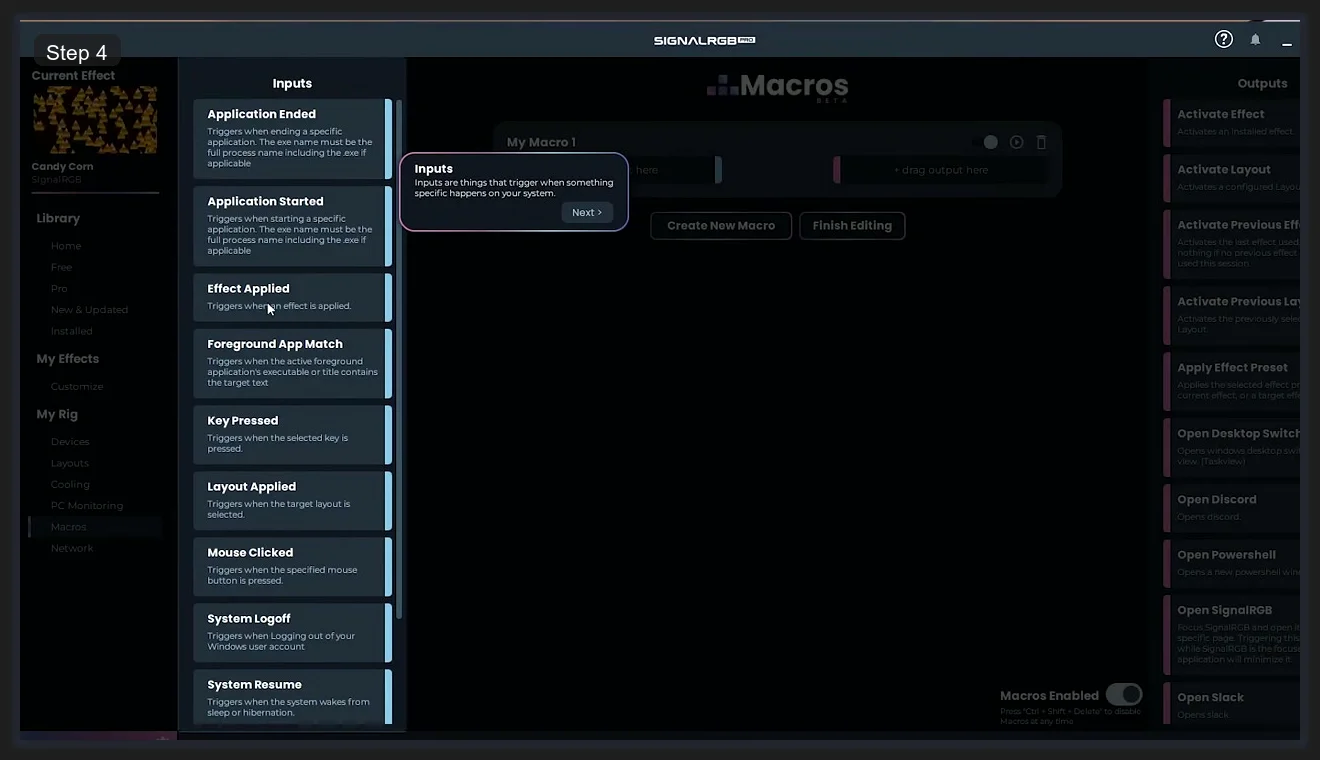
Macros work as Input-to-Output rules. You pick an Input trigger from the left panel and an Output action from the right panel. For automatic game-based lighting, the relevant input is Foreground App Match. Set it to the executable name of your game (e.g., overwatch.exe), and the corresponding Output action is Activate Effect or Activate Layout. When you alt-tab into that game, SignalRGB applies your chosen effect. When you alt-tab out, it reverts.
Other useful Input triggers include:
- Application Started / Application Ended — triggers on process launch or close, not just focus change
- Key Pressed — a hotkey shortcut to change effects without touching the mouse
- System Logoff / System Resume — useful for dimming or switching to a specific ambient effect on wake from sleep
The Output side has actions beyond just RGB: Open Discord, Open PowerShell, Open SignalRGB, and others. These make the Macros system useful as a general automation layer tied to your RGB hardware, not just a lighting switcher. The Beta label means it’s functional but may still change. I’ve been using it for months without issues.
For users who prefer an open-source, no-account-required alternative, OpenRGB is the closest equivalent with slightly worse device detection but zero subscription model. If you’re running a full ASUS build, Armoury Crate with Aura Sync still does things SignalRGB can’t match for ASUS-specific hardware features. But for a mixed-brand desktop with hardware from three or four different manufacturers, SignalRGB is the most practical single-app solution available right now.
Frequently Asked Questions
Is SignalRGB free?
SignalRGB has a free version that includes device control, sync across all supported hardware, and access to the Free effects library. The Pro subscription adds the full effects library, Screen Capture ambient lighting, and additional features. The free version is fully functional for most users. You can try Pro features free for a limited period from the SignalRGB website.
Does SignalRGB replace iCUE, Armoury Crate, and Razer Synapse?
For RGB lighting control, yes. SignalRGB can replace all manufacturer apps for lighting. However, manufacturer apps provide additional non-lighting features SignalRGB doesn’t have: iCUE handles Corsair headset equalizer settings, Armoury Crate provides ASUS fan curves and Scenario Profiles, Razer Synapse manages DPI stages and macros. If you only need lighting sync, SignalRGB handles it entirely. If you need the non-lighting features, you’ll run the manufacturer app alongside it.
How do I make SignalRGB switch effects automatically when I launch a game?
Go to My Rig > Macros. Create a new macro, set the Input to Foreground App Match and enter your game’s executable name, then set the Output to Activate Effect and choose your desired effect. SignalRGB applies that effect whenever that application is in focus and reverts when you switch away.
Can SignalRGB control fans?
Yes, for fans connected through supported USB fan hubs. Corsair Commander Core XT, Commander Pro, and similar Corsair controllers are supported, along with some Lian Li and NZXT hubs. Fans plugged directly into motherboard headers aren’t controlled by SignalRGB. For motherboard fan control, use your motherboard’s software (Armoury Crate Fan Xpert for ASUS, NZXT CAM for NZXT hardware, etc.).
SignalRGB vs OpenRGB: which should I use?
SignalRGB has better device compatibility, a more polished interface, and the Screen Capture ambient lighting feature. OpenRGB is fully open-source, free without any subscription tier, and works on Linux. If you’re on Windows and want the best out-of-box experience for a mixed-brand setup, SignalRGB. If you want open-source or need Linux support, OpenRGB. We compare both in detail in our OpenRGB vs SignalRGB guide.
Related Guides
- SignalRGB setup guide — the install-side companion.
- SignalRGB Free vs Pro — the upgrade decision.
- How to sync RGB across vendors with SignalRGB — the cross-vendor flow.
- SignalRGB audio visualizers — the audio-reactive setup.
- OpenRGB vs SignalRGB — the OpenRGB comparison.