You just finished building your ROG rig, you open Armoury Crate for the first time, and the thing stares back at you like a cockpit with too many buttons. I’ve been there. Most people click around the RGB section, set a rainbow effect, and never touch 80% of what the app can actually do.
That’s a shame, because Armoury Crate isn’t just a lighting controller. It’s got fan curves, game-linked profiles, AI-generated lighting effects, network QoS tools, and a lot more packed into one place. I want to walk you through all of it properly so you’re actually using what you paid for.
What Armoury Crate Actually Includes
Before diving into each section, it helps to understand what you’re dealing with. Armoury Crate isn’t one feature with a few toggles. It’s a hub for five distinct tools that used to require separate software.
- Aura Sync — RGB lighting control and synchronization across all compatible devices
- Fan Xpert 4 — fan curve customization, Smart Mode tuning, and RPM control
- GameFirst — network traffic prioritization for gaming
- Scenario Profiles — app-linked device configurations that switch automatically
- Macros — programmable key sequences for supported hardware
I’ll focus on the four you’ll actually use every day: Aura Sync, Fan Xpert 4, Scenario Profiles, and Settings. If you’re running into problems getting the app working at all, check our guide on Armoury Crate not working first before going further here.
Setting Up Aura Sync: Syncing Your Devices
Aura Sync is where most people start, and it’s honestly the most satisfying part of the app to configure. I’d argue it’s also where people make the most mistakes by rushing it.
Open Armoury Crate and click Aura Sync in the left sidebar. You’ll land on the Sync Devices tab by default. This is the page that matters most for getting everything talking to each other.
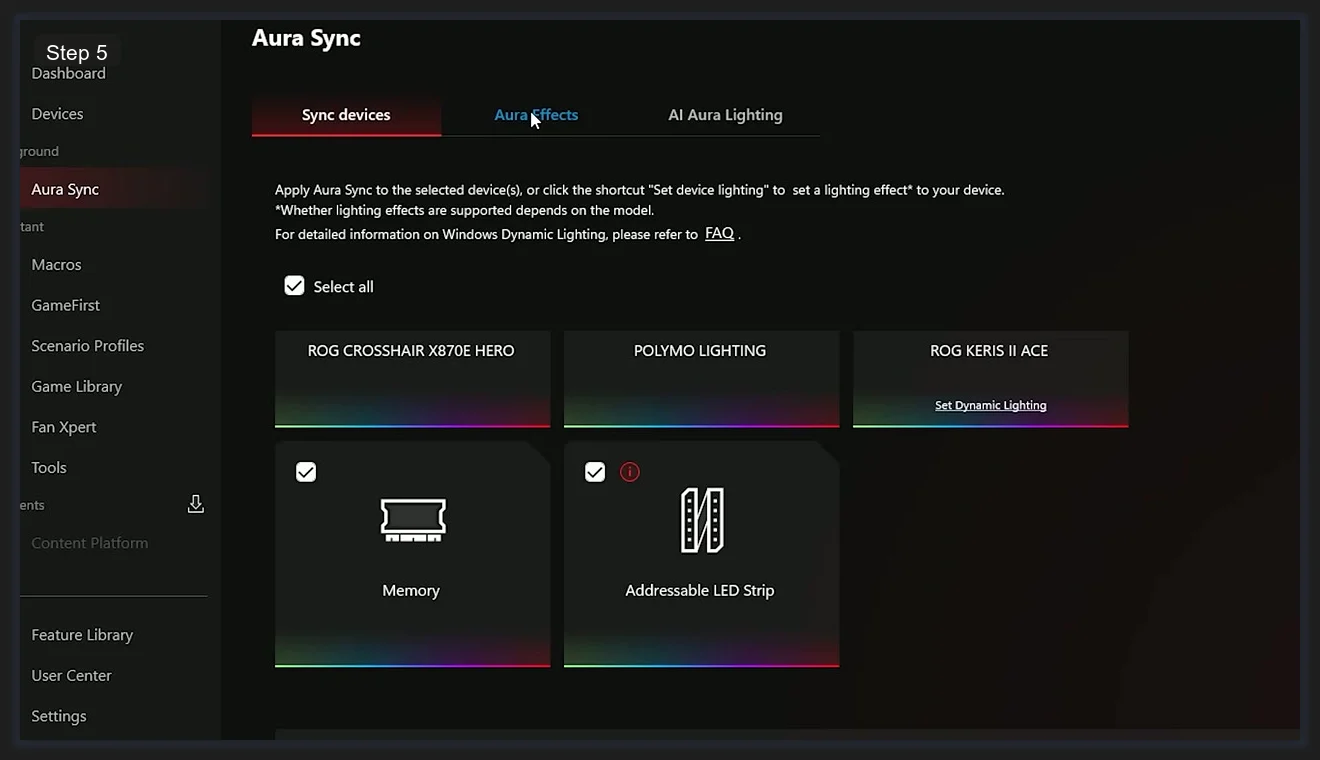
You should see your connected devices listed here. On a fully kitted ROG build, that list typically includes the ROG CROSSHAIR X870E HERO motherboard, POLYMO LIGHTING panels (if you’ve got them), your ROG KERIS II ACE mouse, Memory sticks, and any Addressable LED Strips plugged into your ARGB headers. There are three tabs at the top of this section: Sync Devices, Aura Effects, and AI Aura Lighting. Don’t skip past that third one — I’ll cover it in its own section below because it’s genuinely new and worth your time.
Select the devices you want to sync, then head to the Aura Effects tab to pick your lighting mode. Options range from Static and Breathing to Strobing, Color Cycle, and several reactive modes. Choose your colors, set the speed and brightness, then hit Apply. All synced devices will shift to the same effect simultaneously.
If your RAM isn’t showing up in the device list, that’s a separate issue with how Armoury Crate scans DIMM slots. We’ve got a dedicated article on Aura Sync not detecting RAM that covers the fix.
ARGB Headers: Gen1 vs Gen2 and LED Limits
This is the part most guides skip entirely, and it’ll save you a headache if you’re running multiple ARGB strips or fans off your motherboard headers.
Inside the Aura Sync section, you’ll find a tab specifically for your ARGB headers. Each header can be toggled between Gen1 and Gen2 mode.
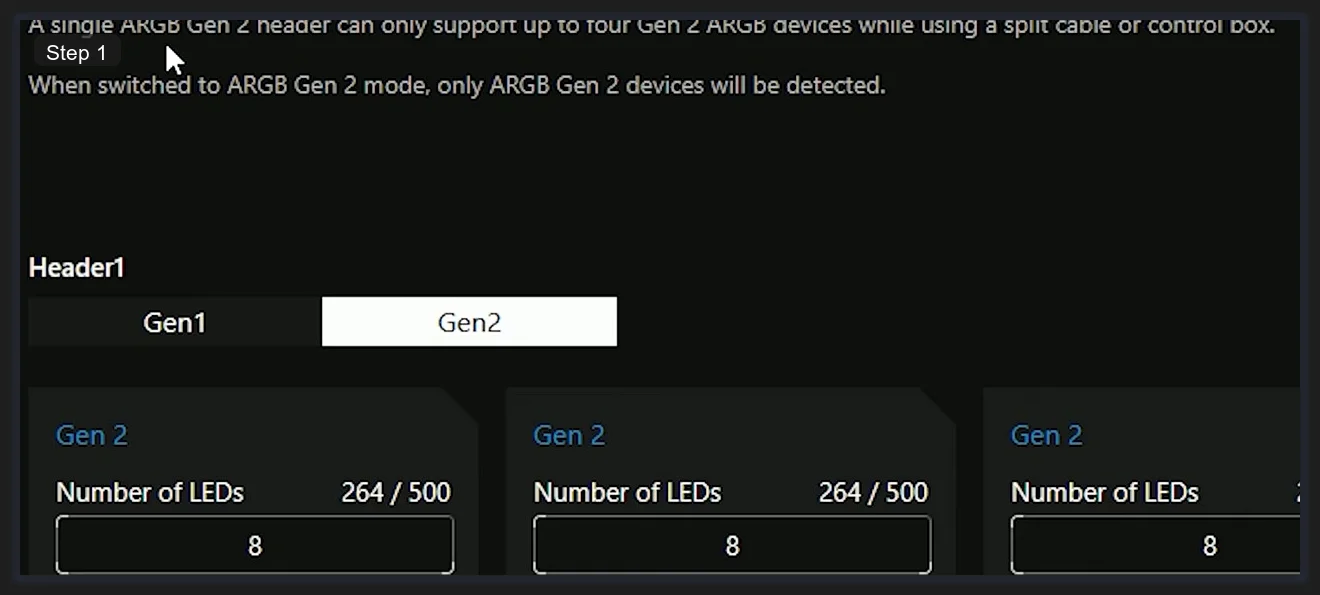
Gen1 supports one device per header. Simple. Gen2 is the one you want if you’re daisy-chaining devices via a split cable, because it supports up to four devices on a single header. The catch (and there’s always a catch) is the LED limit. Each Gen2 header supports a maximum of 500 total LEDs across all connected devices. Armoury Crate actually shows you the count per device in real time. I’ve seen builds where someone plugged in three ARGB fans and wondered why the colors were glitching out; they were sitting at 264 out of 500 LEDs per header but hadn’t noticed the count at all.
The interface shows each connected device as a card with its current LED count displayed. If you’re getting weird lighting behavior on strips or fans, checking this screen first is usually the fastest diagnosis.
AI Aura Lighting: The Experimental Feature Worth Trying
This one’s new for 2026 and I genuinely didn’t expect to like it as much as I do. ASUS added an AI Aura Lighting tab inside the Aura Sync section, and it does something no RGB software has done before at this level.
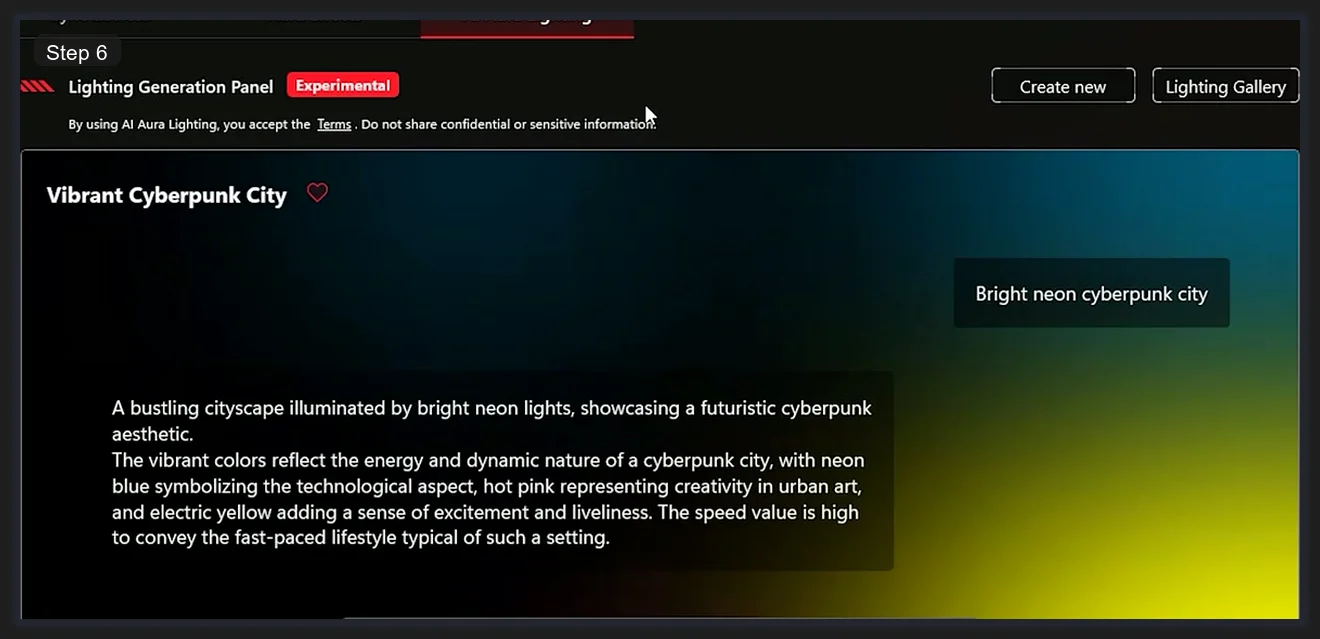
You type a text prompt, and the app generates a lighting effect from it. The example shown in the interface is “Vibrant Cyberpunk City”, which produces a neon blue, pink, and yellow gradient with a fast pulse that looks exactly like the name suggests. It’s tagged Experimental, which is honest of them. It doesn’t always nail the brief, and I’ve had prompts produce effects that felt more “confused sunset” than “Cyberpunk City.” But when it works, it’s a faster way to land on something unique than manually tweaking HSB sliders for 20 minutes.
The panel has two buttons: Create New (for generating a fresh effect from a prompt) and Lighting Gallery (for browsing effects you’ve already generated and saved). I’d recommend keeping a few in the gallery as backups. If you generate something you love, save it immediately because there’s no undo history for prompt-generated effects once you overwrite them.
Fan Xpert 4: Fan Control That Actually Makes Sense
Fan control is the feature people ignore until their PC sounds like a jet on idle or their temps are spiking under load. I’d set this up before you ever run a game.
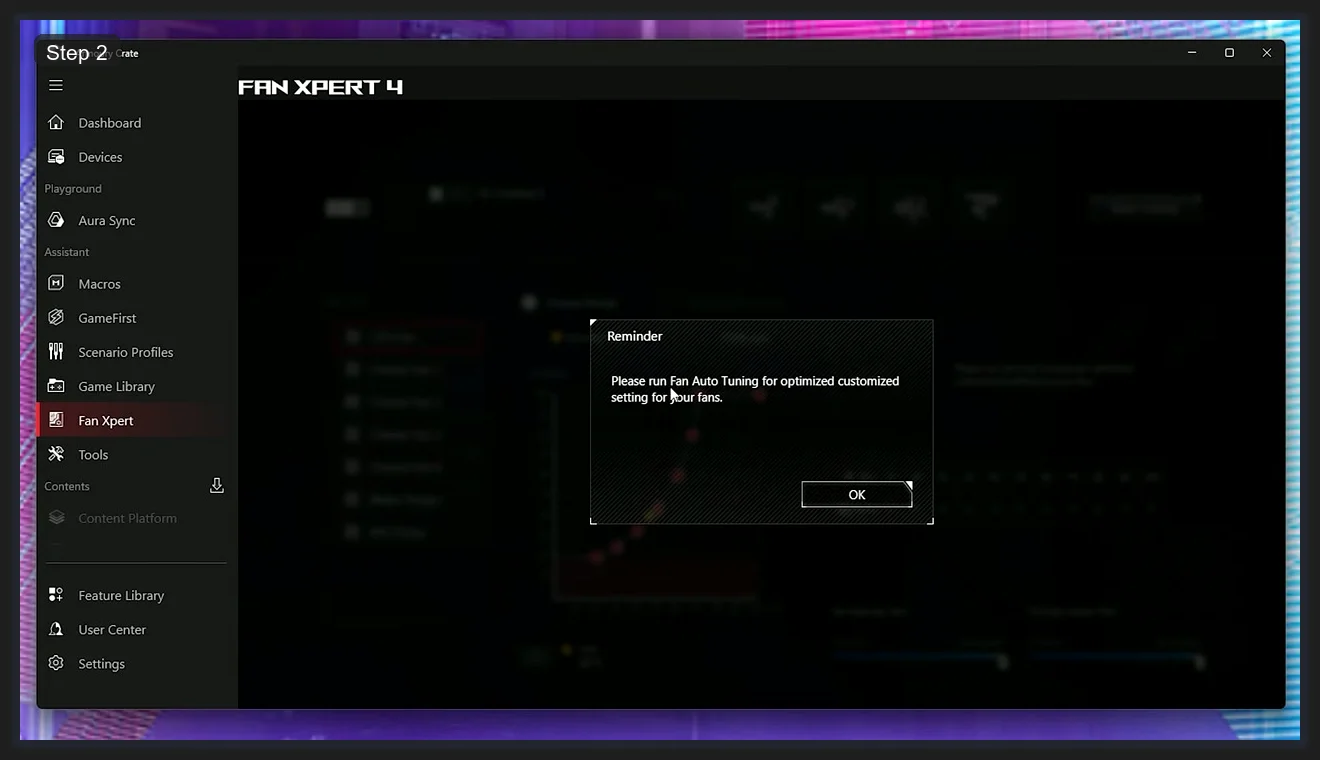
Click Fan Xpert in the sidebar. The first time you open it, you’ll likely see a popup telling you to run Fan Auto Tuning for optimized settings. Do it. It takes a few minutes and profiles each fan connected to your system before it sets baseline curves.
Once that’s done, you’ll see the fan list on the left side of the Fan Xpert 4 interface.
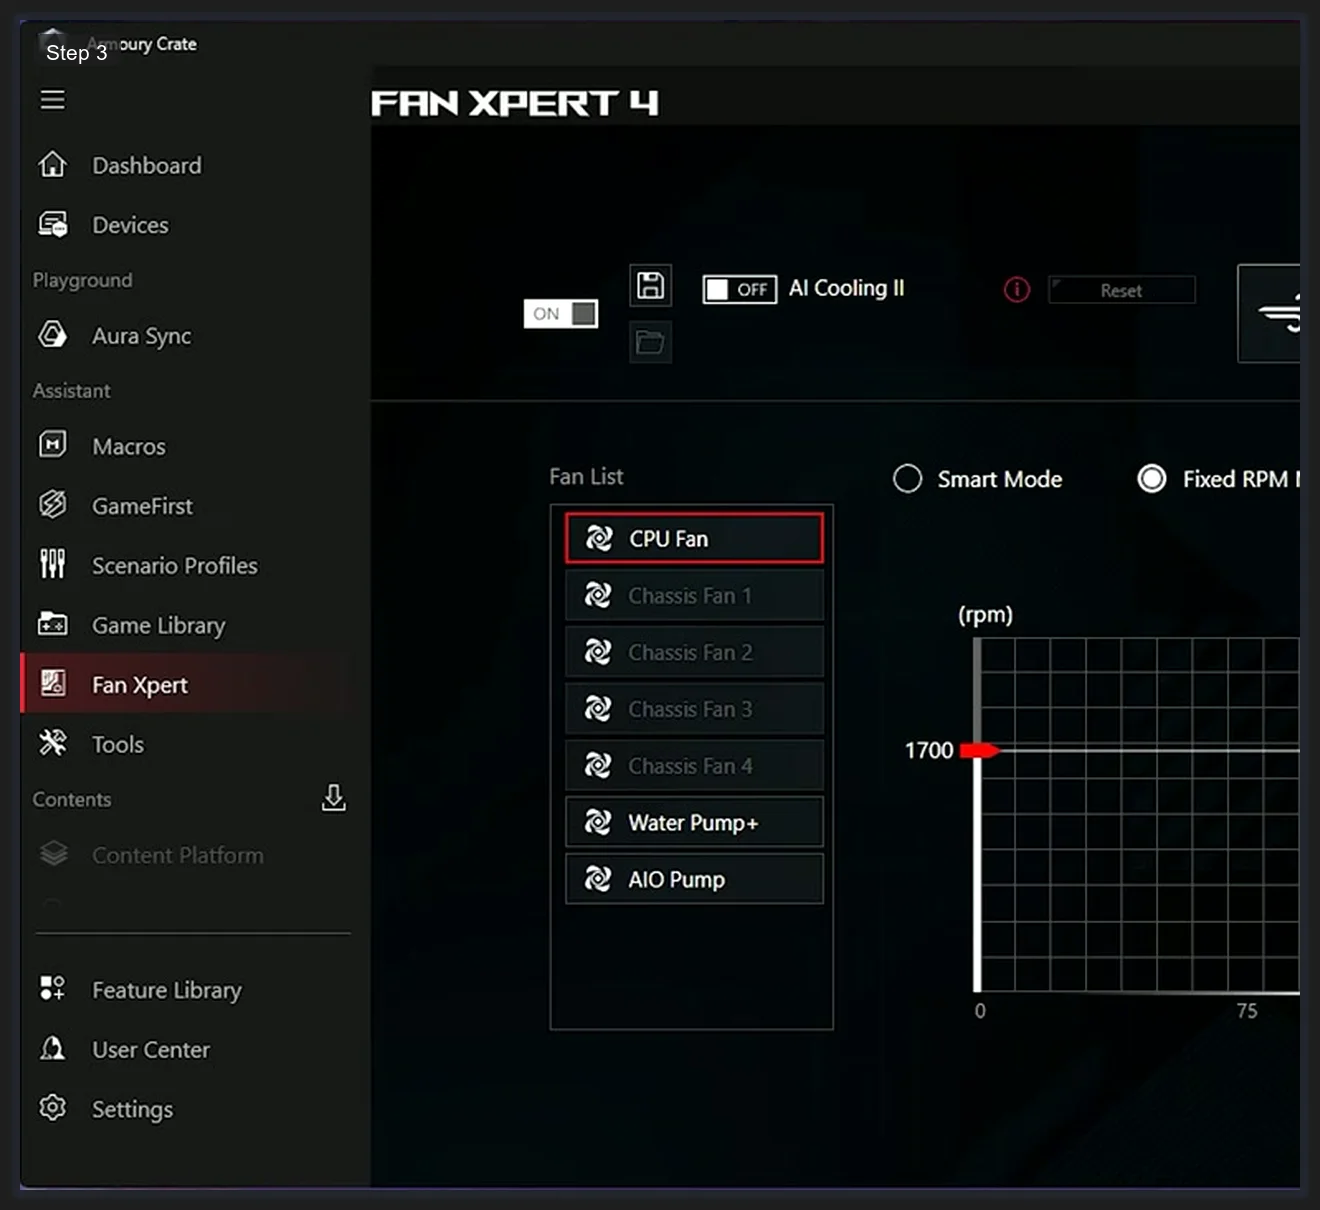
The list shows: CPU Fan, Chassis Fan 1 through Chassis Fan 4, Water Pump+, and AIO Pump. CPU Fan is highlighted by default and that’s where you’ll spend most of your time. The live RPM readout beside each fan updates in real time as you make changes.
For each fan, you’ve got two primary control modes:
- Smart Mode — Armoury Crate adapts the fan speed automatically based on sensor readings. It’s the easiest option and works well for general use.
- Fixed RPM — You set an exact RPM and it stays there regardless of temps. Useful for media editing setups where consistent noise levels matter more than dynamic cooling.
Smart Mode is where the fan curve graph becomes relevant.
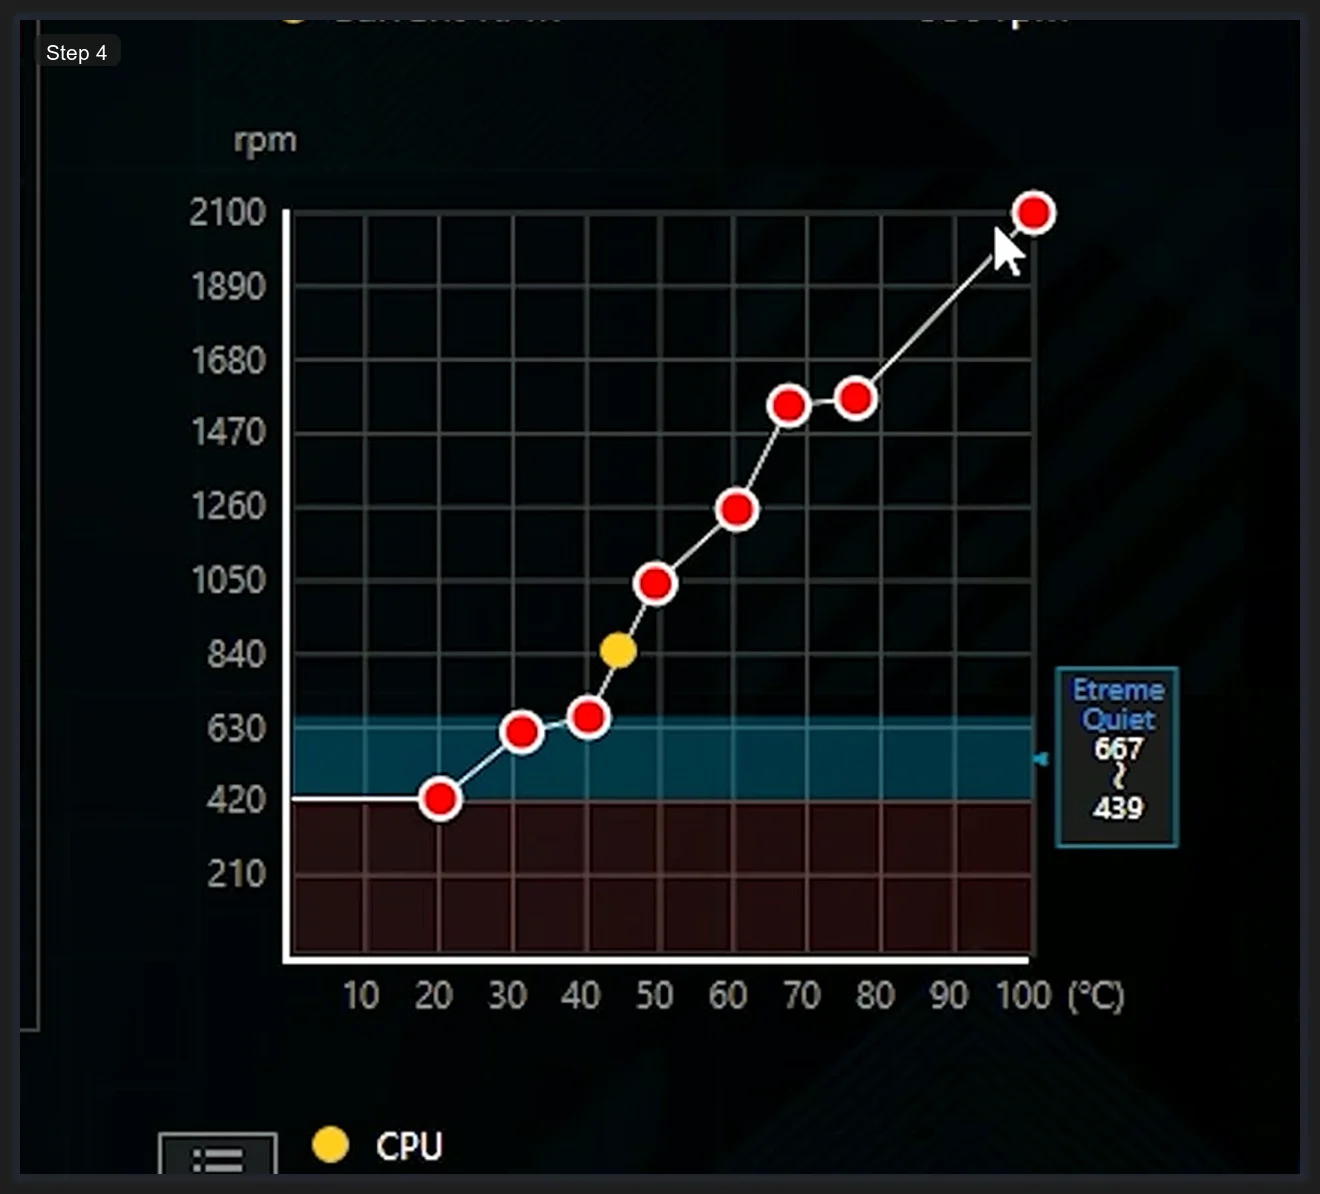
The curve editor shows RPM on the Y-axis (up to around 2100 RPM) and temperature in degrees Celsius on the X-axis (up to 100°C). Red dots connected by a line define your curve. You can drag each dot to reshape the curve however you want. There’s also a yellow dot showing your current CPU temperature and fan RPM in real time, which is genuinely useful while tuning. I’d start with a mild S-curve: keep fans quiet below 50°C, ramp them up sharply between 65°C and 80°C, and let them run full tilt above that.
Scenario Profiles: Game-Linked Device Configurations
This is the feature that turns Armoury Crate from a settings panel into something that actually reacts to what you’re doing. Scenario Profiles let you tie a complete device configuration to a specific application, and the profile switches automatically the moment that app launches.
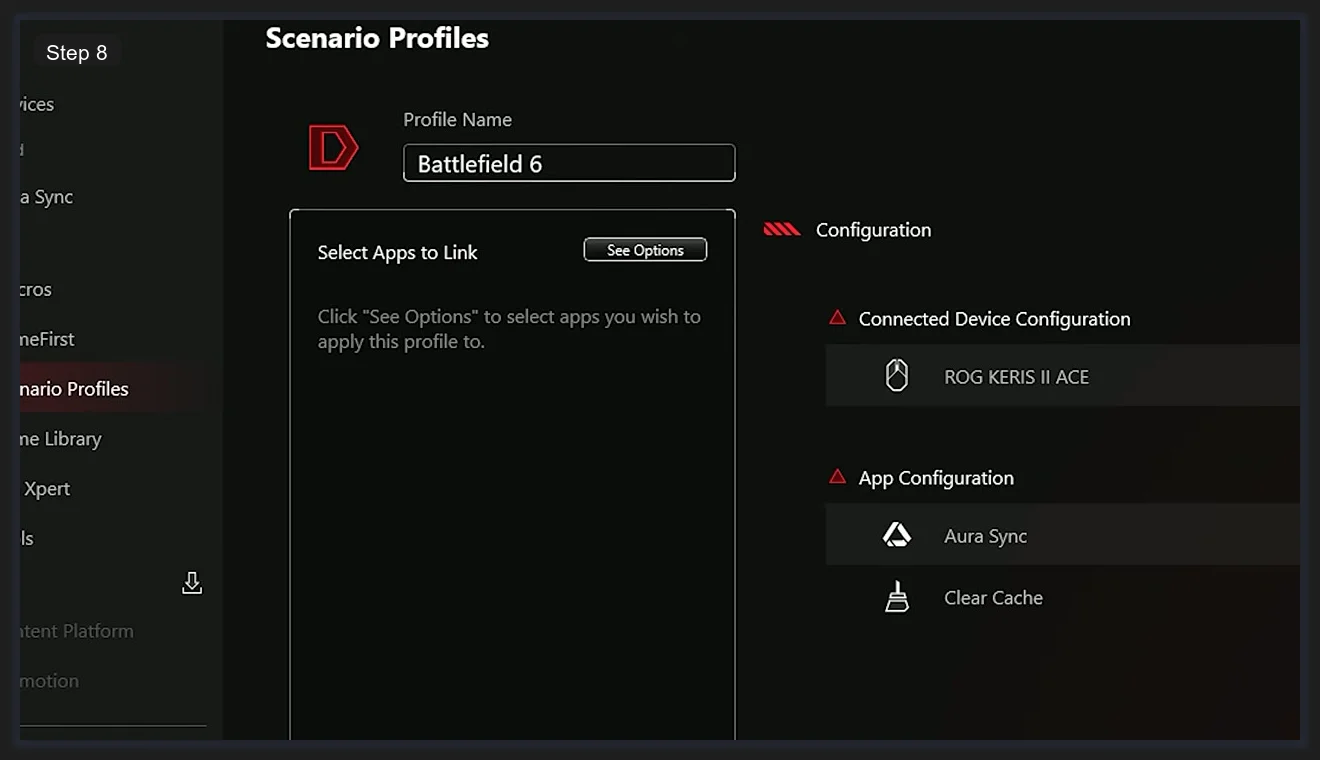
Inside a profile, the Configuration section has two parts. Connected Device Configuration controls hardware like the ROG KERIS II ACE mouse (DPI settings, button mappings). App Configuration handles software-level settings like Aura Sync lighting effects and cache behavior.
To set one up, go to Scenario Profiles, create a new profile, and use the Select Apps to Link panel to browse for your game’s executable. Once linked, any time you launch that game, Armoury Crate applies the profile automatically. When you close the game, it reverts to your default profile.
Practical uses for this are broader than they sound. You could have a Streaming profile that cuts fan noise, dims your RGB to something subtle, and sets your network priority to the streaming software. Or a Work Mode profile that turns off all RGB entirely and sets fans to quiet. It doesn’t have to be gaming-specific at all.
Settings and Themes
The Settings section doesn’t get much attention but it’s worth a quick look, especially the theme options.
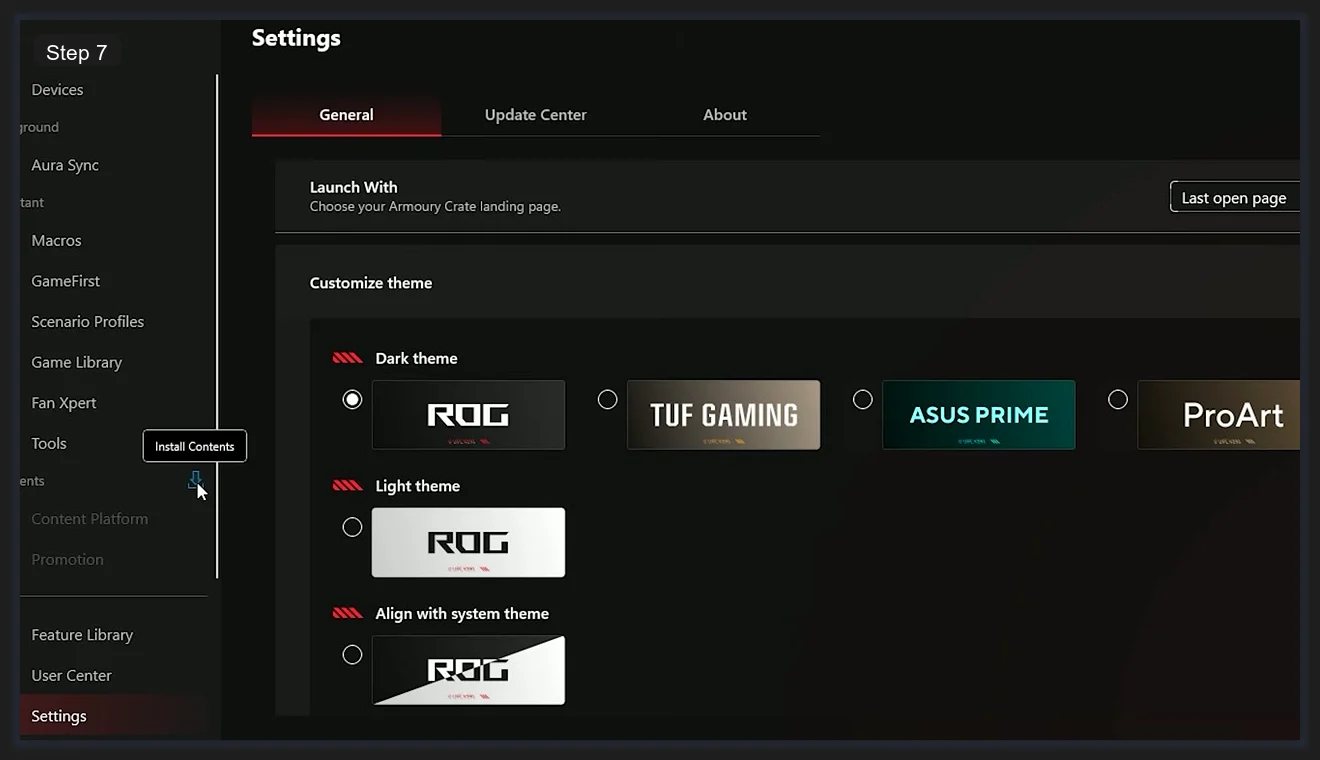
Under Settings > General, you’ll find the Customize Theme option. Dark theme variants include ROG, TUF Gaming, ASUS PRIME, and ProArt. There’s also a Light theme in ROG styling and an Align with System Theme option that lets Windows’ dark/light mode preference control the app automatically. If you’ve got a TUF build, switching to the TUF Gaming dark theme matches your hardware’s branding. The Launch With: Last open page option means Armoury Crate reopens to whichever section you were on last, which saves a few clicks if you’re in and out of Fan Xpert frequently.
If you’re thinking about removing the app entirely down the road, we’ve written a separate guide on how to uninstall Armoury Crate cleanly. And if you want a broader look at your options, our best RGB software roundup covers how Armoury Crate stacks up against the alternatives.
Frequently Asked Questions
What does Armoury Crate actually do?
Armoury Crate is ASUS’s unified control hub that brings together Aura Sync (RGB lighting), Fan Xpert 4 (fan curves and speeds), GameFirst (network prioritization), Scenario Profiles (game-linked configs), and Macros all in a single app. You don’t need separate software for each feature.
How do I set up Aura Sync in Armoury Crate?
Open Armoury Crate and go to the Aura Sync section. Select the Sync Devices tab and confirm your connected hardware is listed. Select the devices you want to sync, switch to the Aura Effects tab, choose your effect, and hit Apply. If a device isn’t showing up, it’s usually a detection issue rather than a sync issue.
What’s the difference between ARGB Gen1 and Gen2 in Armoury Crate?
Gen1 supports a single ARGB device per header. Gen2 supports up to four devices via a split cable, with each header supporting a maximum of 500 total LEDs. Armoury Crate shows the current LED count per device in real time. Exceeding the 500-LED limit causes erratic lighting behavior, so check the count screen if you’re running multiple fans or strips off one header.
What is AI Aura Lighting and is it stable?
AI Aura Lighting is a new experimental feature that lets you type a text prompt (like “Vibrant Cyberpunk City”) and the app generates a custom RGB lighting effect based on that description. It’s tagged Experimental and doesn’t always nail the brief, but it’s a fast way to land on unique effects. Save anything you like to the Lighting Gallery immediately since there’s no undo once you overwrite a generated effect.
How do Scenario Profiles work in Armoury Crate?
Scenario Profiles let you link a saved configuration to a specific application executable. When that app launches, Armoury Crate applies the linked profile automatically. You can configure connected device settings (like mouse DPI) and app-level settings (like Aura Sync lighting effects) per profile. It works for any application, not just games.
Related Guides
- ASUS Aura Sync setup guide — the deeper Aura walkthrough inside Armoury Crate.
- How to use Aura Creator — the timeline-based effect editor.
- Armoury Crate not working fix guide — for when it stops cooperating.
- Armoury Crate vs G-Helper — the lightweight alternative for laptops.