I Almost Didn’t Upgrade to SignalRGB Pro
I’ll be honest with you. I ran SignalRGB’s free tier for three solid months and didn’t think I needed anything more. I had five different RGB brands in my build, they were all synced through one app, and I’d already uninstalled Armoury Crate without looking back. Free SignalRGB was doing everything I thought mattered.
Then I tried the Pro trial. I didn’t expect much. I figured it’d be some extra effects I wouldn’t care about, maybe a few cosmetic tweaks. I was wrong about all of it. The Layout editor alone changed how my entire rig looked during gaming sessions, and Screen Ambience turned my desk into something I genuinely didn’t want to turn off.
I’ve now been on Pro for six months total, and I think I’ve got a clear picture of who actually needs it and who doesn’t. I’ve watched enough people on Reddit ask the same question to know there’s real confusion about what you’re actually paying for. So I’m going to break down exactly what the free tier gives you, what Pro adds on top of it, and whether that $45 per year subscription is worth your money. I’m not sponsored by SignalRGB. I paid for my own subscription. I’ve also tested OpenRGB as an alternative, so I know what else is out there.
If you’re sitting on the fence right now wondering whether to stay on free or pull out your wallet, this is everything I wish someone had told me before I made that decision.
What You Get for Free in SignalRGB
I want to start here because the free tier is genuinely impressive. I think a lot of people underestimate what you can do without paying a single dollar, and I don’t want anyone thinking this article is just a sales pitch for the upgrade. The free tier handles most of what casual RGB users actually need.
When you first open SignalRGB, you’ll land on the Home screen. I’ve got the Library sidebar open here, and you can see it breaks effects into Free and Pro categories right away. There’s no guessing about what you can and what you can’t use.

I counted over 30 free effects available right out of the box. You’ve got your standard color cycling, breathing, rainbow wave, and static color options. I used a simple color cycle across my entire build for the first month and it looked great. The presets are well-designed and they don’t feel like stripped-down versions of the Pro effects. They’re complete, polished lighting modes that work exactly as advertised.
The device setup is where SignalRGB’s free tier really starts to shine. I’m running an ASUS ROG STRIX Z390-E motherboard with multiple ARGB headers, and the Devices page detected everything automatically. You can see the channels, configure each header independently, and even get a preview of your build layout right from this screen.
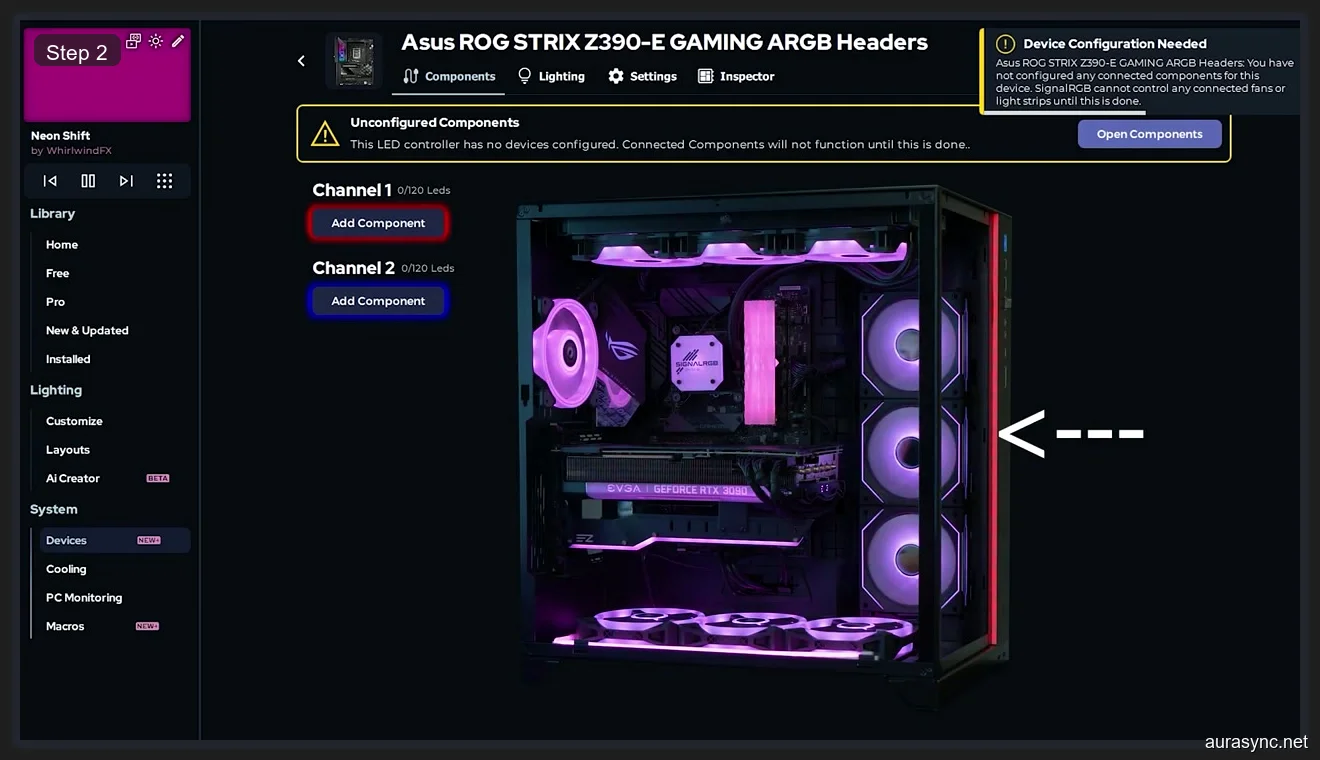
I set up all four ARGB headers on my motherboard through this interface. The process took maybe five minutes total. I’ve spent longer than that just waiting for Armoury Crate to load, so the speed difference alone justified the switch for me. Profiles work on the free tier too, so you can save different lighting configurations and swap between them. I’ve got a gaming profile with brighter effects and a work profile that keeps everything dim and static.
Device support on the free tier is identical to Pro. I want to make that very clear because I see this question constantly. You don’t get access to more hardware by paying. If your device works on free, it works the same on Pro. If it doesn’t work on free, Pro won’t fix that. The hardware detection and driver layer is exactly the same across both tiers.
Free Tier Multi-Brand Support Is the Real Killer Feature
I think the single biggest reason to use SignalRGB over manufacturer apps is multi-brand support, and you get this entirely for free. I’ve got ASUS motherboard headers, Corsair RAM, a Razer Addressable RGB Controller handling my LED strips, and Lian Li Uni Fans. That’s four different manufacturers that would normally require four different apps running simultaneously.
I used to run Armoury Crate, iCUE, Razer Synapse, and L-Connect all at the same time. They’d conflict with each other, eat up system resources, and half the time one app would override what another was doing. I’d set a color in iCUE and watch Armoury Crate change it back thirty seconds later. It was a nightmare, and I know a lot of you have dealt with the same thing because I see those posts on r/buildapc every single week.
Here’s my Razer Addressable RGB Controller in SignalRGB. You can see all six channels laid out with the color-coded Add Component buttons. I’m using this controller for three separate LED strip runs inside my case, and each channel is independently configurable.
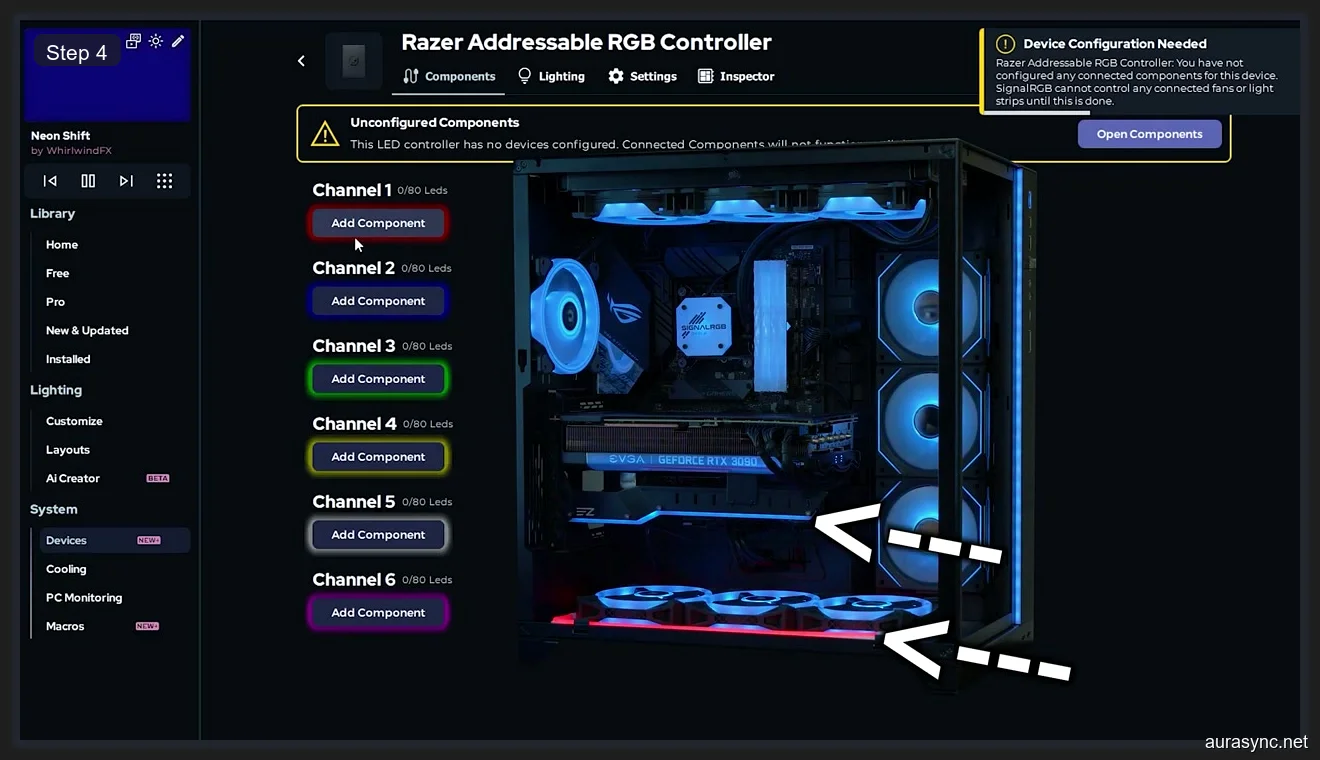
I wired my strips through channels 1, 3, and 5 to keep them separated for cleaner cable management. SignalRGB picked up the controller instantly. I didn’t have to install Razer Synapse at all, which means one less background service eating RAM and one less app fighting for control of my hardware. That matters, especially if you’ve ever dealt with Armoury Crate not working properly after a Windows update.
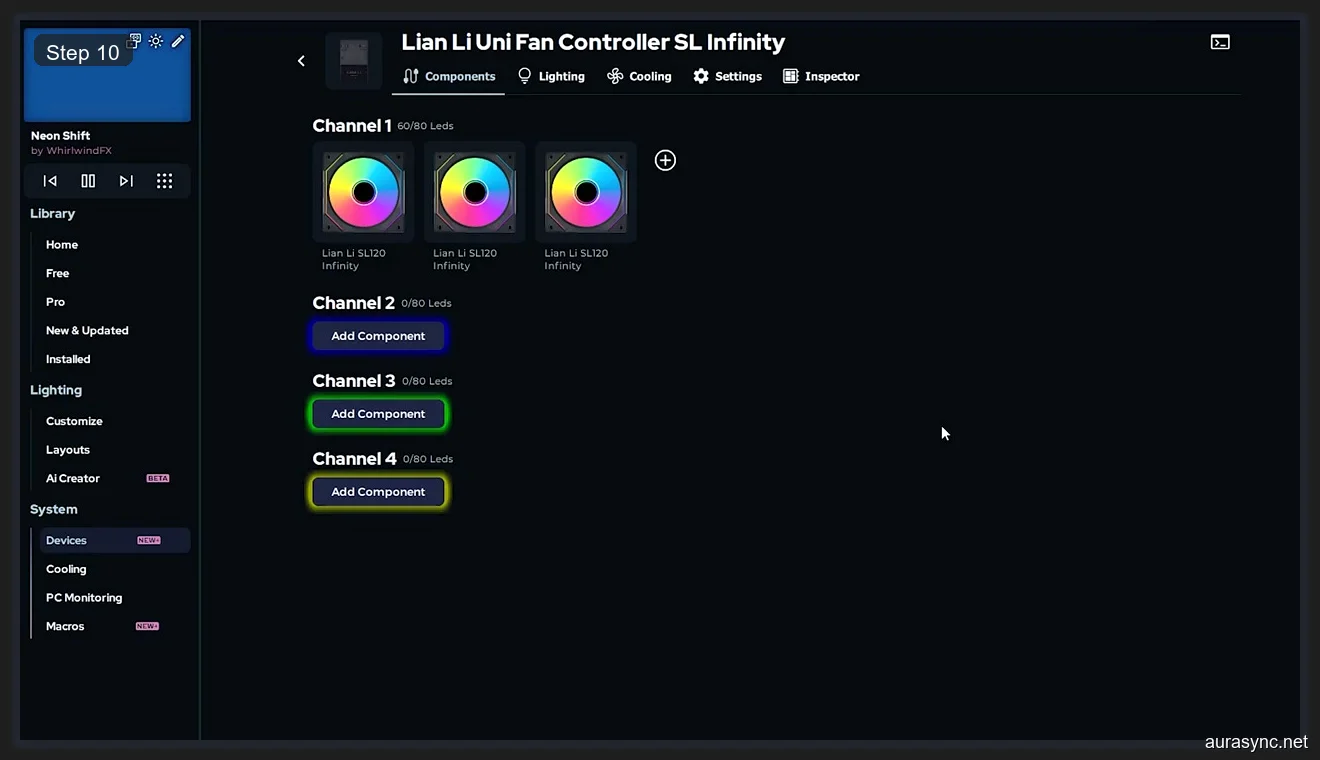
My Lian Li Uni Fans show up just as cleanly. I’ve got three SL120 Infinity fans on the Uni Fan Controller, and they’re all configured through Channel 1. I can see each fan individually in the interface and apply effects across all three simultaneously or target them one at a time.
I want to emphasize this because it’s important: all of this multi-brand unification is free. You don’t need Pro to control ASUS, Corsair, Razer, and Lian Li from one app. You don’t need Pro to sync effects across brands. I ran this exact setup for three months without paying anything, and the sync worked perfectly. The free tier gives you a single pane of glass for your entire build’s RGB, and that alone makes it better than running four separate manufacturer apps.
What Pro Actually Adds to SignalRGB
I’ve spent a lot of time talking about the free tier because I think that context matters. Now let me walk you through what changes when you hand over $45 per year. I’ll be direct about what I think justifies the cost and what I think is just nice to have.
Pro adds five major features: the Layout editor, Pro-exclusive effects, Screen Ambience, game integrations, and priority support. I’ll cover each one individually, but I want to be upfront about this: the Layout editor is the reason I stayed on Pro. Everything else is a bonus.
The Pro effects library adds roughly 40 to 50 additional lighting effects on top of the free ones. Some of them are genuinely cool, like audio-reactive effects that pulse your RGB to music and effects that simulate fire, water, and weather patterns. I use a few of them regularly, but I wouldn’t have upgraded for the effects alone. The free effects cover most practical use cases, and the Pro effects are more about variety than necessity.
Game integrations let you tie your RGB to in-game events. I’ve tested it with a few supported titles and it works well enough. Your lights flash red when you take damage, change color based on health, that kind of thing. It’s fun for about a week and then most people turn it off. I did. It’s a cool party trick, but I wouldn’t list it as a reason to upgrade.
Priority support means your tickets get answered faster. I’ve submitted two tickets in six months and both got resolved within 24 hours. I can’t compare that to free tier support times because I never submitted a ticket before upgrading. Take that one as you will.
The Layout Editor: Why Pro Is Actually Worth It
I need to spend real time on this section because the Layout editor is the feature that turned me from a skeptic into a subscriber. I’ll explain what it does, why it matters, and show you exactly what it looks like in practice.
On the free tier, when you apply an effect like a rainbow wave, SignalRGB sends that effect to each device independently. Your motherboard LEDs get the wave. Your RAM gets the wave. Your fans get the wave. But they’re not coordinated with each other. The wave doesn’t flow from your motherboard to your RAM to your fans in a smooth, continuous motion. Each device starts its own copy of the effect at its own position. It looks fine on its own, but it doesn’t look unified.
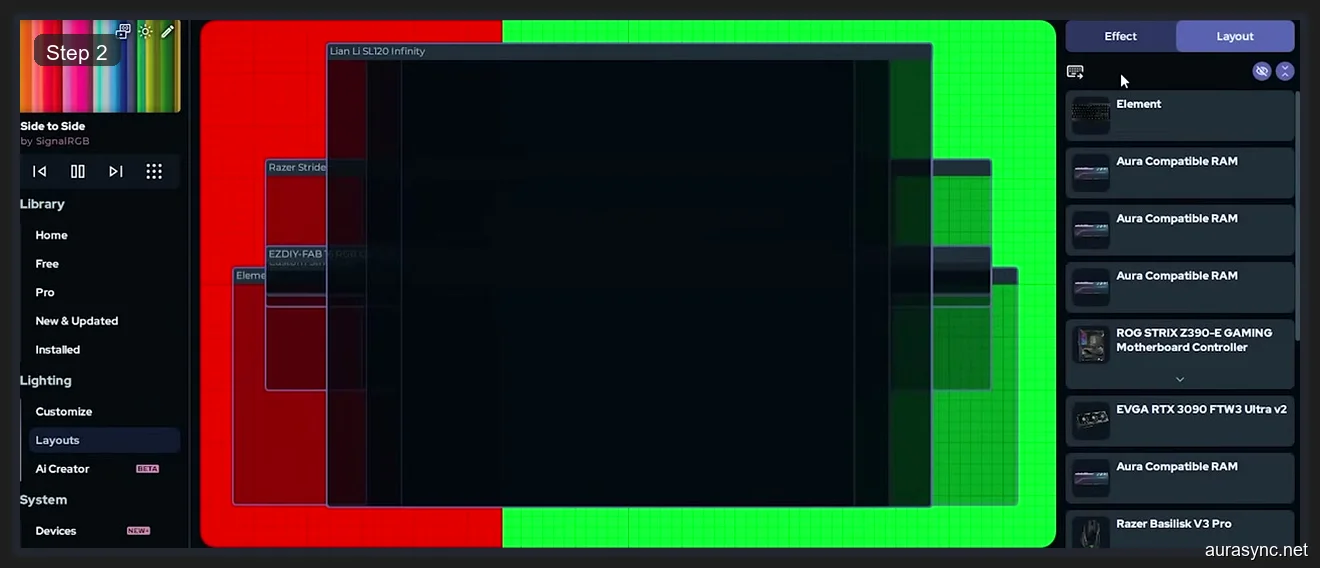
The Layout editor changes this completely. It gives you a 2D canvas where you position virtual representations of every device in your build. You drag each device box to match where it physically sits in your case. Then, when you apply an effect, SignalRGB treats the entire canvas as one surface and flows the effect across all devices based on their positions.
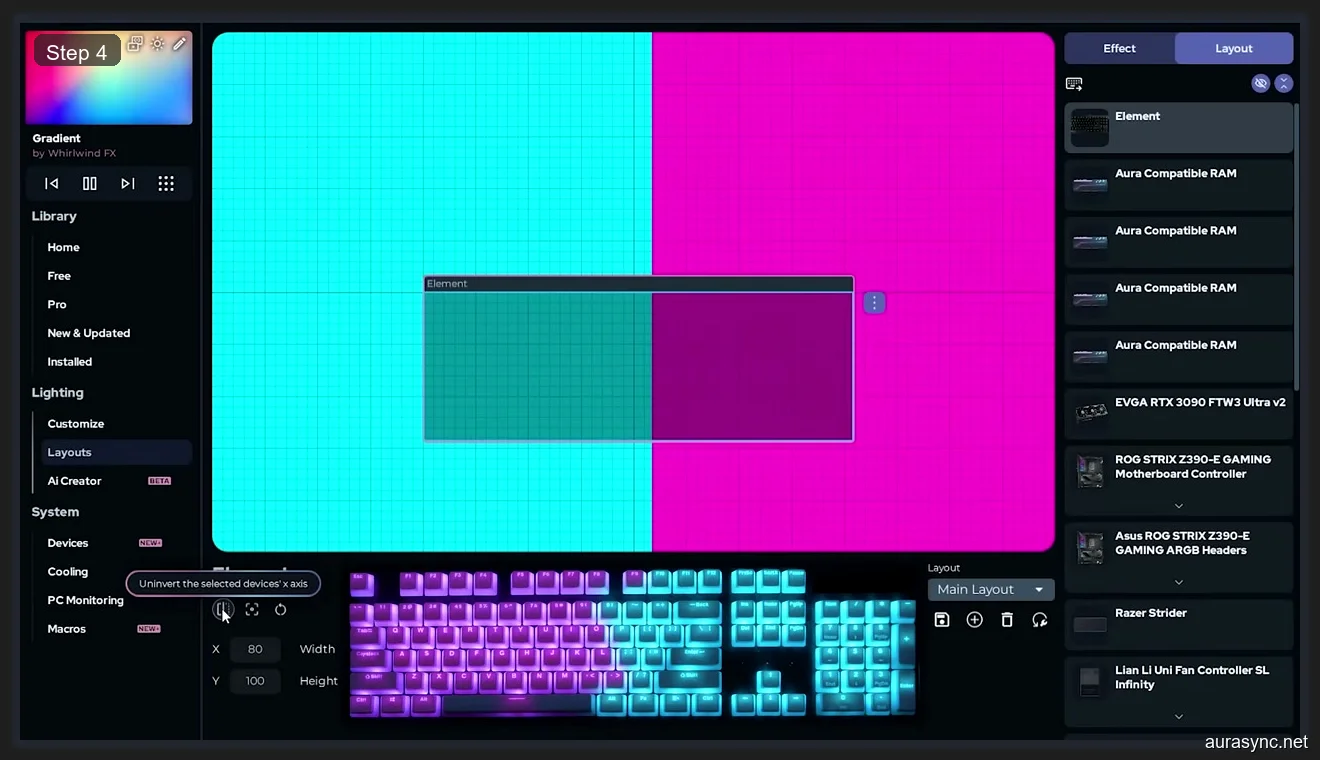
I’ve got the Layout editor open here with a gradient effect active. Look at the device list on the left side. I can see my EVGA RTX 3090, Aura RAM sticks, ASUS Z390-E motherboard headers, Razer Strider controller, and Lian Li fans all listed as individual items. Each one is a box on the canvas that I can drag, resize, and rotate to match my physical layout. The effect flows across all of them as one continuous animation because SignalRGB understands their spatial relationships to each other.
Here’s what that looks like with a device positioned on the canvas. I’ve dragged my keyboard into position to show how the effect display adapts based on where you place each device relative to everything else.
I spent about twenty minutes the first time I set up my layout, and I haven’t needed to touch it since. You place each device once, and every effect you apply from that point forward automatically respects the spatial arrangement. That’s the key insight here: you’re not configuring effects per device anymore. You’re configuring effects per room, per desk, per case. The layout is a one-time setup that makes every single effect look better without any additional work.
I want to explain why this matters in a way that goes beyond just the visual appeal. When I ran the free tier, I’d spend time tweaking individual device settings to try to make effects look coordinated. I’d adjust timing offsets, change speed values, and try to eyeball the sync between my motherboard LEDs and my fans. It was tedious, and it never looked quite right because I was faking spatial coordination through manual timing adjustments.
The Layout editor eliminates all of that work. I don’t tweak timing anymore. I don’t adjust speeds per device. I place the devices where they physically are, pick an effect, and it just works. That time savings alone was worth the subscription for me, because I was spending 15 to 20 minutes every time I wanted to try a new effect on the free tier, and now I spend about 10 seconds picking from the library and watching it flow correctly.
I also want to address the question I had before upgrading: does the Layout editor actually look noticeably different, or is it a subtle improvement that you’d only notice in a side-by-side comparison? It’s noticeable. Very noticeably different. When a wave effect actually travels through your case from left to right, hitting each device in physical order, it looks like your PC is alive. On the free tier, every device starts the same wave simultaneously, and it looks like a bunch of separate light shows happening to be near each other. I can’t show you this in a static screenshot, but if you’ve ever seen a well-coordinated Philips Hue setup where the light moves around the room, that’s the difference we’re talking about.
If you’ve got a single keyboard and nothing else, the Layout editor doesn’t matter to you. I want to be clear about that. But if you’ve got four or more devices, especially devices from different brands spread across your case, the Layout editor is what takes your RGB from “each thing doing its own thing” to “my entire build moves together.” I can’t overstate how much better it looks in person.
Pro Layout in Action: Side to Side Effect
I want to show you what the Layout editor actually produces, because screenshots tell this story better than I can with words alone. I’ve set up a Side to Side effect, which moves a color wave from left to right across the entire canvas.
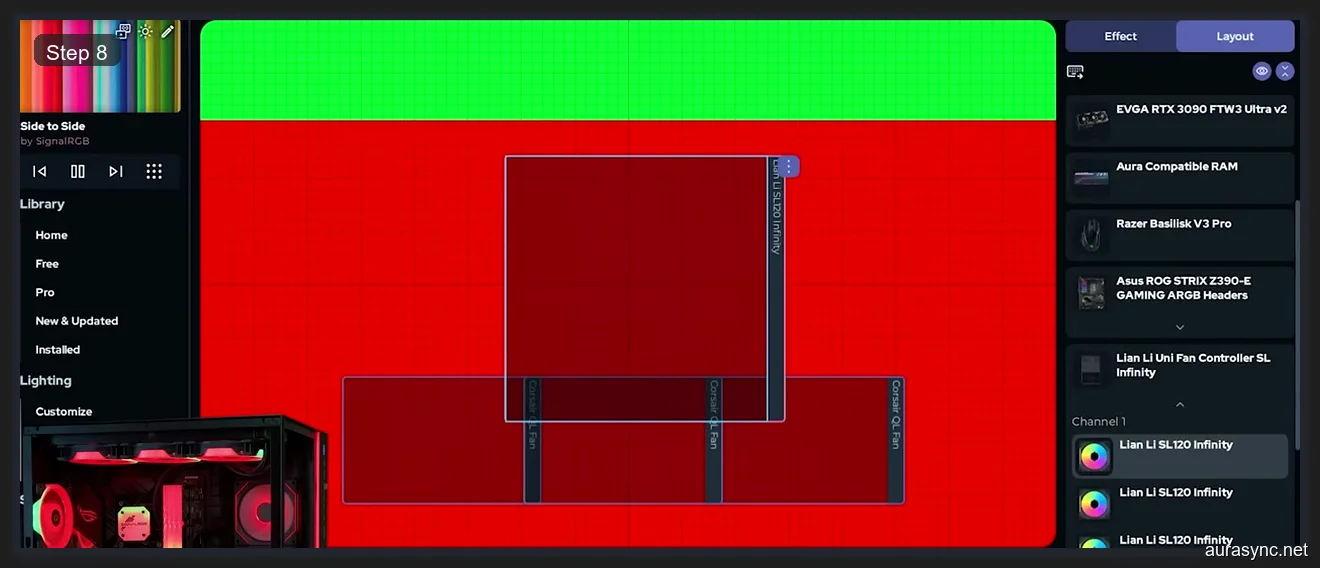
I’ve positioned all my devices to match their physical locations in my PC. The motherboard headers are centered, the RAM is above them, the fans are on the right side where they’re actually mounted, and the GPU is at the bottom. When the Side to Side effect runs, the wave starts from the left edge of the canvas and moves right. It hits my left-side LED strips first, then rolls across the motherboard headers, through the RAM, and finally reaches the fans on the right side of the case.
Without the Layout editor, all of those devices would start the Side to Side effect simultaneously. The wave would appear everywhere at once and move in the same direction on each device individually. It’d look like eight separate animations happening to be in the same case, not one unified motion passing through your build.
Here’s a closer look at how I’ve positioned my LED strips and Razer controller channels within the layout.
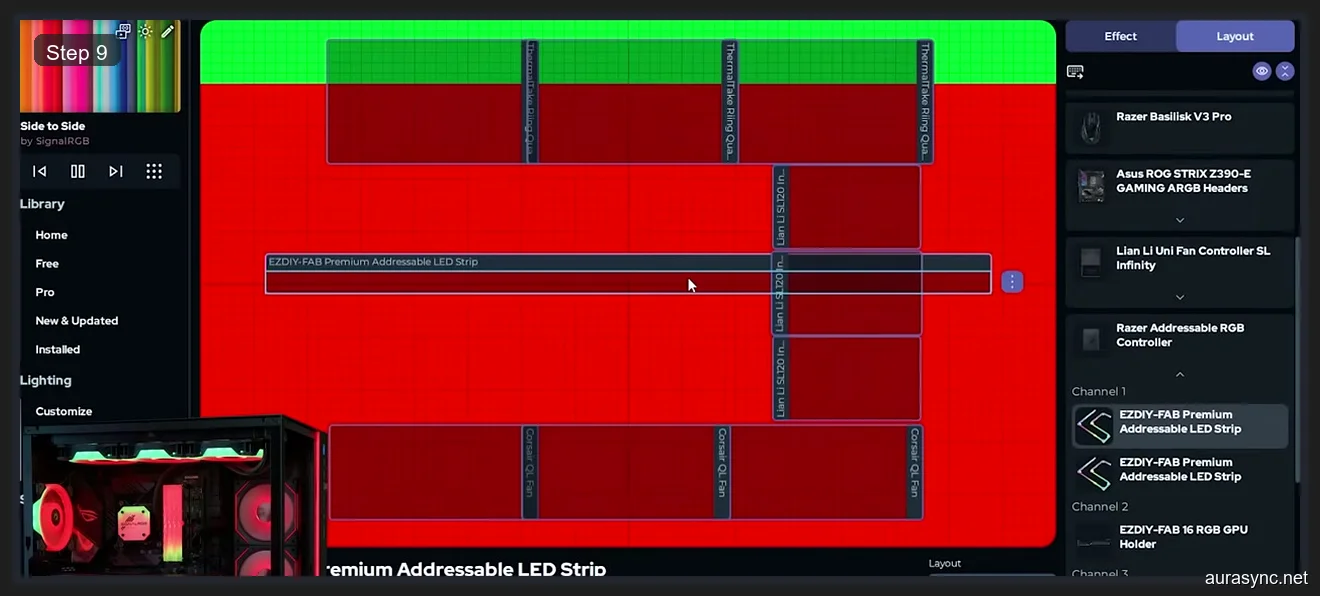
I’ve expanded the Razer controller channels so you can see how each strip gets its own position on the canvas. This level of detail is what makes the Layout editor powerful for complex builds. I’ve got strips running along the top of my case, down the right side, and across the bottom. Each one is positioned where it actually sits, so the effect flows in a physically accurate path through my build.
I’ve had friends come over, look at my PC, and ask what custom software I’m running. They assumed it was some kind of bespoke setup because the lighting looks so coordinated. It’s just the Layout editor doing its job. That spatial awareness is what transforms generic effects into something that actually impresses people who walk into your room.
Screen Ambience: Real-Time Screen Color Sync
Screen Ambience is the second Pro feature that I use regularly. It captures the colors on your monitor in real time and mirrors them to your RGB devices. If you’re watching a movie with a sunset scene, your entire desk glows orange and red. If you’re playing a game in a snowy environment, everything goes cool blue and white. It’s reactive and it’s immediate.
I was skeptical about this feature because I’ve tried similar things from other apps and they’ve always felt laggy or inaccurate. SignalRGB’s implementation is genuinely good. The latency is low enough that I don’t notice any meaningful delay between what’s on screen and what my LEDs are doing. It feels responsive and the color mapping is accurate enough that you can tell what’s happening on screen just by looking at your peripherals.
The GPU cost is real but manageable. I measured it at roughly 2 to 3 percent on my RTX 3090 during gaming. That’s noticeable if you’re chasing every last frame in a competitive shooter, but for single-player games and general desktop use, it’s completely fine. I leave Screen Ambience on during casual gaming and movies. I turn it off for ranked Valorant sessions where I want maximum performance.
I think Screen Ambience works best for people who use their PC for entertainment, not just gaming. Watching movies with ambient lighting behind your monitor is genuinely immersive, and it’s something I didn’t expect to care about until I tried it. I wouldn’t upgrade to Pro for Screen Ambience alone, but combined with the Layout editor, it’s a strong addition that I use multiple times a week.
If your desk setup is primarily about gaming and you’ve got LED strips behind your monitor, Screen Ambience turns your entire wall into a dynamic backlight. It’s the kind of feature that sounds gimmicky until you see it working in person, and then you genuinely can’t go back to static colors behind your display.
What Pro Does NOT Include
I think it’s just as important to cover what you’re not getting with Pro, because I’ve seen misconceptions about this all over Reddit and in Discord channels.
Pro does not give you access to more devices. I’ve said this before, but I’ll say it again because it’s the most common misconception I encounter. The device support list is identical between free and Pro. If your Corsair RAM isn’t detected on free, upgrading to Pro won’t fix that. If your ASUS motherboard headers work on free, they’ll work exactly the same on Pro.
Pro does not add fan speed control or any hardware control beyond RGB lighting. It’s purely a lighting tool on both tiers. If you need fan curves, you’ll still need your motherboard’s BIOS settings or a separate fan controller app.
Pro does not reduce resource usage. SignalRGB uses roughly the same amount of CPU and RAM on both tiers. The Pro effects might use slightly more GPU if you’re running something like Screen Ambience, but the base footprint is identical between free and Pro.
Pro does not include lifetime access. This is a subscription. If you stop paying, you lose access to Pro features and revert to the free tier. Your devices keep working. Your free effects keep working. You just lose the Layout editor, Pro effects, and Screen Ambience. I know subscriptions are controversial in the PC community, and I’ll address whether I think this one is fair in my verdict section below.
SignalRGB Free vs Pro: Complete Feature Comparison
| Feature | Free | Pro ($45/year) |
|---|---|---|
| Device support (ASUS, Corsair, Razer, Lian Li, etc.) | Full | Full (same) |
| Multi-brand sync | Yes | Yes |
| Basic effects (30+ presets) | Yes | Yes |
| Pro effects (40+ additional) | No | Yes |
| Lighting profiles | Yes | Yes |
| Layout editor (spatial device mapping) | No | Yes |
| Screen Ambience (real-time screen sync) | No | Yes |
| Game integrations | No | Yes |
| AI Effect Creator | No | Yes |
| Priority support | No | Yes |
| Fan speed control | No | No (neither tier) |
| Resource usage | Standard | Standard (same) |
Who Should Stay on SignalRGB Free
I’ll be direct here: if your build has one or two RGB devices, stay on free. The Layout editor doesn’t add meaningful value when you’ve only got a keyboard and a mouse, because there’s nothing to spatially coordinate across your setup. A rainbow wave on a single keyboard looks exactly the same whether it’s running through the Layout engine or not.
If you’re using SignalRGB primarily to replace bloatware like Armoury Crate or iCUE, the free tier does that job perfectly well. I wrote an entire OpenRGB setup guide for people who want zero-cost RGB control, but honestly, SignalRGB free is easier to set up and supports more devices out of the box than OpenRGB does.
If you just want a static color across your build, free handles that. If you want basic effects like breathing or color cycling, free handles that too. I ran free for three months with a five-device build and it was perfectly fine. I wasn’t unhappy with it at all. I just didn’t know what I was missing until I tried the Pro trial and saw the Layout editor in action.
If you’re budget-conscious and every dollar matters, there’s absolutely no shame in staying on free. It’s a fully functional RGB controller that beats most manufacturer apps in both reliability and ease of use. You’re not getting a crippled product. You’re getting a complete product that happens to have optional premium features on top.
Who Should Upgrade to SignalRGB Pro
I think Pro becomes genuinely worth it once you cross the four-device threshold. If you’ve got motherboard headers, RAM, fans, and LED strips all from different brands, the Layout editor transforms your build from “things that glow” into a coordinated lighting system. That’s not marketing language. That’s what I experienced firsthand over six months of daily use.
If you’re a content creator who films or streams your build, Pro is essentially a requirement. The Layout editor makes your RGB look professional-grade on camera, and Screen Ambience adds dynamic lighting during gameplay that your audience can actually see. I’ve had stream viewers comment on my lighting after I switched to Pro. It’s noticeably different on camera in a way that free tier effects simply aren’t.
If you care about effect flow, where the lighting moves in a continuous motion through your build rather than each device doing its own animation independently, Pro is the only way to get that in SignalRGB. The Layout editor is the key to everything. I’ve covered this in detail in my SignalRGB setup guide, including how to position devices properly for the best visual results.
If you want Screen Ambience for movie watching or casual gaming, Pro gives you that too. I use it three or four times a week, and it’s become a standard part of how I use my desk setup. I turn it on for single-player games, movies, and YouTube sessions. I turn it off for competitive gaming where I want full GPU power available.
My Verdict After 6 Months on SignalRGB Pro
I’ve been paying $45 per year for six months now, and I’m going to renew when my subscription comes up. That’s my verdict in one sentence.
I think the subscription model is fair for what you get in return. I know a lot of PC builders have subscription fatigue right now, and I understand that completely. I pushed back against it myself before trying the trial. But $45 per year breaks down to $3.75 per month, and the Layout editor alone saves me more than that in time and frustration compared to manually tweaking effects per device on the free tier.
I don’t think Pro is for everyone, and I’ve tried to be clear about that throughout this entire article. If you’ve got a simple build with two devices and you just want them to be blue, free is perfect for you. If you’ve got a complex multi-brand build and you care about how your lighting looks as a unified system, Pro is worth the money.
I’d recommend everyone try the free tier first. Use it for at least a month. Get your devices set up, try the free effects, and see if you hit the wall I hit: wanting your effects to flow across devices instead of just playing on each one independently. If you never hit that wall, stay on free and don’t feel bad about it. If you do hit it, the Pro trial will show you exactly what you’ve been missing.
I’m glad I upgraded, but I’m also glad I took three months on free before making that call. It gave me perspective on what the free tier actually delivers, and it made the Pro upgrade feel like a genuine step up rather than an expected unlock that should have been free all along.
OpenRGB as a Free Alternative to SignalRGB
I want to mention OpenRGB here because it’s the main free alternative that people bring up whenever SignalRGB pricing comes into the conversation. OpenRGB is completely free, fully open-source, and it supports a huge range of RGB devices across multiple platforms.
I’ve tested OpenRGB extensively on my own build. It works well for basic color control and simple effects. It’s lighter on system resources than SignalRGB, and it runs on Linux as well as Windows, which gives it a real advantage for Linux users who don’t have any alternative.
Where OpenRGB falls short compared to SignalRGB is effect quality and the user interface. SignalRGB’s effects are smoother, the UI is more polished and intuitive, and device detection is generally more reliable across brands. OpenRGB sometimes requires manual configuration and tweaking that SignalRGB handles automatically during the initial setup. I covered the full comparison in my SignalRGB vs OpenRGB article if you want the detailed breakdown.
I think the right approach is to try OpenRGB first if you’re completely against paying for RGB software. If it does what you need, that’s great, and you’ve saved yourself some money. If you find it lacking in effects or ease of use, SignalRGB free is the next step up, and it doesn’t cost anything either. Pro is only necessary when you specifically want the premium features I’ve described in this article. There’s no wrong choice here, only different priorities and different builds.
Is SignalRGB Pro a subscription or a one-time purchase?
It’s a subscription. SignalRGB Pro costs $45 per year, and there’s currently no lifetime or one-time purchase option available. I know that frustrates some people, and I understand the sentiment completely. The subscription gives you access to the Layout editor, Pro effects, Screen Ambience, game integrations, and priority support for as long as you’re paying. If you cancel, you revert to the free tier but you keep all your device configurations and free effects intact.
Does SignalRGB offer a free trial of Pro?
Yes, they do. SignalRGB offers a free trial of Pro features so you can evaluate everything before spending any money. I’d strongly recommend using it before committing to the subscription. The trial gives you access to the full Layout editor, all Pro effects, and Screen Ambience. I used the trial before upgrading, and it’s what convinced me the Layout editor was worth the price of admission.
What happens to my settings if I cancel SignalRGB Pro?
Your device configurations, profiles, and free effects stay exactly as they are. You don’t lose any of that. You lose access to Pro-exclusive features: the Layout editor, Pro effects, Screen Ambience, and game integrations. Your devices continue working through SignalRGB free just like they did before you upgraded. I’ve tested this by letting my trial expire before subscribing, and the transition back to free was completely seamless. Nothing broke, and I just couldn’t use the Pro features anymore until I subscribed.
Does SignalRGB Pro use more system resources than free?
The base resource usage is essentially the same between tiers. I’ve monitored CPU and RAM usage on both free and Pro, and the difference is negligible during normal operation. The one exception is Screen Ambience, which adds roughly 2 to 3 percent GPU usage because it’s capturing and processing your screen content in real time. If you’re not running Screen Ambience, Pro and free have virtually identical resource footprints on your system.
Is SignalRGB free actually free forever?
Yes, as of 2026, SignalRGB free is genuinely free with no time limit or expiration. You don’t need to create an account to use the free tier, and there’s no trial period that runs out. The free effects, full device support, and multi-brand sync are available indefinitely. I’ve been using SignalRGB in some form for nine months total and the free features haven’t been reduced, restricted, or locked behind a paywall in that time.
Does SignalRGB Pro support more devices than the free version?
No, it doesn’t. Device support is identical between free and Pro. I’ve confirmed this directly through my own testing. The same hardware detection system runs on both tiers. If a device works on free, it works on Pro with no difference. If a device isn’t supported on free, upgrading to Pro won’t add support for it. The difference between tiers is purely about lighting effects, the Layout editor, and features like Screen Ambience. Your hardware compatibility doesn’t change based on your subscription status at all.
Related Guides
- SignalRGB setup guide — the from-zero install.
- How to sync RGB across vendors with SignalRGB — the cross-vendor flow that justifies Pro.
- SignalRGB audio visualizers — the Pro effect library highlight.
- OpenRGB vs SignalRGB — the free alternative comparison.