I’ve got a Razer Cobra sitting on my desk, Synapse 4 is open, and I’m genuinely not sure how many people actually use more than 10% of what this app offers. Most setups I’ve seen: one DPI stage, default polling rate, rainbow lighting effect. Done. Which is fine, but it’s leaving a lot on the table.
Razer Synapse 4 (currently on version V4.0.86.2603250358 as of March 2026) is a real upgrade over Synapse 3 in terms of architecture. It’s supposedly 30% faster under the hood thanks to a multi-threaded rewrite. In practice, the startup time is noticeably snappier and profile switching doesn’t lock up the mouse for a second like it used to. That said, the Razer Insider forums are full of people calling it buggy and reverting to Synapse 3, so your mileage may vary depending on your hardware. I’m running it without issues on Windows 11 24H2.
This guide covers every section that actually matters: Performance (DPI stages and polling rate), Surface Calibration, Chroma lighting, Linked Games, Macros, and Key Binds. I’ll skip over the stuff that’s self-explanatory and focus on the parts where people usually get confused or don’t realize what’s possible.
The Dashboard: Your Starting Point
When you open Synapse 4, you land on the Dashboard. It shows your connected devices at the top and a grid of installed modules below. The device card isn’t just cosmetic. Clicking your mouse card takes you into that device’s settings, which is the most direct route to the Performance, Lighting, and Calibration tabs.
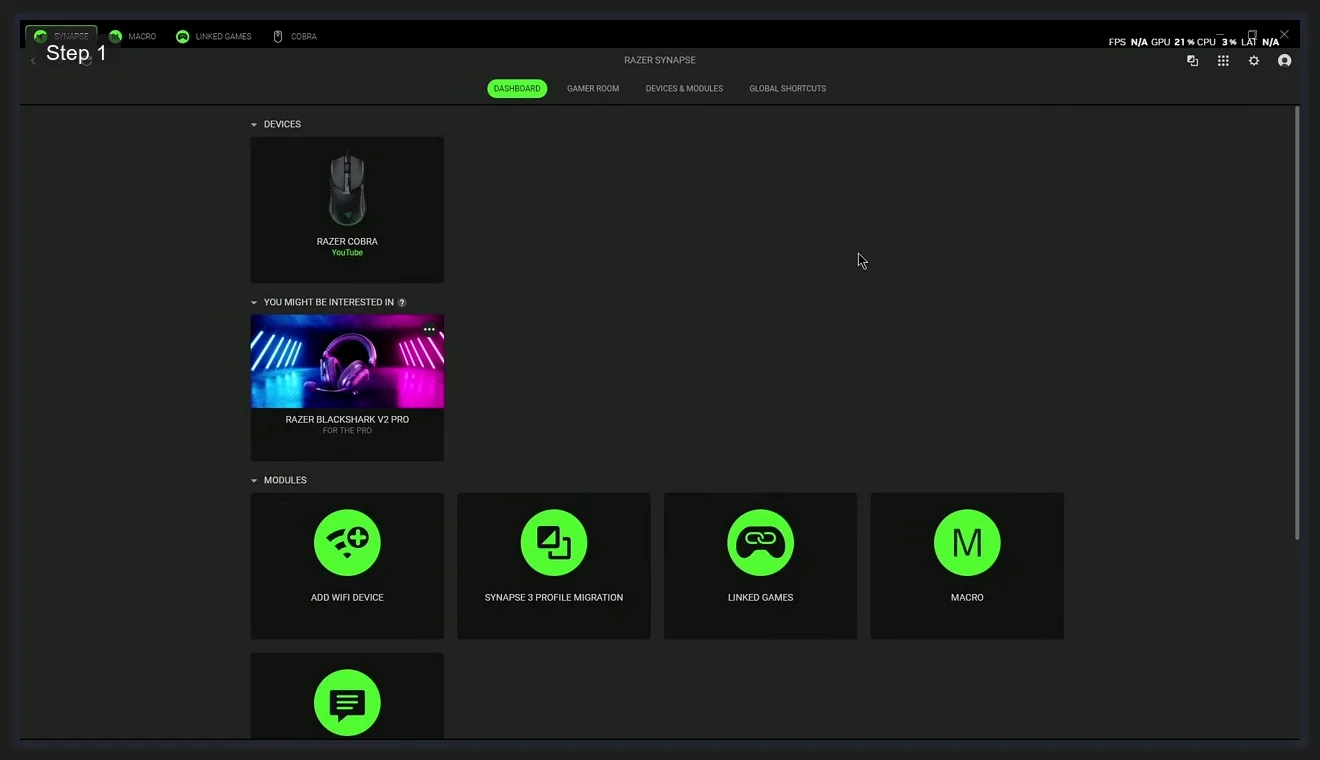
The module tiles on the dashboard are worth noting. Synapse 3 Profile Migration appears automatically if Razer detects existing Synapse 3 profiles on your system. It handles the transfer in one click, including macros and Chroma effects. I’d run it as soon as you install Synapse 4 if you’re coming from Synapse 3, because it saves having to rebuild everything manually. The Linked Games and Macro tiles open those respective modules directly. There’s also a Chat Support tile at the bottom row if you want live support, though the Razer Insider forum community tends to have faster answers for software issues.
Performance Tab: DPI Stages and Polling Rate
Click your device from the Dashboard, then select the Performance tab. This is where you configure the two most gameplay-relevant settings: DPI sensitivity stages and polling rate. I’d set these before touching anything else.
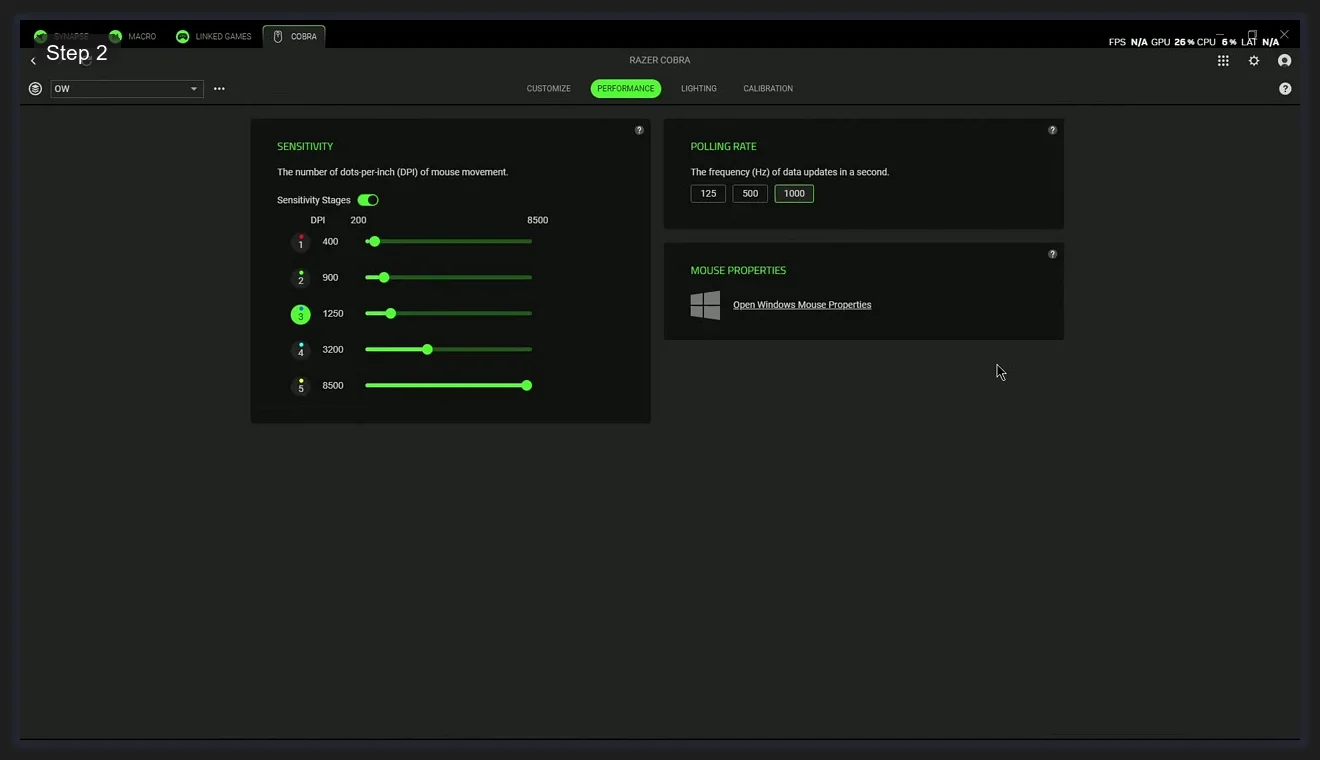
The DPI section lets you set up to five sensitivity stages. Each stage is a saved DPI value your mouse can cycle through on-the-fly using the DPI cycle button (typically the button behind the scroll wheel). The active stage is shown with a green indicator. I run three stages personally: 800 DPI for desktop use, 1600 for general gaming, and 3200 for situations where I need faster cursor movement. You can set stages anywhere between the mouse’s minimum and maximum DPI. On the Razer Cobra that’s 200 through 8500, but it varies by model.
The Polling Rate section on the right has three options: 125 Hz, 500 Hz, and 1000 Hz. Higher polling rate means the mouse reports its position to Windows more frequently. 1000 Hz means 1000 position reports per second, which gives you 1ms latency between physical movement and on-screen response. Most gaming mice default to 1000 Hz and you should leave it there. The only reason to drop it is if your system is genuinely struggling with USB polling overhead, which is rare on modern hardware.
One thing worth knowing: DPI stages are stored in the profile you’re editing, not globally. If you set up stages in the “YouTube” profile (the default profile name Synapse assigns when no game is running), those stages are only active when that profile is loaded.
Calibration: Surface Profiles and Lift-Off Range
The Calibration tab is the one most people skip entirely. I understand why. It sounds more technical than it is. But if you’re playing FPS games at low DPI, this setting matters more than most people realize.
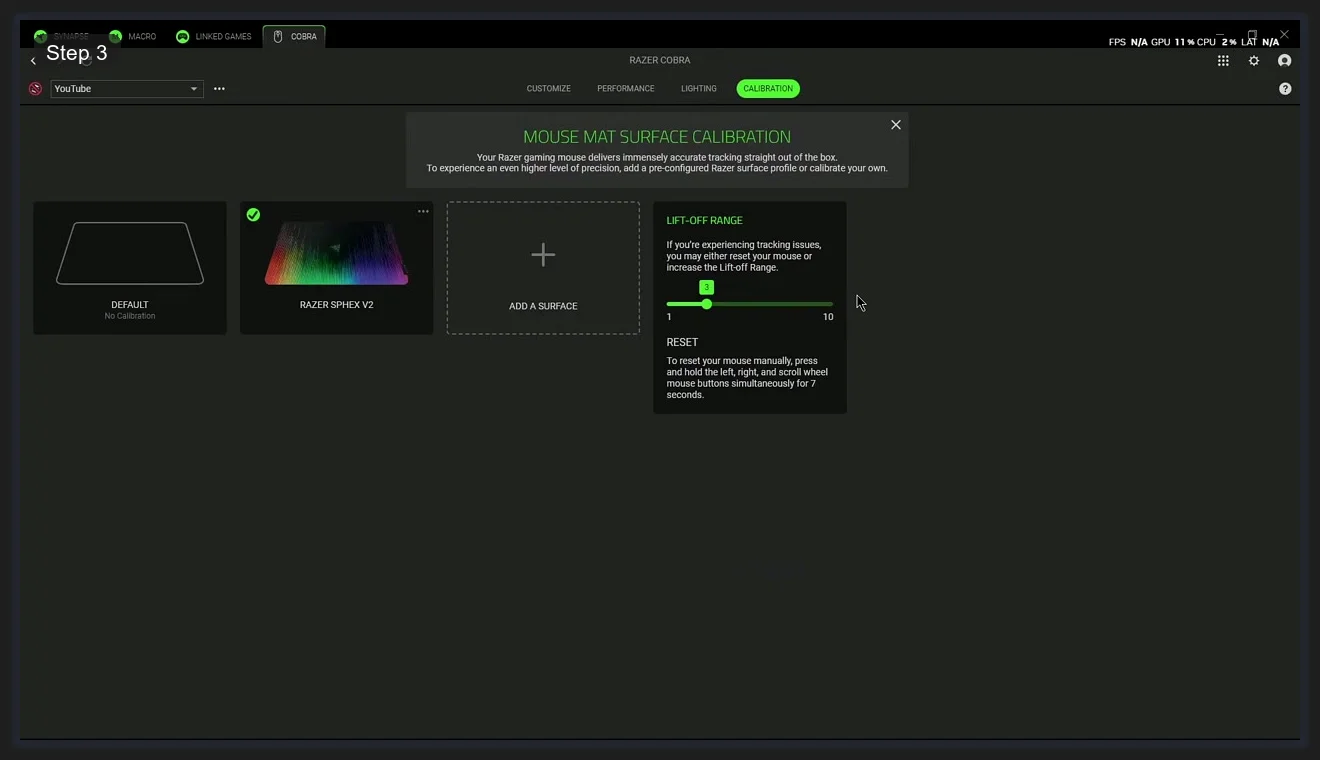
When you open Calibration, a popup explains what surface calibration does: your mouse has built-in surface profiles for common Razer mousepads. Selecting the right profile means the optical sensor is tuned for the specific weave and texture of your mousepad, which improves tracking accuracy. I’ve got a Razer Sphex V2, which shows up as a named option with a checkmark when selected. If your pad isn’t listed, the Add a Surface option runs a custom calibration, slowly guiding you through a tracking routine on your actual pad surface.
The Lift-Off Range slider on the right (scale of 1-10) controls how high you can lift your mouse before tracking stops. A lower value means tracking cuts off closer to the surface. In FPS play at low sens, you lift and reposition your mouse constantly, and a lower lift-off distance means the cursor doesn’t drift as you pick the mouse up. I keep mine at 3. If you notice your cursor moving slightly when you lift the mouse to reposition, bump the lift-off range down. The Reset option in the bottom right resets the mouse sensors manually (hold left, right, and scroll wheel buttons for 7 seconds) if tracking feels completely wrong after a surface change.
Chroma Lighting: More Than Just RGB
The Lighting tab (accessible from the device settings) gives you Chroma effect options for whatever zones your device supports. On the Razer Cobra, that’s the logo and scroll wheel. Options include Static, Breathing, Spectrum Cycling, Reactive (lights up on click), Ripple, and a handful of others.
Chroma Studio is the advanced option worth knowing about. It’s not shown in the standard Lighting tab dropdown. Instead, it shows up when you scroll down in the effects list. Studio opens a timeline-based editor where you can layer effects across multiple zones and sync lighting to in-game events for supported titles. I don’t use it often for a single mouse, but if you’ve got a full Chroma setup (keyboard, headset, mouse, mousepad), Studio is how you build synchronized multi-device effects that aren’t available in the standard sync options. Think of it as Premiere Pro for RGB.
(Quick note: if you’re trying to sync Razer Chroma with non-Razer RGB devices, that’s where Razer Chroma Connect comes in. It currently supports devices from ASUS, Corsair, Logitech, and a few others. It’s a separate section in Synapse under the Devices tab.)
Linked Games: Auto-Profile Switching
Linked Games is Razer’s equivalent of Armoury Crate’s Scenario Profiles. The idea is the same: a profile activates automatically when a specific game launches. I’d set this up if you play multiple games with genuinely different DPI preferences, because manual profile switching mid-session is annoying.
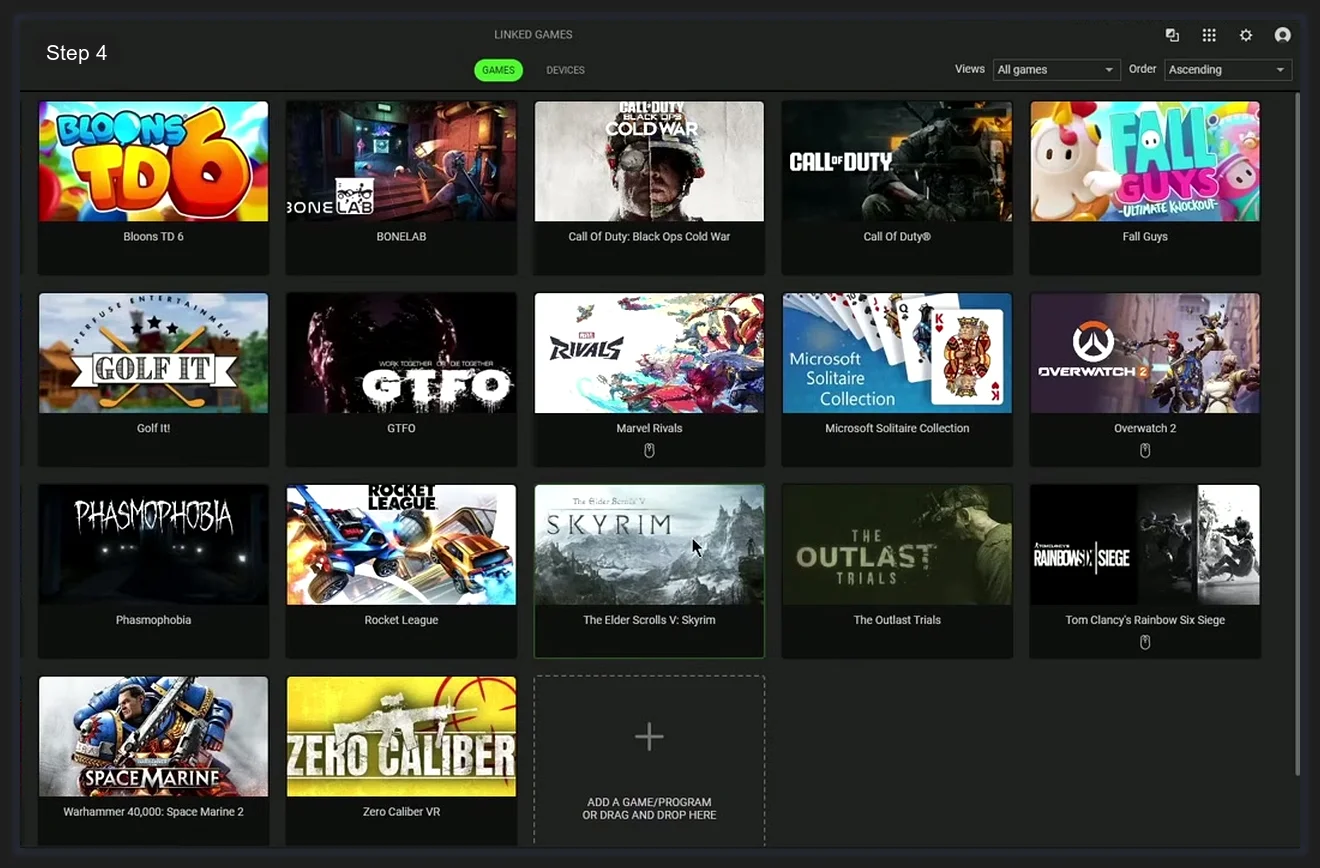
The Linked Games module shows every game Synapse has detected on your system as a tile grid. You’ll see major titles detected automatically, things like Overwatch 2, Skyrim, Phasmophobia, Rocket League, and whatever else is installed via Steam, Epic, or standalone. Click any game and you get two options: link a mouse profile to it, or link a Chroma Studio effect to it. When that game’s executable launches, Synapse applies your linked settings. When you close the game, it reverts to whatever your default profile is.
The Devices and Effects toggle at the top of the Linked Games view switches between managing per-game device profiles versus per-game Chroma effects. Games without a linked profile will use whatever profile is currently active on your mouse, which means your default profile is a sensible starting point to configure properly.
Macros: Building Action Sequences
The Macro module in Synapse 4 is more capable than most people realize. I’ve seen people use it only for simple key repeat macros, but it handles multi-step sequences with delays, mouse functions, text injection, application launches, and loops.
Click Macro from the Dashboard or the top navigation bar. The editor opens with a left panel showing action types and a recording timeline on the right. The action types are:
- Delay — adds a timed pause between actions
- Keyboard Function — records a key press or key combination
- Mouse Function — adds a click, scroll, or button action
- Macro — nests another macro inside this one
- Launch — opens a specified application or file
- Run Command — executes a command line instruction
- Text Function — types a string of text automatically
- Loop — repeats a sequence a set number of times
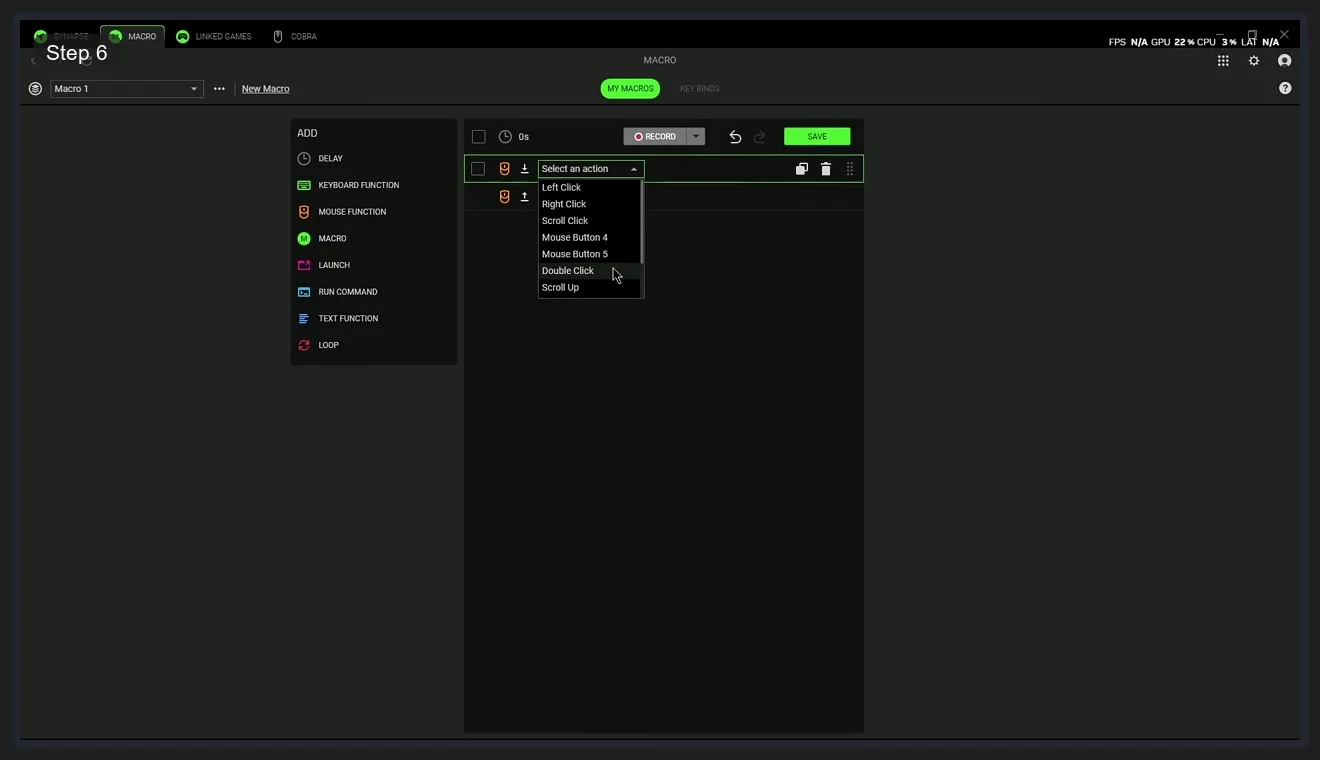
The Mouse Function action type has a dropdown with Left Click, Right Click, Scroll Click, Mouse Button 4, Mouse Button 5, Double Click, Scroll Up, and Scroll Down. Combining these with delays and keyboard functions is how you build things like an auto-buy macro for CS2, a rapid-fire macro, or a reloading sequence for games with manual reload animations.
The Launch action is the one I find most useful outside of gaming. It lets you trigger an application launch from a macro. You browse to the executable using a file picker.
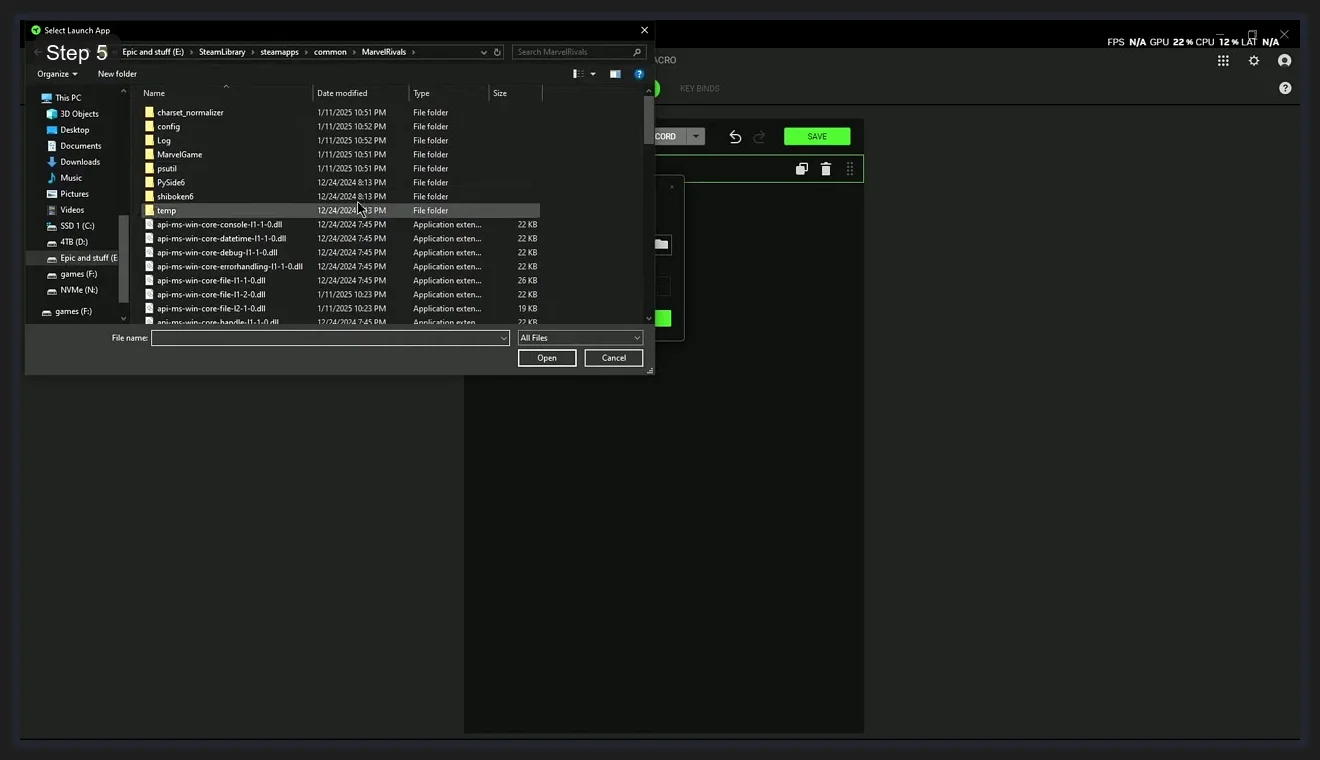
In practice this means you can set up a single button press on your mouse that launches Discord, opens a specific folder, or runs a batch file. I’ve got one macro that opens my second monitor’s brightness control app and one that opens the calculator. Trivial stuff, but it adds up when you’ve got spare buttons on the mouse.
Once a macro is built, you save it to the Macro library. Then head to Key Binds to assign it to a mouse button.
Key Binds: Assigning Macros and Hypershift
The Key Binds tab shows a diagram of your mouse with every programmable button labeled. Click any button on the diagram to open the assignment menu for that button.
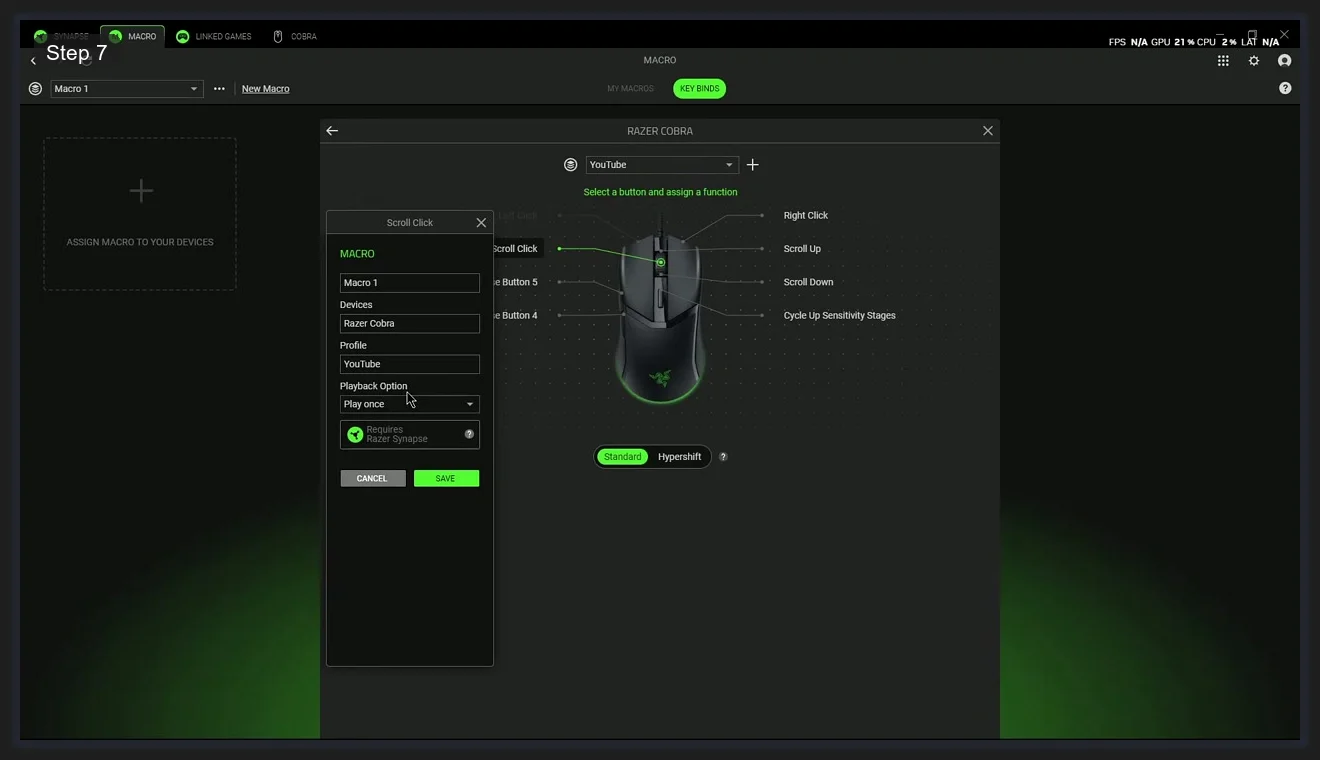
The assignment dialog has two tabs at the bottom: Standard and Hypershift. Standard assignments are what the button does normally. Hypershift assignments are what the button does while you hold your designated Hypershift key simultaneously. Hypershift effectively doubles your button count without adding physical buttons.
To assign a macro, click the button in the diagram, go to the Macro section in the assignment list, select your macro from the dropdown (shown here as “Macro 1”), and set the Playback Option. Options are: Play once (runs the macro once per press), Play while assigned key is held (loops while held), and Toggle (starts and stops on alternate presses). For most use cases, Play once is what you want. The “Requires Razer Synapse” badge on the assignment dialog means the macro only works when Synapse is running, which is true for all profile-based assignments.
Hypershift setup requires a bit more work. You first assign the Hypershift modifier to a button (usually the profile switching button or a spare side button), then go to the Hypershift tab on any other button to set what it does while Hypershift is held. It’s a clean way to give a 5-button mouse the functionality of a 10-button macro pad without the physical footprint.
Global Shortcuts and a Few Things Worth Knowing
The Global Shortcuts tab (visible in the top navigation bar of the device view) lets you set keyboard shortcuts that work across all profiles regardless of which profile is active. I use one to toggle Synapse’s on-screen DPI indicator on and off.
A few things I’d mention that aren’t immediately obvious. First, profiles are per-device, not global. Changes to the Razer Cobra’s profiles don’t affect any other connected device. Second, the FPS, GPU, CPU, and Latency readout in the top-right corner of Synapse (the overlay bar) is live system data. It doesn’t affect your games but it’s a quick sanity check while you’re tuning settings. Third, if Synapse 4 crashes or fails to detect your device on boot, restarting the Razer Service via Windows Services (services.msc) usually fixes it faster than a full app restart.
If you’re looking at other RGB software options alongside Razer Synapse, we cover the full landscape in our best RGB software roundup. And if you’re dealing with an ASUS build alongside your Razer gear, the Armoury Crate guide is worth reading for syncing the two platforms.
Frequently Asked Questions
What is Razer Synapse 4 and do I need it?
Razer Synapse 4 is Razer’s device management software for configuring mice, keyboards, headsets, and other Razer peripherals. You need it to customize DPI stages, polling rate, button assignments, macros, and Chroma lighting. Your Razer device works without it at factory defaults, but you can’t change any settings without it installed.
How do I set up DPI stages in Razer Synapse 4?
Open Synapse 4, click your mouse device on the Dashboard, and select the Performance tab. The Sensitivity section lets you configure up to five DPI stages. Click any stage to edit its value. The stage highlighted in green is currently active. Your mouse cycles through stages using the DPI cycle button, typically located behind the scroll wheel.
What is Hypershift in Razer Synapse?
Hypershift is a modifier key feature that doubles your button count. You designate one button as the Hypershift key, then assign secondary functions to all other buttons under the Hypershift layer. While holding the Hypershift key, those buttons perform their secondary assignment. This effectively gives you twice as many macro slots without adding physical buttons.
How does Linked Games work in Razer Synapse 4?
Linked Games automatically applies a device profile or Chroma effect when a specific game launches. Synapse detects installed games automatically and shows them in a tile grid. Click any game to assign your preferred profile or lighting preset. When you launch that game, Synapse switches to the linked settings instantly and reverts to your default profile when the game closes.
Why is Razer Synapse 4 not detecting my device?
The most common fix is restarting the Razer Service in Windows Services (run services.msc, find Razer Service, right-click and Restart). If that doesn’t work, try unplugging and reconnecting your device, then wait 10 seconds. A full Synapse reinstall is the nuclear option and fixes about 90% of persistent detection failures according to the Razer Insider support threads.
Should I use Razer Synapse 4 or Synapse 3?
Synapse 4 is the current version and is 30% faster than Synapse 3 on paper, but there are active Razer Insider forum threads where users report input lag, FPS drops, and profile issues that don’t exist in Synapse 3. If Synapse 4 causes problems on your setup, rolling back to Synapse 3 is a legitimate option. Synapse 3 is still available from Razer’s support pages. For most users on current hardware with Synapse 4 running V4.0.86 or later, it works fine.
Related Guides
- Razer Synapse 4 profiles + auto-switch guide — the deeper per-game profile flow.
- OpenRGB as the cross-vendor alternative — if you want to control Razer alongside other brands.
- RGB sync troubleshooting playbook — for the third-party-RGB-toggle Synapse trap.