I bought an NZXT N5 Z690 case last year, and the sales pitch was simple: plug everything into the NZXT Smart Device, install CAM, and your fans and lighting basically manage themselves. That’s mostly true, but “install CAM and it works” skips over a lot. I spent the first week just using whatever defaults the app set, which meant my pump ran at 100% constantly and my lighting was some pre-set purple cycle I didn’t choose.
NZXT CAM (currently v4.76.2 as of March 2026) is genuinely well-designed compared to most PC software in this category. It’s free, it doesn’t require an account to use the core features, and the fan curve editor is more intuitive than what you get in Armoury Crate or MSI Center. The catch is that it only works properly with NZXT hardware. If you’ve got a full NZXT build or even just their AIO cooler, here’s everything worth knowing about using it properly.
PC Monitoring: System Stats at a Glance
The first section in the sidebar is PC Monitoring. This is where NZXT CAM earns its “system utility” label. It shows real-time graphs for CPU usage, CPU clock speed, CPU temperature, GPU usage, GPU clock speed, GPU temperature, RAM usage, and network bandwidth simultaneously. All on one scrollable dashboard.
What makes it genuinely useful is the per-process breakdown at the bottom. You can see which applications are consuming CPU, GPU, RAM, and network resources right now. I’ve used it to catch background processes hammering the GPU during gaming sessions more than once. That said, if you just want system monitoring and don’t have NZXT hardware, HWiNFO64 is a better dedicated tool. CAM’s monitoring is good enough for NZXT users but it’s not a replacement for a dedicated monitoring suite.
The System Specs section below PC Monitoring is a one-page summary of your hardware: CPU model and specs, motherboard, GPU, RAM capacity and speed, storage drives, and OS version. It’s useful as a quick reference, though it doesn’t go as deep as CPU-Z or Speccy for per-component details.
Cooling: Fan Curves and Thermal Profiles
The Cooling section is where I spend most of my time in CAM, and it’s what separates it from simpler lighting apps. Every fan connected to your NZXT Smart Device or NZXT hub shows up here as an individual channel. You configure each one independently.
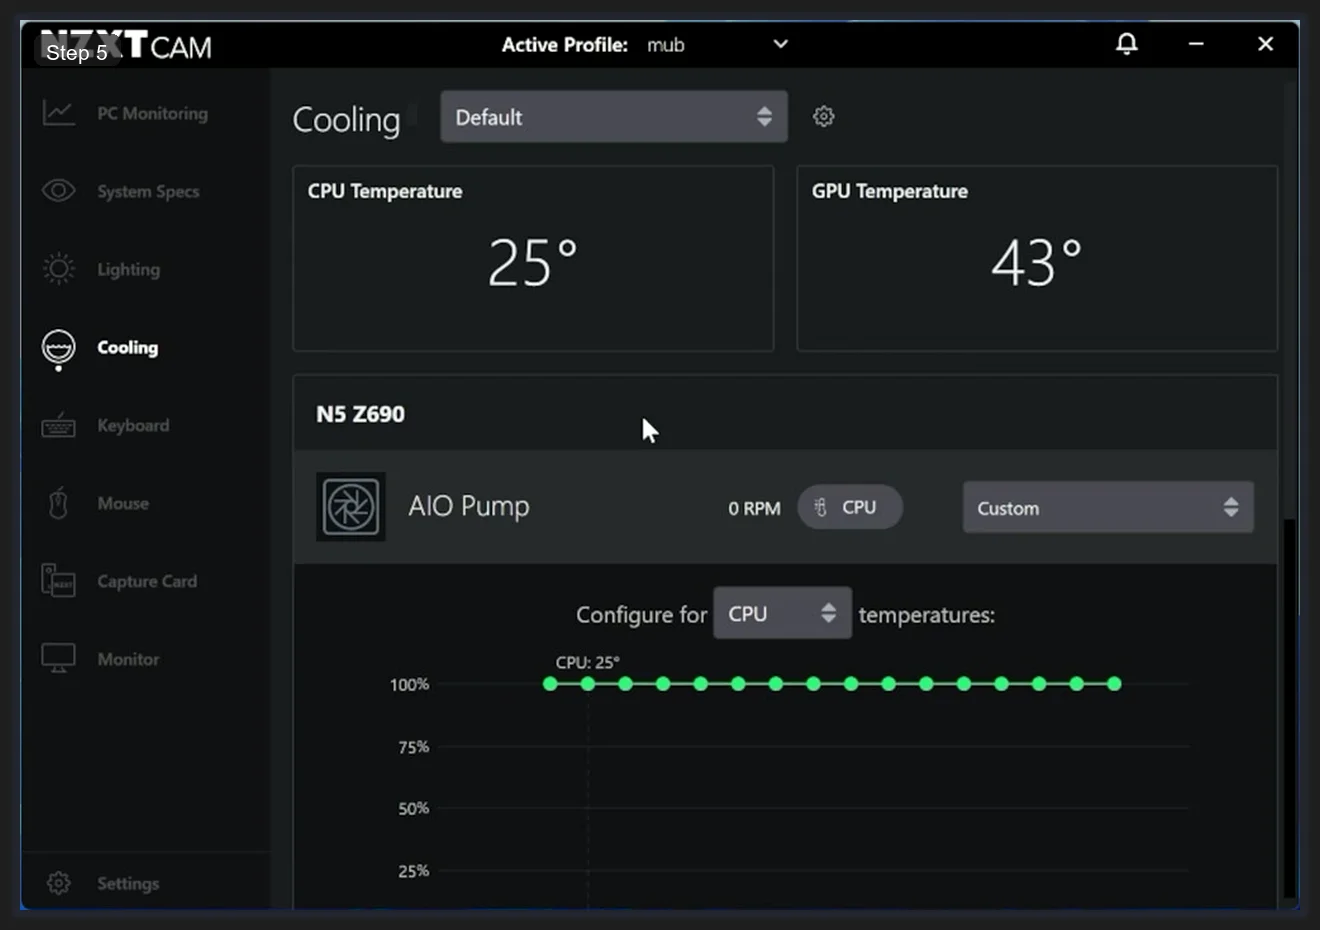
At the top of the Cooling page you’ll see live temperature readouts: CPU Temperature and GPU Temperature in large text. These update in real time and the Cooling controls reference these sensors. Each fan channel below lets you pick which temperature sensor drives it. CPU temp is the default, but you can switch any fan to respond to Liquid (coolant) temperature or GPU temperature instead, which matters if you’re building a cooling configuration around a specific thermal bottleneck.
For fan profiles, each channel has a dropdown with four options: Fixed (constant RPM), Silent (quiet preset curve), Performance (aggressive preset curve), and Custom (your own curve). The built-in Silent and Performance curves are fine as starting points, but Custom is where you actually dial things in for your specific build.
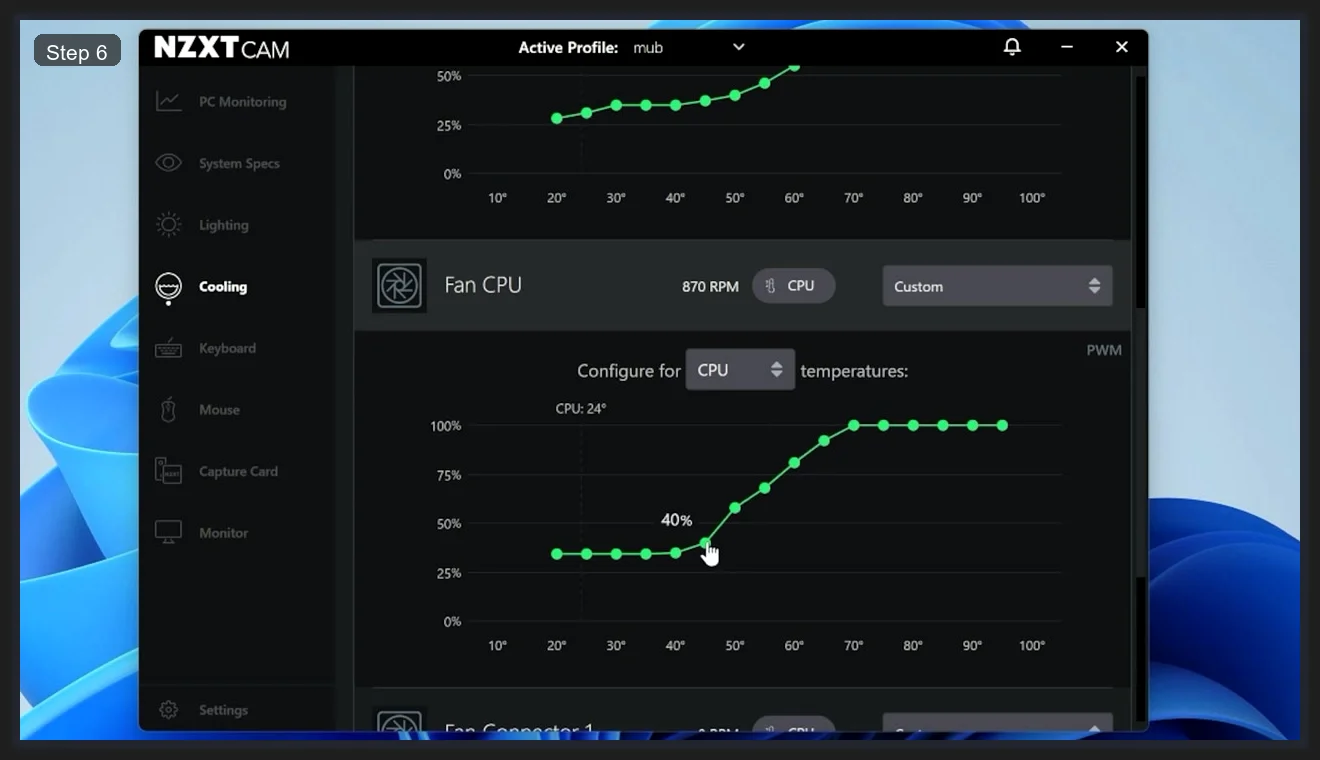
The Custom curve editor shows fan speed percentage (0-100%) on the Y-axis and temperature in degrees Celsius on the X-axis. Each green dot is a control point you can drag. The curve shown here is a reasonable real-world setup: fans sit at around 30% below 20°C (basically silent at idle), ramp progressively through the 40-60°C range, and hit 100% by 70°C. The live CPU temperature tooltip moves along the X-axis as your CPU heats up, which makes it easy to visualize where your current workload sits on the curve.
I’d suggest a different curve depending on your use case:
- Daily driver / quiet build: Start at 25-30% up to 45°C, ramp to 60% by 60°C, 100% by 80°C. Stays near-silent during web browsing and documents work.
- Gaming rig: Start at 35% at idle, ramp to 70% by 70°C, 100% by 85°C. Accepts more noise in exchange for better sustained thermals under load.
- AIO pump: Leave at Fixed 100%. Pump noise is inaudible and running it below 100% risks coolant stratification over time.
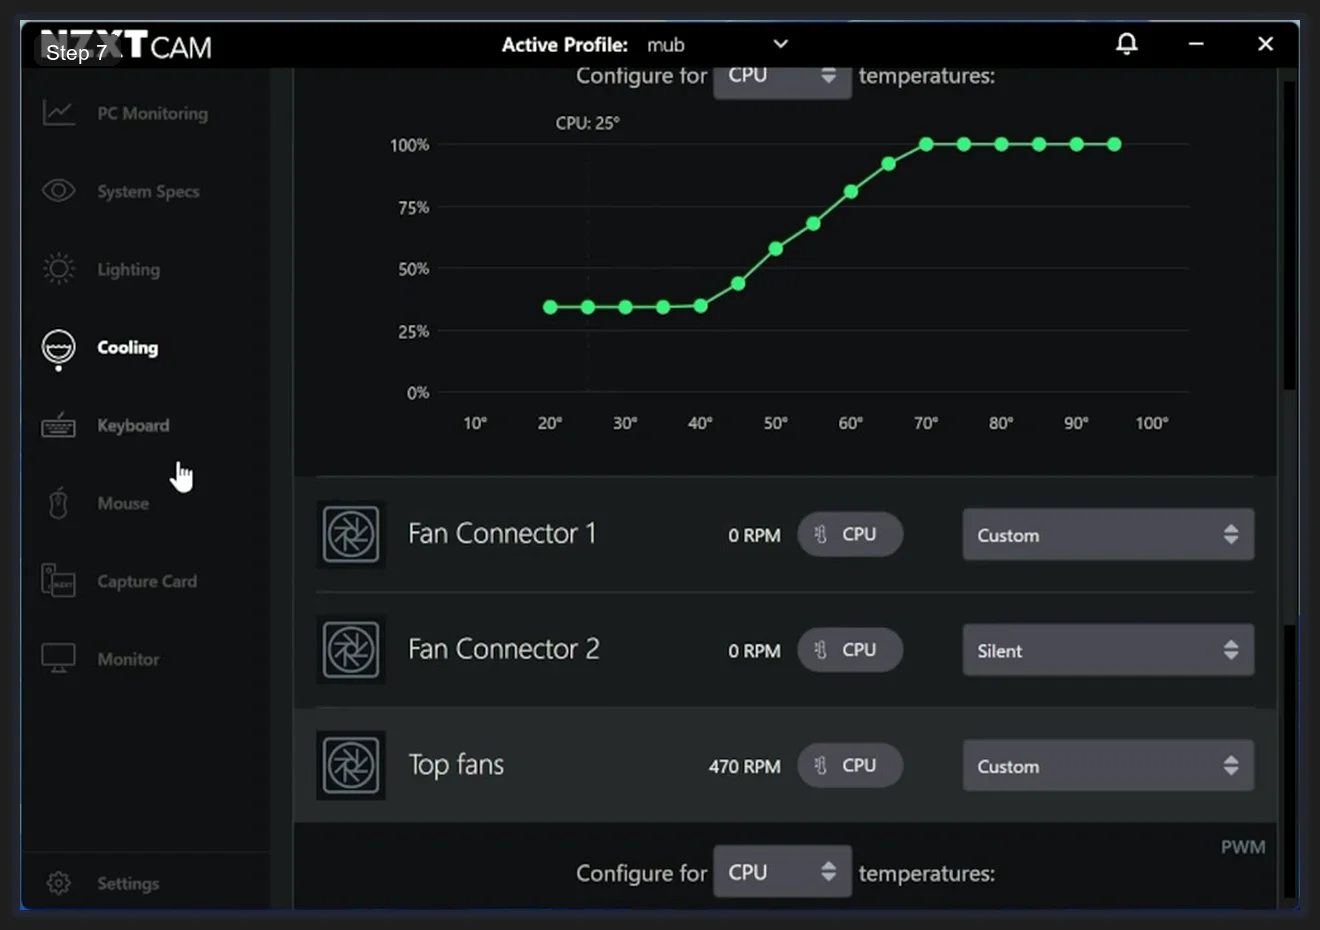
The fan list shows every channel your Smart Device detected. In a typical NZXT N5 case build you’ll see Fan Connector 1, Fan Connector 2, Top Fans, Fan CPU, and AIO Pump as separate rows, each showing live RPM. The Silent and Custom profile tags are displayed beside each one. Channels set to Silent are marked with the preset label; Custom channels show their user-configured profile. If a fan reads 0 RPM, it’s either not spinning at the current temperature (below the curve’s starting point) or there’s a connection issue to check.
The profile dropdown at the top of the Cooling page (Default) applies a saved profile across all channels at once. You can create multiple named profiles here for different scenarios, such as a silent working profile and a performance gaming profile, and switch between them with a single click.
Lighting: Effects and Color Control
The Lighting section works similarly to Cooling: hardware is grouped by device, and each channel gets its own effect and color settings. If you’ve got an NZXT case, your ARGB fans typically connect to a 5V_ARGB header on the Smart Device, and the included lighting strip runs off 12V_RGB1.
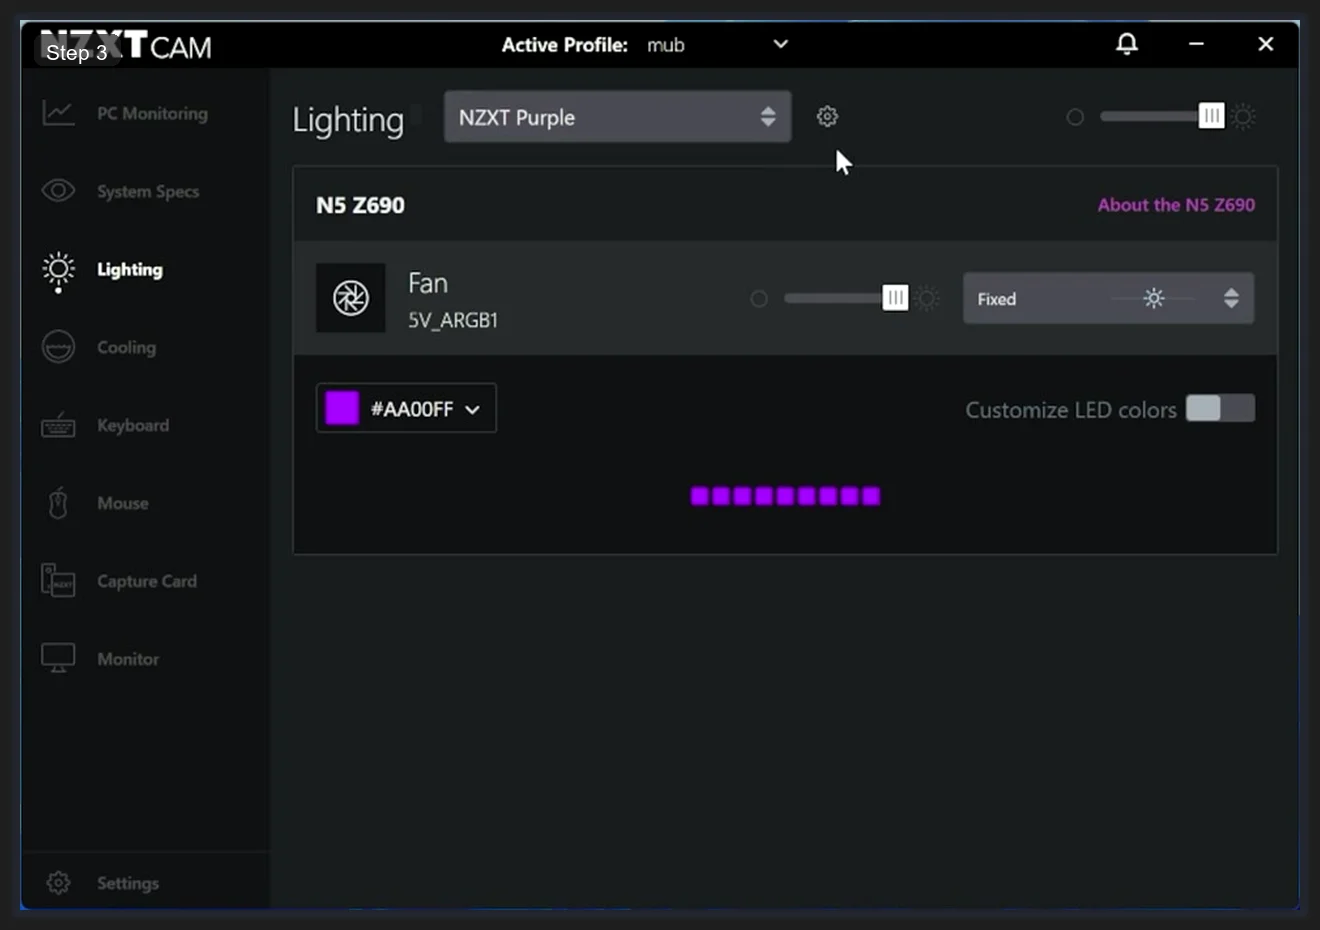
The top-right brightness slider adjusts all lights on the current profile simultaneously. The effect dropdown on the right side of each channel row sets the animation mode. The color picker appears below the channel when you select it, showing your current hex code and a preview strip of the active LEDs. Clicking the color swatch opens a full color picker where you can enter an exact hex value or use the HSV wheel.
The lighting preset dropdown (labeled NZXT Purple in the example above) selects from saved color profiles. You can create your own named presets here and apply them across all connected NZXT lighting channels at once, which is faster than adjusting each channel individually when you want a unified look.
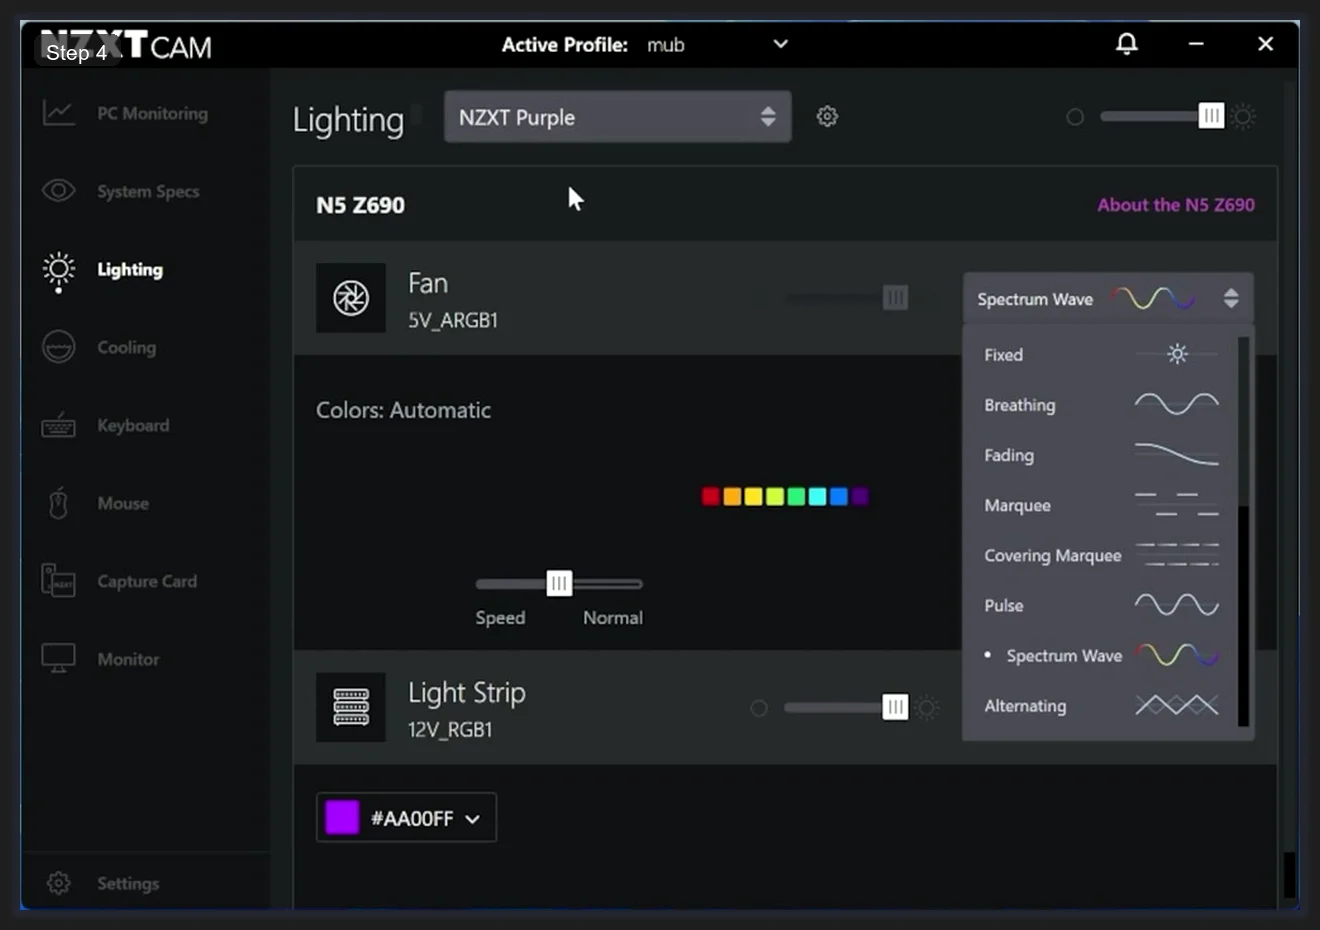
There are eight effect types in NZXT CAM:
- Fixed — static color, no movement
- Breathing — fades in and out on a single color
- Fading — smooth transition between two or more colors
- Marquee — a stripe of color moves across the LED strip
- Covering Marquee — a block of color fills the strip progressively
- Pulse — rapid flicker effect, similar to Breathing but sharper
- Spectrum Wave — full rainbow cycles across the LEDs in a traveling wave
- Alternating — alternates between two colors on individual LEDs
The Customize LED colors toggle (visible when Spectrum Wave is not selected) lets you manually assign different colors to individual LED zones instead of using a uniform color across the whole channel. I use Fixed with Customize LED colors enabled on the ARGB fan to set the inner ring one color and the outer blades another.
One limitation worth noting: NZXT CAM’s lighting only controls NZXT-branded devices. If you want to sync NZXT lighting with ASUS Aura Sync or Corsair iCUE, that sync doesn’t exist natively in CAM. You’d need a third-party solution like OpenRGB. We’ve covered how to use OpenRGB separately for mixed-brand setups.
Profiles: Saving and Switching Configurations
The Active Profile dropdown in the top center of the CAM window (visible as “mub” in the screenshots) shows which profile is currently loaded. Profiles save your complete cooling and lighting configuration together. You can create multiple profiles for different scenarios.
Switching profiles is instant. I keep three: a Quiet profile for late-night work (Silent curves, dim Fixed lighting), a Gaming profile (aggressive curves, Spectrum Wave lighting), and the default mub profile I use for general daily use. The active profile name appears in the system tray when CAM is running minimized, so you can glance and see what’s loaded without opening the full app.
If you’re running NZXT hardware in a multi-device setup alongside ASUS gear, the profile system here and Armoury Crate’s Scenario Profiles can coexist without conflict since they control completely separate hardware.
Settings: Startup Behavior and Backup
The Settings section (bottom of the left sidebar) is quick to configure and worth doing early.

The main options under General:
- Language and Temperature Display (Celsius/Fahrenheit) — basic preferences
- Minimize NZXT CAM to tray when closing — keep this on. CAM needs to stay running in the background to maintain fan curves and lighting. If you close it fully, your NZXT hardware reverts to defaults.
- Start NZXT CAM on Windows startup — enable this for the same reason. Fan curves won’t load until CAM starts, so you want it running before you open any games.
- Start NZXT CAM minimized when launching on Windows startup — keep this on too. No reason to have the full UI open every boot.
- Enable Dark Mode — personal preference. The light theme is actually usable, but dark mode is easier on the eyes if you’re doing late-night configuration.
The Settings Backup section at the bottom has two buttons: Export and Import. Export saves your complete configuration (lighting, cooling curves, profiles) to a file you can store externally. Import loads it back. I’d export your settings after you’ve configured everything the way you like it, and definitely before reinstalling Windows or upgrading to a new version of CAM. I lost a week of fan curve tuning once by not doing this before a Windows reinstall.
The NZXT Firmware section in the sidebar (under Settings) handles firmware updates for connected NZXT devices. CAM will prompt you when updates are available. I’d apply them when prompted since firmware updates sometimes fix lighting glitches and fan control responsiveness.
The Profile Sync option syncs your CAM profiles to your NZXT account, allowing you to load them on another machine. If you’re not signed into an NZXT account, this section does nothing. You don’t need an account for local usage.
Frequently Asked Questions
What is NZXT CAM and is it free?
NZXT CAM is a free PC monitoring and device management application for Windows. It provides real-time system monitoring (CPU, GPU, RAM, network), fan curve control for NZXT hardware, and RGB lighting management for NZXT devices. There’s no subscription or paid tier for core functionality. Version 4.76.2 is the current release as of early 2026.
Do I need NZXT hardware to use NZXT CAM?
For fan control and lighting, yes. NZXT CAM manages fans and lighting only through NZXT Smart Devices, NZXT cases with integrated hubs, and NZXT AIO coolers. The PC Monitoring section works on any hardware as a system monitoring tool, but the fan curve and lighting features require an NZXT controller in your build.
How do I set up a custom fan curve in NZXT CAM?
Go to Cooling in the left sidebar. Find the fan channel you want to customize and change its dropdown from Silent or Performance to Custom. A graph appears below showing fan speed percentage (Y-axis) versus temperature in Celsius (X-axis). Drag the green dots to shape your curve. Changes apply live so you can observe RPM changes in real time as you adjust. Click Save when done.
Why do my NZXT fans go to default settings when I restart my PC?
NZXT CAM must be running for fan curves and lighting to stay active. If your fans reset to defaults after a reboot, it means CAM isn’t starting with Windows. Go to Settings, enable Start NZXT CAM on Windows startup and Start NZXT CAM minimized when launching on Windows startup. Also enable Minimize NZXT CAM to tray when closing to prevent accidentally stopping CAM by closing the window.
Can NZXT CAM sync lighting with other RGB software like Armoury Crate or iCUE?
Not natively. NZXT CAM controls only NZXT hardware and doesn’t have direct integration with ASUS Aura Sync, Corsair iCUE, or Razer Chroma. For cross-brand lighting sync, OpenRGB is a better option as it supports all of these simultaneously. NZXT CAM and OpenRGB can run together, though you’ll want to disable CAM’s lighting control for NZXT devices if you want OpenRGB to control them instead.
Does NZXT CAM slow down gaming performance?
NZXT CAM running in the background has a minimal performance impact for most users. The in-game overlay is a different matter. The FPS overlay feature in CAM has been reported to cause frame rate drops in some games, particularly competitive titles. I’d disable the in-game overlay in Settings if you’re chasing every frame. The background process itself (no overlay) shouldn’t meaningfully impact gaming performance on modern hardware.
Related Guides
- NZXT CAM fan control deep dive — the fan curve and profile sync details.
- OpenRGB as the lighter cross-vendor alternative — if CAM is too heavy.
- RGB sync troubleshooting playbook — for cross-vendor RGB issues.