You’ve got six RGB apps running at startup and your RAM is still the wrong color. I’ve been there. iCUE won’t talk to your Gigabyte headers, Aura Sync crashes on boot, and Mystic Light somehow claims it doesn’t see the very motherboard it shipped with. It’s a mess, and it doesn’t have to be.
OpenRGB fixes all of that. I’ve been using it for over a year across multiple builds, and it’s genuinely the best single-app solution for PC RGB control right now. This guide walks you through everything: installation, the SMBus driver situation, color control, profiles, the Effects Plugin, and what to do when a device won’t show up. Let’s get into it.
What Makes OpenRGB Different
Most RGB software is vendor-locked. It’s designed to sell you on an ecosystem, not to actually give you control. OpenRGB takes the opposite approach.
It’s fully open source, hosted on GitLab at gitlab.com/CalcProgrammer1/OpenRGB by developer Adam Honse (username CalcProgrammer1). The project has cleared 4,500 stars on GitLab and supports hundreds of devices from Corsair, ASUS, Gigabyte, MSI, Razer, Logitech, and many more. It runs on Windows, Linux, and macOS. No account needed, no telemetry, no bloat.
I’d describe it as a universal remote for RGB. You don’t need it to replace every single manufacturer app if you don’t want to, but you can. For a broader look at your options, check out our best RGB software guide.
Downloading and Installing OpenRGB
Head to the OpenRGB download page or go directly to the GitLab releases page. The current version as of 2026 is in the 0.9 / 1.0 release candidate range. Download the Windows installer if you’re on Windows.
During installation, you’ll hit one important screen: the option to enable I2C/SMBus Support. Check that box. SMBus is the communication protocol used to talk to RAM sticks and motherboard RGB headers directly. Without it, OpenRGB won’t detect those devices at all.
Here’s the thing about SMBus on Windows: OpenRGB used to rely on a driver called WinRing0 for this. They’ve since replaced it with the PawnIO driver because WinRing0 had documented security vulnerabilities. PawnIO does the same job more safely. When you enable I2C/SMBus Support during install, Windows will ask for elevated permissions to install the PawnIO driver service. That’s expected. Let it through.
Before you even open OpenRGB: close iCUE, Aura Sync, Mystic Light, and any other RGB software running in your system tray. Multiple apps trying to write to the same SMBus simultaneously causes conflicts and can prevent detection entirely. (I once spent 45 minutes thinking my RAM wasn’t supported before I realized iCUE was still quietly running in the background. Don’t repeat my mistake.)
First Launch: Run as Administrator

On first launch, you must run OpenRGB as administrator. Right-click the executable in File Explorer and choose “Run as administrator.” OpenRGB needs elevated privileges to create and start its driver service on the first run. After that initial setup, you may be able to run it normally depending on your configuration, but I always run it as admin just to avoid issues.

When it opens for the first time, you’ll see the main window with a device list on the left. If it’s empty or missing devices you expected, don’t panic. We’ll cover detection issues in the troubleshooting section below.
Understanding the Main Interface
OpenRGB’s interface is organized into tabs. Here’s what each one does.
Devices Tab
This is where you’ll spend most of your time. It lists every detected device on the left side. Click a device to see its zones and LED controls. You can change modes, pick colors, and apply settings per device or across everything at once with the “Apply All Devices” button.
Plugins Tab
This is where installed plugins appear, including the Effects Plugin (more on that shortly). You can enable, disable, and manage plugins from here without restarting the app.
SDK Client Tab
This lets OpenRGB connect to another machine running an OpenRGB SDK server, which is useful for remote control setups. Don’t confuse it with the SDK Server setting, which turns your local machine into the server.
Settings Tab
General app configuration lives here, including the option to start minimized, start with Windows, and enable the SDK server on launch.
Controlling Colors: Zones, Modes, and Direct Mode

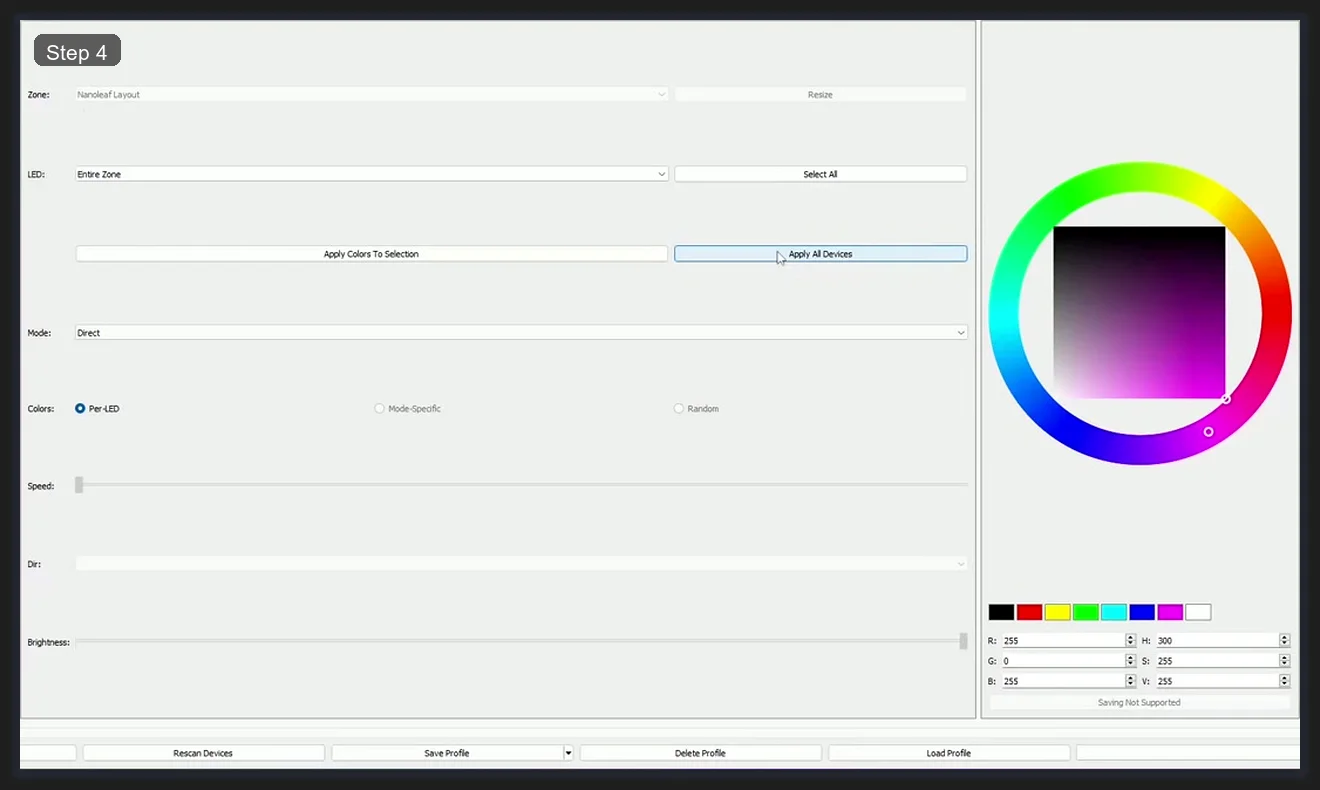
Once you’ve selected a device in the Devices tab, you’ll see a zone selector at the top. Zones split a device into addressable sections. A keyboard might have separate zones for the main keys, logo, and underglow. For something like a Nanoleaf Layout, you’ll see a single “Entire Zone” option since the whole panel group acts as one unit.
Below the zone selector is the Mode dropdown. This is one of the most important settings. Modes include:
- Static: Solid color, set once and done.
- Breathing: Fades in and out.
- Rainbow: Cycles through spectrum colors.
- Direct: Sends color data in real-time, LED by LED. Required for the Effects Plugin and any SDK-based control.
I always set devices to Direct mode if I want dynamic effects or software-driven control. Static mode works great for a clean single-color aesthetic. Pick your color from the wheel on the right side of the interface, then hit Apply Colors To Selection for just the selected device or Apply All Devices to push that color everywhere at once.
Per-LED Control

This is where OpenRGB gets genuinely powerful. In the LED dropdown (next to the zone selector), you can switch from “Entire Zone” to individual LED numbers. I’ve used this to set specific LEDs on a controller to different colors, something no manufacturer app I’ve tried has let me do this granularly without a scripting workaround.
It’s fiddly for large devices with dozens of LEDs, but for smaller things like a GPU logo or a single-digit zone, it’s extremely useful. Select the LED number from the dropdown, pick a color, and hit apply. Each LED remembers its setting independently.
Saving and Loading Profiles
OpenRGB saves your color configurations as profiles with the .orp file extension. These files store all your device settings, zones, modes, and colors in one package. You can carry them between machines or share them online.
To save a profile, click Save Profile at the bottom of the Devices tab. To load one, hit Load Profile. It’s that simple. Where it gets really useful is the startup option. In Settings, you can tell OpenRGB to load a specific profile automatically when it starts. Combine that with the “Start with Windows” option and your RGB is configured before you even log in. I keep a “desk mode” profile and a “gaming mode” profile and switch between them in about two seconds.
Adding the Effects Plugin

The built-in modes cover basics, but if you want animated effects like rain, gradient sweeps, or reactive lighting, you need the OpenRGB Effects Plugin. It’s a separate download from GitLab, maintained by the OpenRGB Developers group. As of the screenshots here, it’s on version 0.8.
Here’s how to install it:
- Download the Effects Plugin from the OpenRGB GitLab releases page (look for the plugins section).
- Drop the plugin file into your OpenRGB plugins folder. On Windows, that’s typically
C:\Users\[YourName]\AppData\Roaming\OpenRGB\plugins\. - Restart OpenRGB.
- Go to the Plugins tab and confirm the plugin appears. Make sure the Enabled checkbox is checked.
Once enabled, a new Effects tab appears in the main window. Your devices need to be in Direct mode for effects to work. I can’t stress that enough. If effects aren’t doing anything, check the mode first.
The SDK Server (Remote Control and Third-Party Integration)

OpenRGB has a built-in SDK server that lets other applications control your lighting over a network connection. Tools like Artemis RGB, Project Aurora, and various home automation setups can hook into it. The default port is 6742, though you can change it in settings (the screenshot shows port 16021, which is a custom configuration).
To enable it, go to Settings and toggle on the SDK server. You can also set it to start automatically on launch. Once it’s running, any local or remote application that speaks the OpenRGB SDK protocol can connect, enumerate your devices, and push color data to them directly.
The SDK Client tab is for the reverse scenario: connecting your local OpenRGB instance to a server running on another machine. You’ll need the IP address of that machine and the port. This is useful for syncing multiple PCs on the same desk or letting a media server drive lighting across machines. For a comparison of how this stacks up against alternatives, see our SignalRGB vs OpenRGB breakdown.
Troubleshooting: Device Not Detected
This is the most common issue people run into and it’s almost always one of a few causes.
1. You’re Not Running as Administrator
Start here. Right-click, run as admin. If that fixes it, configure a scheduled task or shortcut to always launch elevated.
2. Another RGB App is Holding the SMBus
Close iCUE, Aura Sync, Mystic Light, Razer Synapse, and anything else. Check the system tray. Check Task Manager for lingering processes. Then restart OpenRGB. This fixes probably 60% of detection failures in my experience.
3. SMBus Support Wasn’t Installed
If you skipped the I2C/SMBus option during install, RAM and motherboard headers won’t show up. Reinstall and check that option this time.
4. Your Device Isn’t Supported Yet
OpenRGB’s device compatibility list is long but not exhaustive. Check the GitLab issues page or the OpenRGB compatibility list to confirm your specific device model and firmware version are supported. Newer or niche hardware sometimes needs a few months before someone writes a driver for it.
5. Try Rescan
Hit the Rescan Devices button at the bottom of the Devices tab. OpenRGB doesn’t always catch hotplugged devices without a manual rescan. Quick and worth trying before anything else.
Should You Ditch Your Manufacturer Apps?
Honestly, for most people, yes. If you’re running into iCUE’s notoriously high CPU usage (we’ve written about fixing iCUE high CPU separately), or if Aura Sync is fighting with something else on your system, OpenRGB is a clean replacement that doesn’t phone home, doesn’t auto-update without asking, and doesn’t install background services you didn’t agree to.
The tradeoff is feature depth on specific devices. Corsair’s per-key lighting profiles with iCUE have more granularity for some keyboards than OpenRGB currently exposes. If you’re deep into Razer Synapse’s macro system, that doesn’t transfer. But for straight color control across mixed-brand setups? OpenRGB wins. It’s not close.
I keep one manufacturer app around: iCUE, purely for headset EQ. Everything else runs through OpenRGB.
Frequently Asked Questions
Is OpenRGB safe to use on Windows?
Yes. OpenRGB is open source and its code is publicly auditable on GitLab. The PawnIO driver it installs for SMBus access is a purpose-built replacement for the older WinRing0 driver, which had known security issues. The PawnIO approach is more targeted and doesn’t expose the same attack surface. Always download from the official GitLab releases page and not a third-party mirror.
Why isn’t OpenRGB detecting my RAM?
RAM RGB is controlled over the SMBus protocol, which requires the PawnIO driver to be installed. If you didn’t check “I2C/SMBus Support” during installation, your RAM won’t appear. Reinstall OpenRGB with that option enabled. Also make sure no other RGB software is running simultaneously, since SMBus conflicts prevent detection. Run OpenRGB as administrator and hit Rescan after closing competing apps.
Can OpenRGB control devices on Linux and macOS?
Yes, OpenRGB supports all three major operating systems. Linux support is actually quite strong, and SMBus access on Linux doesn’t require a special driver the way Windows does. macOS support exists but is more limited due to Apple’s tighter hardware access restrictions. Device compatibility varies by OS, so check the GitLab wiki for your specific hardware and platform combination.
What is the OpenRGB Effects Plugin and where do I get it?
The Effects Plugin is a separate add-on that adds animated lighting effects beyond the basic static and breathing modes. It’s maintained by the OpenRGB Developers group and hosted on GitLab. Download the plugin file, place it in your OpenRGB plugins folder (typically AppData\Roaming\OpenRGB\plugins\ on Windows), restart the app, and enable it in the Plugins tab. Your devices must be set to Direct mode for effects to apply.
How do I make OpenRGB load my profile automatically on startup?
Save your current setup as a profile using the Save Profile button in the Devices tab. Then go to Settings, enable “Start with Windows,” and select your saved profile as the startup profile. OpenRGB will launch minimized to the system tray and apply your profile automatically. The profile is saved as a .orp file, so you can back it up or transfer it to another machine easily.
Related Guides
- OpenRGB cross-vendor setup guide — the deeper from-zero install with BIOS settings.
- OpenRGB setup overview — the older companion guide.
- OpenRGB vs SignalRGB — the comparison if you’re picking sides.
- RGB sync troubleshooting playbook — for the cross-vendor problems OpenRGB solves.