I have ASUS motherboard RGB, a Razer Addressable controller, three Corsair QL fans, two no-brand ARGB strips, and a Lian Li UNI fan controller. For the last year I’d basically given up on having any of it actually sync.
The vendor utilities don’t talk to each other. iCUE pretends Razer doesn’t exist. Razer Synapse pretends Corsair doesn’t exist. ASUS Armoury Crate technically supports “Aura Sync” with some third-party hardware but the list of compatible devices hasn’t been meaningfully updated in years. I tried OpenRGB first because it’s free and I’m cheap, and it worked great for the motherboard headers and the Corsair stuff, but it could not see my Razer Addressable controller no matter how many drivers I reinstalled. Tried JackNet RGB Sync as a bridge. JackNet is dead, last commit was years ago. Eventually I just gave up and ran iCUE for the fans, Synapse for the keyboard, Armoury Crate for the mobo, and accepted that the colors would never match.
Then I gave SignalRGB another try. I’d dismissed it before because the Pro tier is $45/year (more on whether that’s worth it later), but the free tier covers basically everything you need for cross-brand sync. After about a weekend of setting it up properly, this is the first time in years my entire build has actually been the same color at the same time. I want to walk through the actual setup, including the steps the official tutorial glosses over, because there are a few things that are genuinely not obvious.
Why cross-brand RGB sync is actually hard
Before the how-to, a quick “why is this so cursed” rant because it’s worth understanding.
Every RGB peripheral company has a financial incentive to lock you into their ecosystem. Corsair sells more devices if iCUE only works well with Corsair. Razer pushes Chroma so you’ll buy Razer-branded everything. ASUS keeps Aura tied to Armoury Crate so you’ll think their boards are better. The result is four to six “RGB hubs” all running on your machine, each consuming RAM, each fighting over USB hubs and SMBus access, none of them coordinating.
The technical layer underneath is actually simpler than the software pretends. Almost all addressable RGB hardware uses the same underlying protocol (WS2812B-style addressable LEDs, controlled per-pixel over a single data line). The difference between a Corsair fan and a Razer strip is mostly the connector and the controller chip’s firmware. Once you have one piece of software that knows how to talk to all those controllers (which is what OpenRGB and SignalRGB both attempt), the actual color sync is trivial because the LEDs themselves all want the same kind of signal.
SignalRGB’s main advantage over OpenRGB is the device support list, especially for newer Razer ARGB controllers, Lian Li UNI fan ecosystems, and some of the trendier proprietary systems like Twinkly and Govee. Its main disadvantage is that the polished version requires a paid subscription, but the free tier is enough to actually sync your stuff.
Step 1: Uninstall (or at least disable) every vendor RGB app
This is the step everyone wants to skip. Don’t.
If you keep iCUE, Armoury Crate, Synapse, OMEN Light Studio, Mystic Light, RGB Fusion, or any of them running, they’ll fight SignalRGB the moment you launch it. Sometimes the fight is invisible (lights flicker between two colors for a half-second every few minutes). Sometimes it’s catastrophic (RGB locks up entirely, USB devices disconnect, you reboot to fix it).
The official SignalRGB onboarding screen shows you a list of vendor apps to uninstall. It’s accurate. Go through Control Panel → Programs → Programs and Features and remove every one you find. The big ones to look for:
- Corsair iCUE (and Corsair Utility Engine, the older version, if it’s still there)
- Razer Synapse 3 (and Razer Central, Razer Cortex)
- ASUS Armoury Crate (use the official ASUS Armoury Crate Uninstaller tool, manual removal leaves traces that re-install themselves)
- MSI Center / MSI Dragon Center / MSI Mystic Light
- Gigabyte RGB Fusion 2.0
- NZXT CAM (if you only have it for RGB and not for fan control)
- Logitech G HUB (only if you don’t need the keyboard/mouse macros, otherwise leave it but disable LIGHTSYNC)
- HP OMEN Gaming Hub / OMEN Light Studio
Reboot after uninstalling. Then disable Windows 11’s Dynamic Lighting too if you’re on Win11, because that’ll also fight SignalRGB for control of compatible devices. Settings → Personalization → Dynamic Lighting → master toggle off.
Heads up: if you’re an ASUS owner, Armoury Crate has a habit of reinstalling itself via Windows Update. There’s a BIOS toggle to permanently disable this — go into BIOS, find the “Armoury Crate” or “ASUS Auto Install” setting (usually under Tool or Advanced), set it to Disabled. Otherwise you’ll be back here in three weeks.
Step 2: Install SignalRGB and let it find your controllers
Run the SignalRGB installer as administrator. If you see a popup listing conflicting .exe processes, it means you missed an uninstall (or the app is still running in the system tray). SignalRGB will offer to close them automatically, take that offer. If it can’t, open Task Manager and end them by hand.
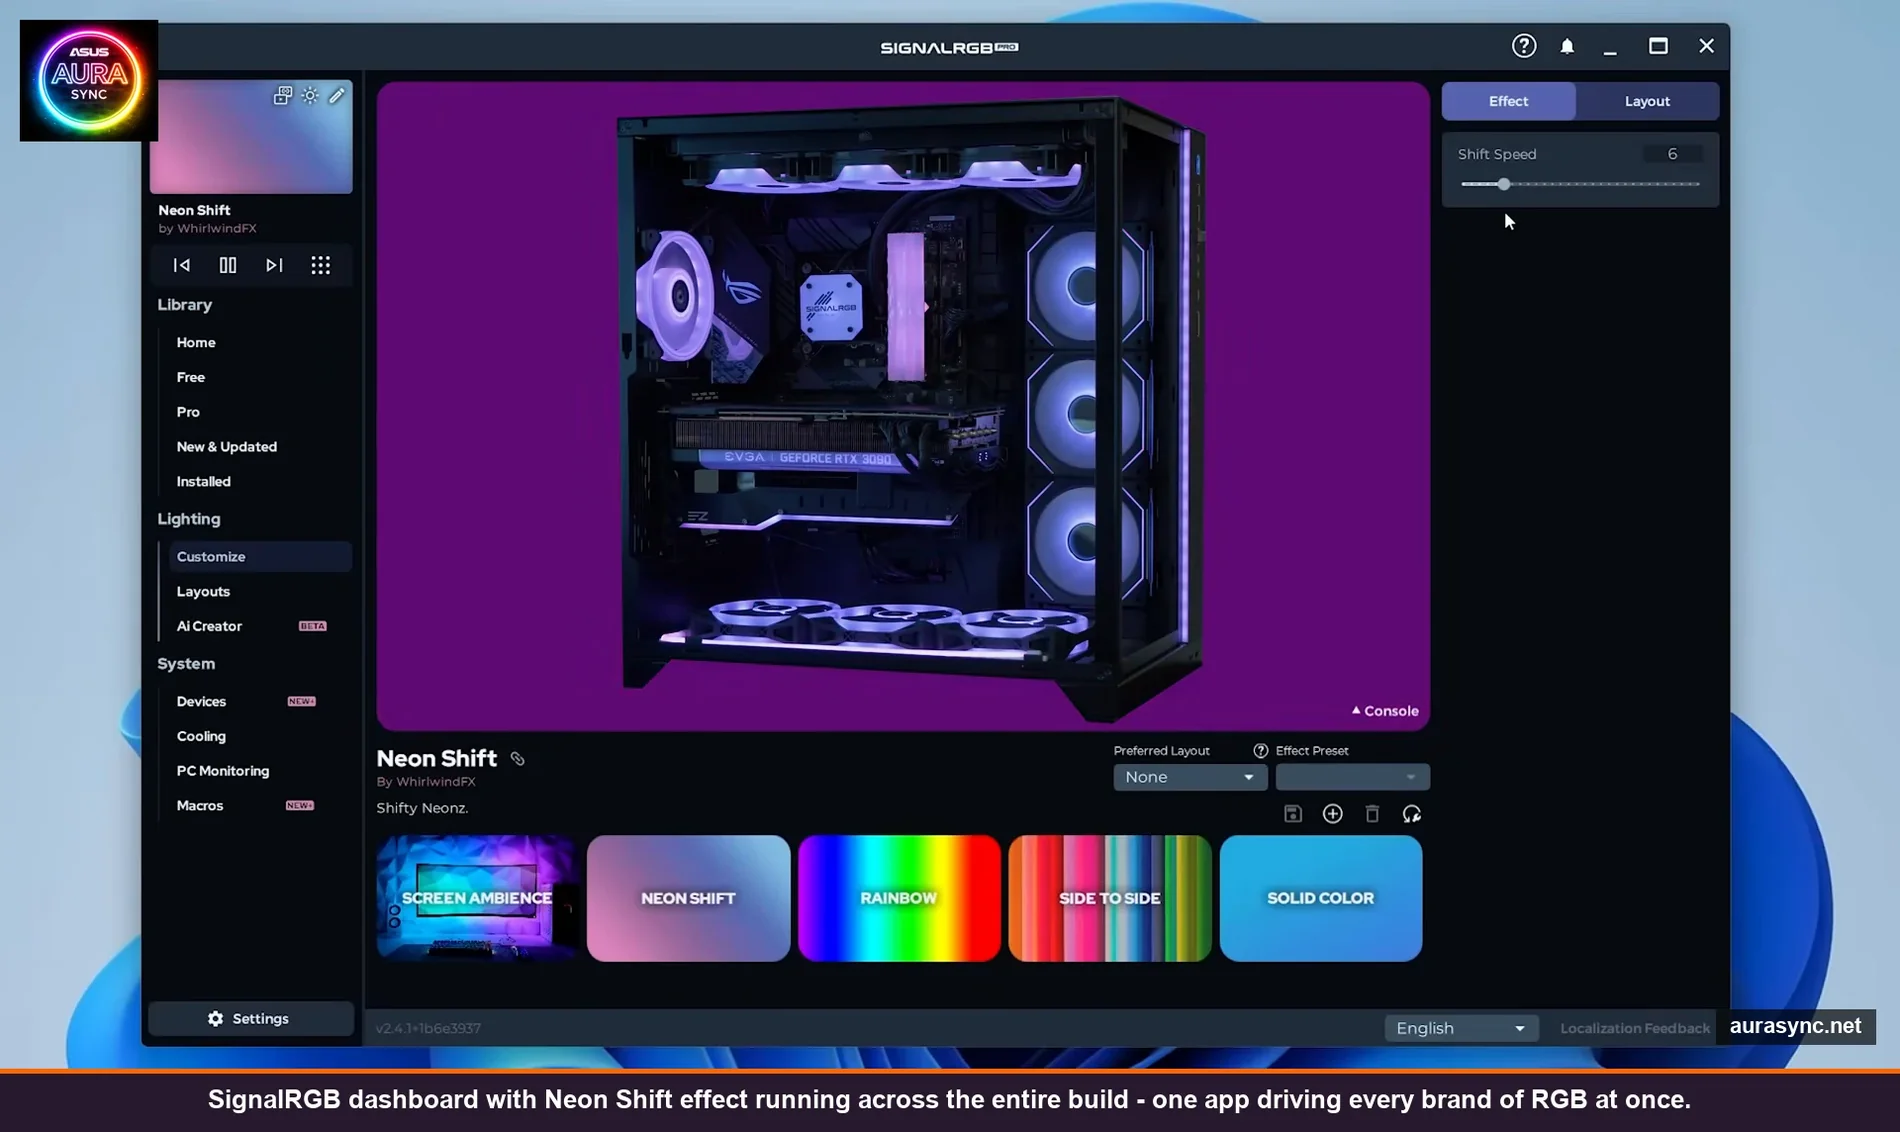
Once SignalRGB launches you should see most of your stuff slowly cycling through the default Neon Shift effect. If only some of your devices are reacting, that’s expected at this point because you haven’t configured the controllers yet, you’ve only let SignalRGB push a generic color to whatever it auto-detected.
Click on the Devices tab in the left sidebar. This is where the actual cross-brand magic happens. Every controller and motherboard header SignalRGB found will be listed here under “Fan/RGB Controllers” with a tiny number badge showing how many channels each has.
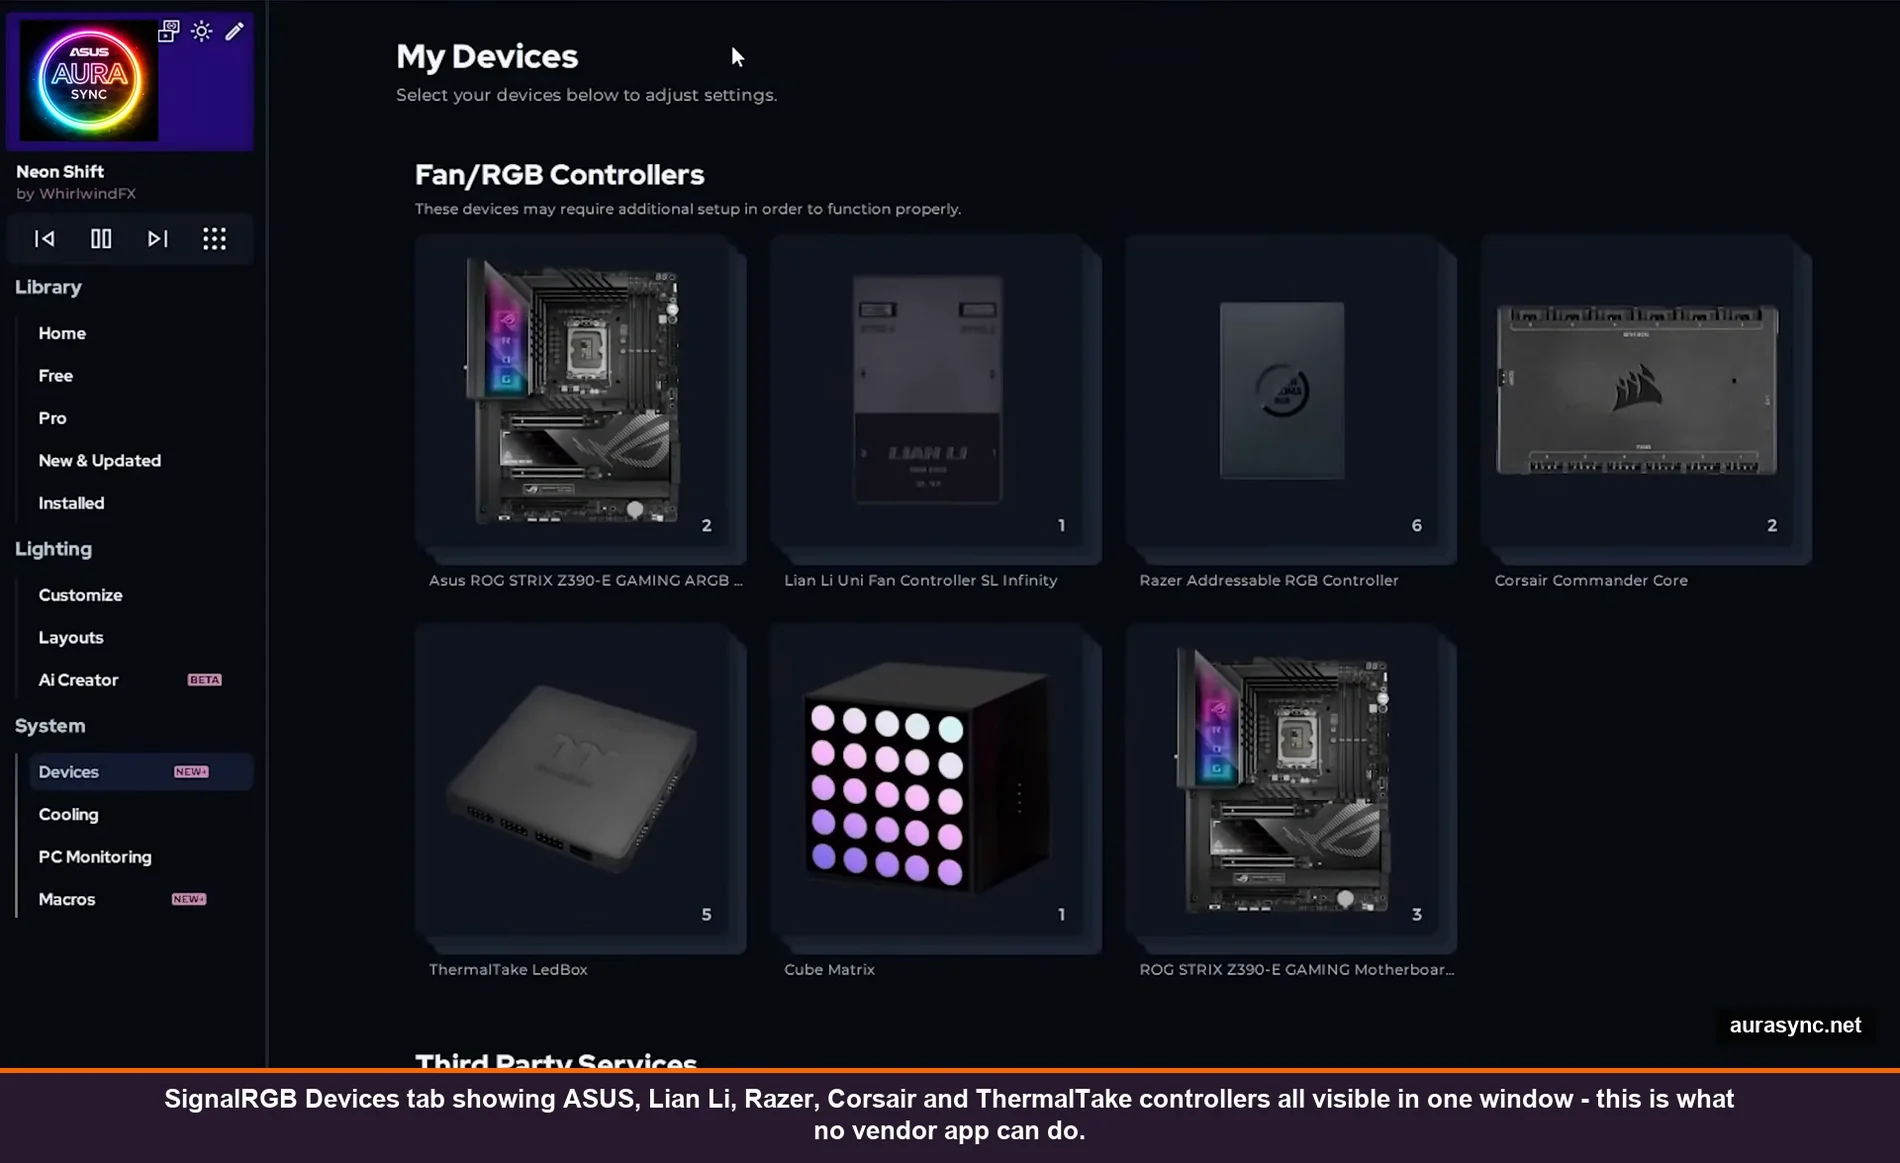
This is what mine looks like. ASUS ROG STRIX Z390-E motherboard, Lian Li UNI Controller SL Infinity, Razer Addressable RGB Controller, Corsair Commander Core, ThermalTake LedBox, Cube Matrix, ROG STRIX motherboard. SignalRGB sees all of these in one window. iCUE could see the Corsair stuff. Armoury Crate could see the ROG STRIX. Razer Synapse could see the Razer controller. None of the vendor apps could see all of them at once. That’s the entire point.
Step 3: Map your physical hardware to the channels (the pulsing-color trick)
This is the step that took me a while to get right. Each controller has multiple channels (a Razer Addressable controller has 6, the Corsair Commander Core has 6, etc). SignalRGB doesn’t know what’s connected to which channel, it only knows the channel exists.
Click into a controller. You’ll see “default strips” already on each channel as placeholders. Hover over one and click the X to delete it. Now any channel that physically has something connected will start pulsing red while everything else stays blue. Whatever is pulsing red in your case is what’s wired to that channel.
This is genuinely brilliant for diagnosing wiring on a PC you didn’t build yourself. I have a six-month-old prebuilt and I had no idea which fan was on which header until I did this. Click each channel in order, watch which fan or strip pulses red, write it down.
Once you know what’s where, click “Add Component” on the channel. SignalRGB has a huge library of pre-configured components with the correct LED counts already set, so search for your model. If your specific fan or strip isn’t in the library (no-brand stuff, custom strips, anything cheap from AliExpress), click Create and make a custom strip with the LED count.
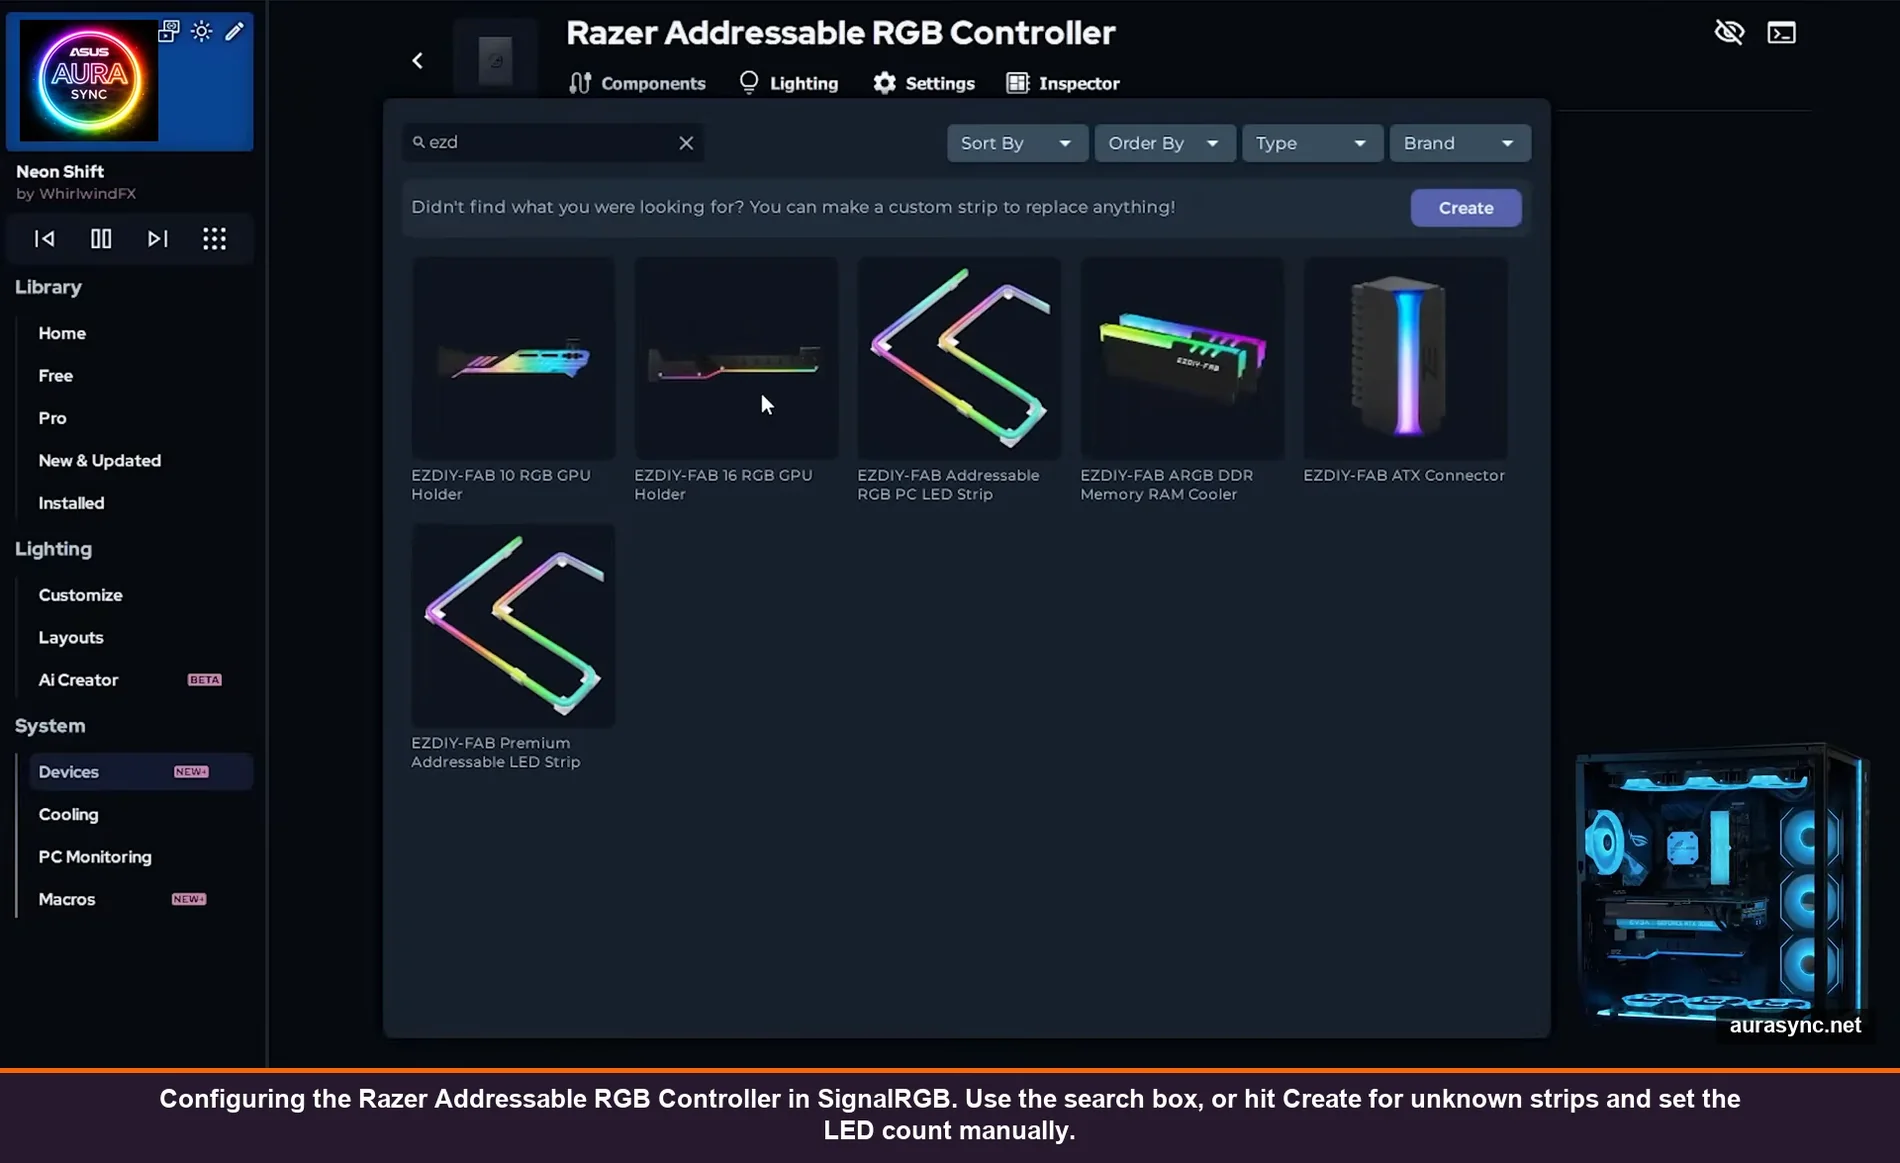
The Razer Addressable controller view looks like this when you’re configuring components. The component picker on the left shows what SignalRGB knows about. Notice the Create button in the top right, that’s your escape hatch for unknown hardware. I had to use it for two no-brand 27-LED strips that aren’t in any database.
Pro tip: the order you add components in matters if they’re physically chained on a single port. Add them in the order that the wiring runs. If you add them in the wrong order, the effect will look correct on each strip individually but will jump between them. There’s no way for SignalRGB to know the physical order, only you can tell it.
Step 4: Set up Layouts so effects flow through your build (the step nobody does)
This is the step that almost every other “RGB sync” guide skips entirely, and it’s the difference between “all my lights are the same color” (which is fine) and “this wave effect is actually flowing left-to-right across my entire desk” (which is the dream).
Load any directional effect. Side to Side is a good test one. Then click the Layouts tab. You’ll see a grid with all your devices floating around as boxes. Each box represents one physical device.
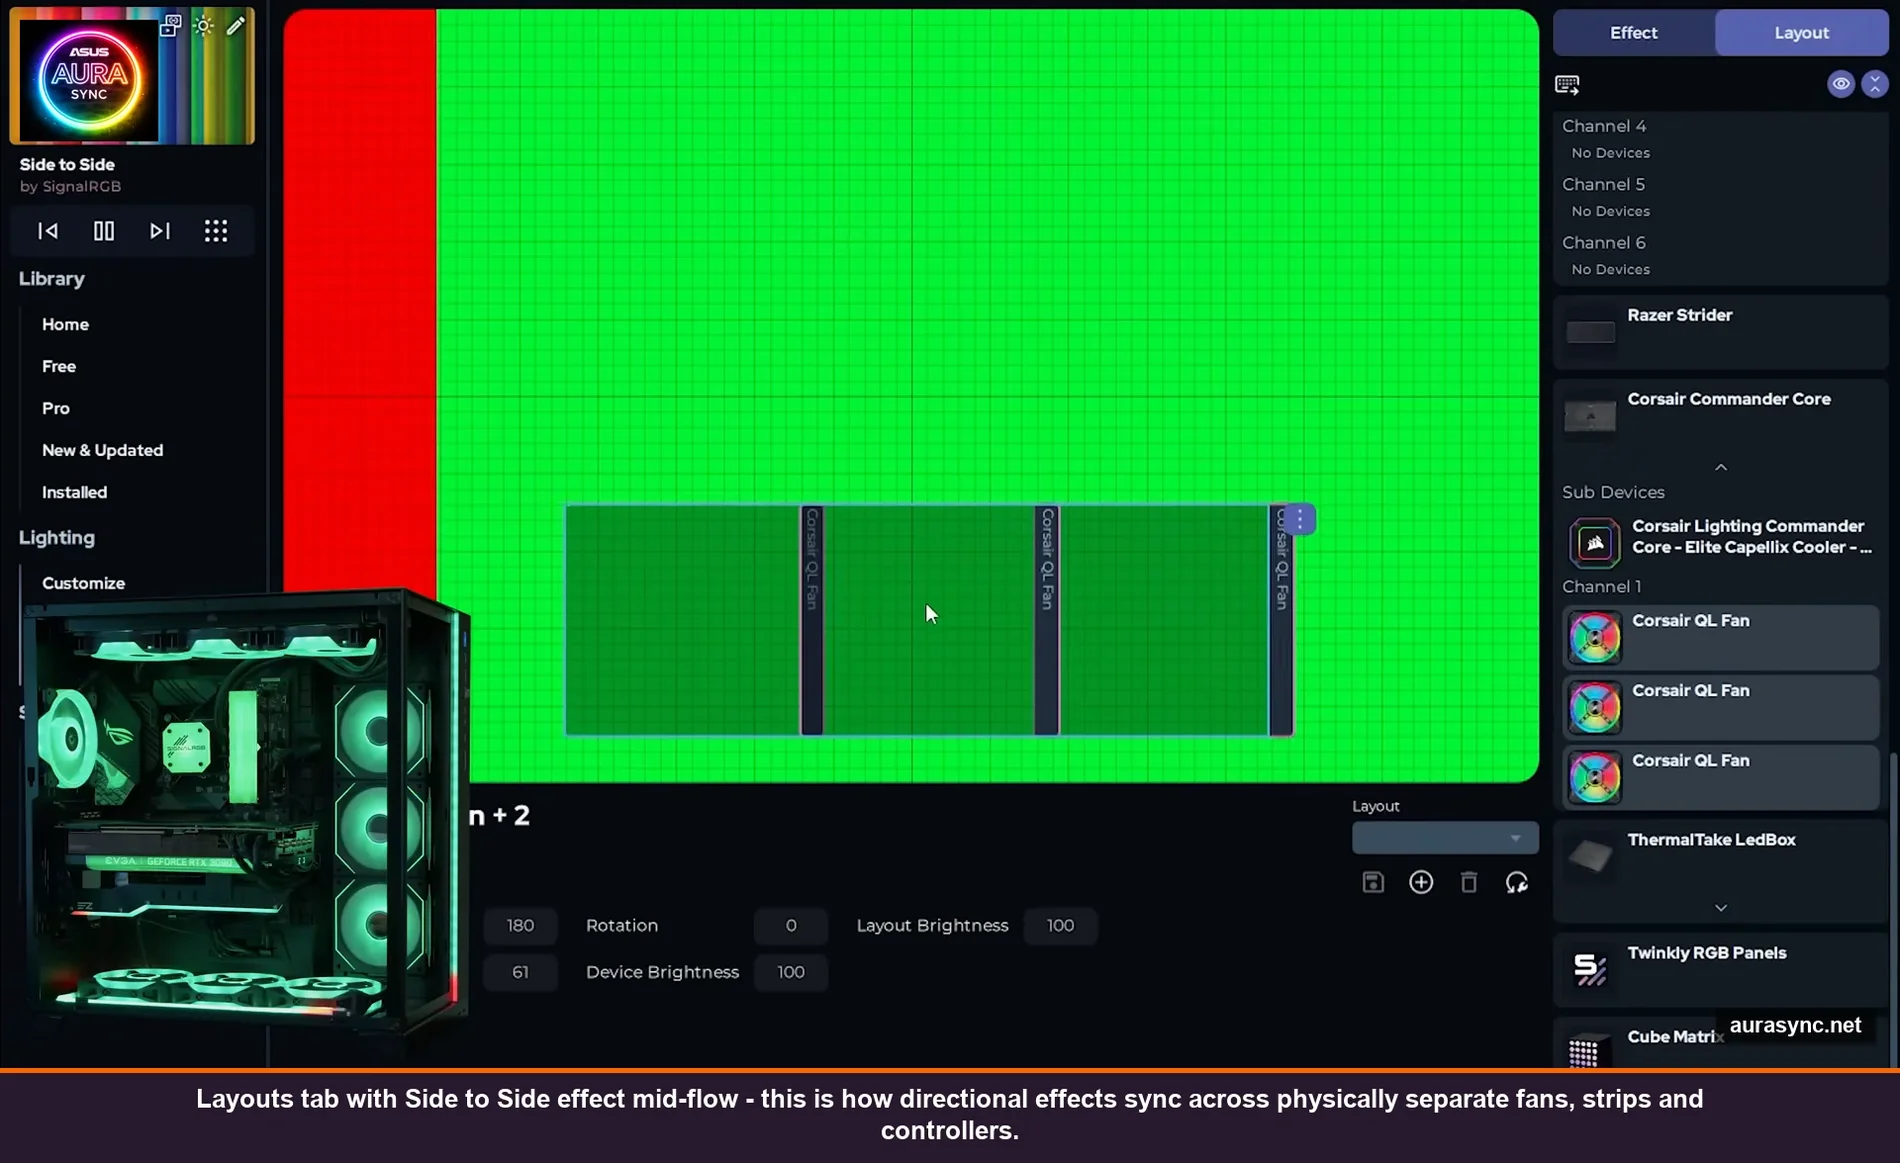
Hit the “Hide All” button (the eyeball icon in the top right). Now devices are easier to position one at a time. The workflow:
- Click a device in the right sidebar to unhide it
- Look at your actual PC, the device that’s pulsing blue is the one you just selected
- Drag the box on the grid to where the device physically is in your build (front fan = front of grid, top fan = top of grid)
- Watch the effect direction. If it’s flowing the wrong way on a fan, use the rotation buttons (rotate 90° at a time) until it matches. For fans mounted upside-down, hit the “Invert X-axis” button
- Repeat for every device, then save the layout with a name
This is genuinely satisfying once it’s done. With a side-to-side wave applied, the color literally rolls across the front fans, then up through the top fans, then across the rear, then down through the GPU shroud strips. Vendor software can’t do this even within their own ecosystems because they don’t have a cross-device layout system.
Step 5: Now apply effects across the whole layout
With your layout saved, head back to the Home dashboard and pick any effect. The free tier has a respectable library, the Pro tier ($45/year) unlocks a much bigger one plus the audio visualizers, screen ambient, and game-reactive effects.
The effect will play across every device you mapped, in the physical order you arranged them. Customize tab lets you change the colors and speed for any effect. Save your favorites as presets so you can switch quickly.
What this fixes vs. what it doesn’t
What works after doing all this:
- True cross-brand color sync — Corsair fans, Razer strips, ASUS mobo headers, no-brand stuff, all the same color at the same time
- Directional effects that flow across physically separate hardware
- Audio-reactive RGB across all devices (Pro feature, but worth trying free for a week)
- Screen-ambient mode (Ambilight-style, also Pro)
- One app instead of four to five vendor apps eating your RAM
What doesn’t fully work:
- Hardware-level features. SignalRGB controls lighting only. If you used iCUE for fan curves or Synapse for mouse DPI, you still need the vendor app for that. You can usually run the vendor app in a “lighting disabled” mode to keep the non-RGB features.
- Onboard memory profiles. Razer keyboards, Logitech G mice, etc. store profiles on the device itself. SignalRGB doesn’t write to those, so if you unplug the device, it falls back to its onboard profile.
- Some very new/proprietary devices. SignalRGB’s device support is broad but not universal. Check the supported devices list before assuming your gear works.
- The first cold boot. Same issue I covered in detail in the rainbow-after-restart fix applies here, SignalRGB needs to launch and reapply your effect on every boot. Make sure it’s set to start with Windows (Settings inside SignalRGB, “Start with Windows” toggle on). Otherwise you’ll see rainbow for 5-10 seconds at boot.
Verdict
SignalRGB is the only realistic answer if you have peripherals from three or more brands and you actually want them synced. OpenRGB is also good, free, and open-source, but its device support trails SignalRGB’s especially for Razer stuff and newer fan ecosystems. Full breakdown of how the two compare here.
The Pro tier ($45/year) buys you screen-ambient, audio-reactive effects, and the bigger effect library. If you only care about color sync and basic effects, free is enough. If you want the polish, Pro is fine but try the free tier first to make sure SignalRGB actually sees all your hardware.
Took me a weekend to set up properly, mostly because of the layout step (which I did wrong twice and had to redo). It’s been stable for about three months. Cheaper than buying all-Corsair or all-Razer stuff just for sync.
FAQ
Can I keep iCUE installed for fan control while using SignalRGB for lighting?
Sort of, yes. Open iCUE, go to your fans, set them to “static” or disable lighting on the device level. iCUE will still control the fan curves but won’t push lighting commands. SignalRGB then takes over the LEDs. It’s a bit of a juggling act and updates to either app sometimes break the truce, so honestly the cleanest setup is to ditch iCUE for fan control too (use the BIOS Q-Fan / equivalent for fan curves) and run SignalRGB alone.
Does SignalRGB support Windows 11 Dynamic Lighting devices?
It can control them, yes, but you have to disable Dynamic Lighting in Windows Settings first or they’ll fight. The full Dynamic Lighting hands-on covers how the priority list works, basically whichever app is at the top of the priority list wins.
Will SignalRGB work with my motherboard’s ARGB headers?
Most modern boards yes, especially ASUS, Gigabyte, MSI, and ASRock from the last 4-5 years. Older boards (pre-Z390 / pre-X470) sometimes need OpenRGB instead because SignalRGB’s motherboard support skews toward newer hardware. Easy way to check: install SignalRGB, look in Devices for your motherboard. If it’s listed, you’re good.
Does SignalRGB use a lot of RAM and CPU?
About 200-300MB RAM idle, more during audio-reactive effects. CPU is basically zero except during real-time effects (audio visualizer, screen ambient) where it bumps to 1-3% on a modern CPU. Way better than running iCUE + Armoury Crate + Synapse all at once, which adds up to 800MB-1GB easily.
Is the $45/year Pro tier actually worth it?
Honest answer: only if you specifically want audio-reactive lighting, screen ambient (Ambilight-style), or game-reactive effects. The base effect library on free is large. Full free-vs-pro breakdown here if you’re trying to decide.
Related Guides
- ASUS Aura Sync setup — the ASUS-side prep before cross-vendor sync.
- Corsair iCUE 5 setup — the Corsair-side prep.
- MSI Mystic Light setup — the MSI-side prep.
- Razer Synapse 4 profiles — the Razer-side prep.
- OpenRGB as the universal alternative — the open-source cross-vendor approach.
- RGB sync troubleshooting playbook — what to do when sync breaks.
- ASRock Polychrome Sync setup — the ASRock side of cross-vendor sync.